


- sales/support
Google Chat:---
- sales
+86-0755-88291180
- sales01
sales@spotpear.com
- sales02
dragon_manager@163.com
- support
tech-support@spotpear.com
- CEO-Complaints
zhoujie@spotpear.com
- Only Tech-Support
WhatsApp:13246739196
- Purchase/Shipping/Refund
WhatsApp:13424403025
IMX708-75 Camera User Guide
This camera does not support the Buster system
Hardware Connection
To test the Raspberry Pi camera, you need to connect the Raspberry Pi to an HDMI screen or DSI screen
The packages of the CSI (camera) and DSI (monitor) ports on the Raspberry Pi motherboard are similar, so be careful not to connect them incorrectly when wiring. The CSI interface is located between the audio interface and the HDMI interface. The camera interface of the Raspberry Pi Zero series is next to the power interface. If you are using a computing module, it depends on the layout of the baseplate.
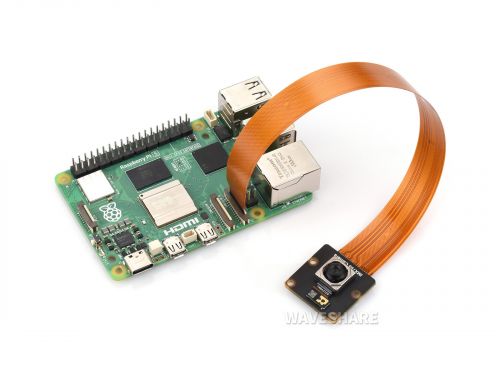
- Connect to Raspberry Pi 5
- Place the metal surface of the cable towards the wired network port and insert it into the port
- Pi5 has two CSI interfaces, and either interface can be connected
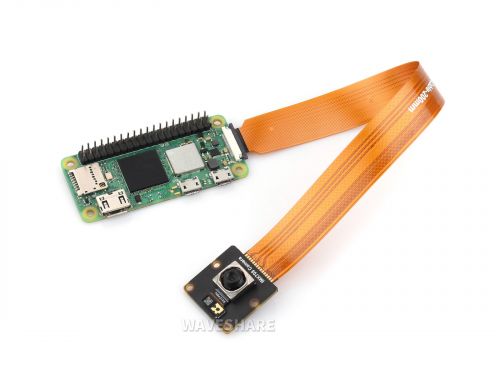
- Connect to the Raspberry Pi Zero series
- Put the metal side of the cable downwards and connect it to the camera interface
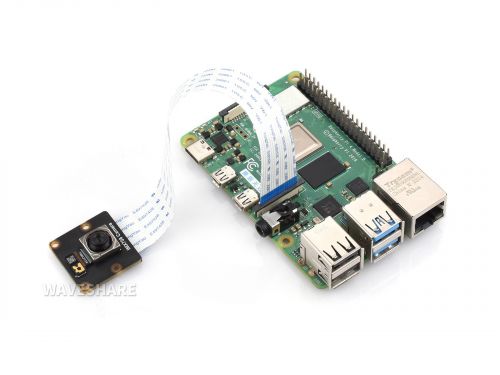
- Other Raspberry Pi motherboards
- Put the metal side of the cable downwards the HDMI interface and connect it to the camera interface
About the Model
| Photosensitive chip model | Supported Raspberry Pi motherboard models | Supported driver types |
|---|---|---|
| OV5647 | All Raspberry Pi motherboards | libcamera / Raspicam |
| OV9281 | All Raspberry Pi motherboards | libcamera |
| IMX219 (Raspberry Pi official) | All Raspberry Pi motherboards | libcamera / Raspicam |
| IMX219 (Third-party) | Raspberry Pi computing module | libcamera |
| IMX290/ IMX327 | All Raspberry Pi motherboards | libcamera |
| IMX378 | All Raspberry Pi motherboards | libcamera |
| IMX477 (Raspberry Pi official) | All Raspberry Pi motherboards | libcamera / Raspicam |
| IMX477 (Third-party) | All Raspberry Pi motherboards | libcamera |
| IMX462 | All Raspberry Pi motherboards | libcamera |
| IMX519 | All Raspberry Pi motherboards | libcamera (Install additional driver) |
| IMX708 (Raspberry Pi Camera Module 3) | All Raspberry Pi motherboards | libcamera |
| IMX708 (Third-party) | All Raspberry Pi motherboards | libcamera |
| IMX296 (Raspberry Pi Global Camera) | All Raspberry Pi motherboards | libcamera |
| IMX500 (Raspberry Pi AI Camera) | All Raspberry Pi motherboards | libcamera |
Test Camera
Software Configuration
If you are using the latest Raspberry Pi Camera Module 3 or Raspberry Pi Global Shutter Camera, you need to run the following command to update the system (Internet connection required).
sudo apt-get update -y
sudo apt-get upgrade -y
If only one camera is called, connect the camera to the CAM1 port.
If you are using a camera that is not the official Raspberry Pi, you need to configure a config.txt file separately.
If you are using the latest Bookworm system, you need to configure /boot/firmware/config.txt.
sudo nano /boot/config.txt
#If it is the bookworm system
sudo nano /boot/firmware/config.txt
Find the camera-auto-detect=1 statement and change it to camera_auto_detect=0
At the end of the file, add the following setting statements according to the camera model
| Model | Setting statement |
|---|---|
| OV9281 | dtoverlay=ov9281 |
| IMX290/IMX327/IMX462 | dtoverlay=imx290,clock-frequency=37125000 |
| IMX378 | dtoverlay=imx378 |
| IMX219 | dtoverlay=imx219 |
| IMX477 | dtoverlay=imx477 |
| IMX708 | dtoverlay=imx708 |
Note: To use the IMX290 on the Raspberry Pi 5, you also need to add the json file to the command directory to use it. The operation is as follows:
sudo wget https://files.waveshare.com/wiki/common/Imx290.zip
sudo unzip Imx290.zip
sudo cp imx290.json /usr/share/libcamera/ipa/rpi/pisp
- Binocular camera configuration
- At present, both the CM4 baseplate and the Raspberry Pi 5 support access to two cameras
- If the user needs to access two camera calls at the same time, cam0 and cam1 can be added after the corresponding camera configuration statement to specify the camera.
- For example, if IMX219 is connected to CAM0 interface, and at the same time OV5647 camera interface is connected to CAM1
dtoverlay=imx219,cam0
dtoverlay=ov5647,cam1
Test Camera (Bullseye System)
Quick Call
Applicable for OV5647, official IMX219, official IMX477.
Open the Raspberry Pi terminal and turn on the camera preview:
sudo libcamera-hello -t 0
If you want to close the preview window, you can use Ctrl-C to terminate the program.
Test Camera (Bookworm System)
Quick Call
Applicable for OV5647, official IMX219, official IMX477.
Open the Raspberry Pi terminal and turn on the camera preview:
sudo rpicam-hello -t 0
If you want to close the preview window, you can use Ctrl-C to terminate the program.
Preface
To check what version of the system you are using, run sudo cat /etc/os-release to see if there is any information about the following two images, and then select.
- The Raspberry Pi OS Bookworm changed the camera capture application from libcamera-* to rpicam-*, which currently allows users to continue using the old libcamera, but libcamera will be deprecated in the future, so please use rpicam as soon as possible.
- If you are using the Raspberry Pi OS Bullseye system, please scroll down the page to use this tutorial's libcamera-* section.
RPicam
When running the latest version of Raspberry Pi OS, rpicam-apps already has five basic features installed. In this case, the official Raspberry Pi camera will also be detected and automatically enabled.
You can check if everything is working by inputting the following:
rpicam-hello
You should see a camera preview window for about five seconds.
Note: If you're running on a Bullseye Raspberry Pi 3 and earlier, you need to re-enable Glamor to ensure that the X Windows hardware acceleration preview window works properly. Input the command sudo raspi-config in the terminal window, then select Advanced Options, Glamor, and Yes. Exit and restart your Raspberry Pi. By default, Raspberry Pi 3 and earlier devices running Bullseye may not be using the correct display driver. Please refer to the /boot/firmware/config.txt file and make sure that dtoverlay=vc4-fkms-v3d or dtoverlay=vc4-kms-v3d is currently active. If you need to change this setting, please restart.
rpicam-hello
rpicam-hello -t 0
- Tuning file
The libcamera for Raspberry Pi has tuning files for each type of camera module. The parameters in the file are passed to the algorithm and hardware to produce the best quality image. libcamera can only automatically determine the image sensor being used, not the entire module, even if the entire module affects the "tuning". As a result, it is sometimes necessary to override the default tuning file for a particular sensor.
For example, a sensor without an infrared filter (NoIR) version requires a different AWB (white balance) setting than the standard version, so an IMX219 NoIR used with a Pi 4 or earlier device should operate as follows:
rpicam-hello --tuning-file /usr/share/libcamera/ipa/rpi/vc4/imx219_noir.json
The Raspberry Pi 5 uses different tuning files in different folders, so here you will use:
rpicam-hello --tuning-file /usr/share/libcamera/ipa/rpi/pisp/imx219_noir.json
This also means that users can copy existing tuning files and modify them according to their preferences, as long as the parameter --tuning-file points to the new version.
The --tuning-file parameter is applicable to all rpicam-apps just like other command-line options.
rpicam-jpeg
rpicam-jpeg is a simple static image capture application.
To capture a full-resolution JPEG image, use the following command. This will display a preview for approximately five seconds, then capture the full-resolution JPEG image to the file test.jpg.
rpicam-jpeg -o test.jpg
The -t <duration> option is used to change the duration of the preview display, and the --width and --height options will alter the resolution of the captured static images. For example:
rpicam-jpeg -o test.jpg -t 2000 --width 640 --height 480
- Exposure control
All of this rpicam-apps allow the user to run the camera with a fixed shutter speed and gain. Capture an image with an exposure time of 20ms and a gain of 1.5x. This gain will be used as an analog gain within the sensor until it reaches the maximum analog gain allowed by the core sensor driver. After that, the rest will be used as a digital gain
rpicam-jpeg -o test.jpg -t 2000 --shutter 20000 --gain 1.5
The AEC/AGC algorithm for the Raspberry Pi enables application-defined exposure compensation, allowing images to be made darker or brighter through a specified number of stops.
rpicam-jpeg --ev -0.5 -o darker.jpg
rpicam-jpeg --ev 0 -o normal.jpg
rpicam-jpeg --ev 0.5 -o brighter.jpg
- Digital gain
The digital gain is applied by the ISP, not by the sensor. The digital gain will always be very close to 1.0 unless:
- The total gain requested (via the option --gain or via the exposure profile in the camera adjustment) exceeds the gain that can be used as an analog gain within the sensor. Only the extra gain required will be used as a digital gain.
- One of the color gains is less than 1 (note that the color gain is also used as a digital gain). In this case, the published digital gain will stabilize at 1 / min (red gain, blue gain). This means that one of the color channels (instead of the green channel) has a single-digit gain applied.
- AEC/AGC is changing. When AEC/AGC moves, the digital gain typically changes to some extent in an attempt to eliminate any fluctuations, but it quickly returns to its normal value.
rpicam-still
It emulates many features of the original app raspistill.
rpicam-still -o test.jpg
- Encoder
rpicam-still allows files to be saved in a number of different formats. It supports PNG and BMP encoding. It also allows the file to be saved as a binary dump of RGB or YUV pixels with no encoding or file format. In the latter case, the application that reads the file must be aware of its own pixel arrangement.
rpicam-still -e png -o test.png
rpicam-still -e bmp -o test.bmp
rpicam-still -e rgb -o test.data
rpicam-still -e yuv420 -o test.data
Note: The format in which the image is saved depends on the -e (equivalent to encoding) option and is not automatically selected based on the output file name.
- Raw image capture
The raw image is an image that is produced directly by an image sensor, before any processing of it by the ISP (Image Signal Processor) or any CPU core. For color image sensors, these are usually Bayer format images. Note that the original image is very different from the processed but unencoded RGB or YUV images we saw before.
Get the raw image:
rpicam-still --raw --output test.jpg
Here, the -r option (also known as raw) indicates capturing the raw image and JPEG. In fact, the original image is the raw image that generates a JPEG. The original images are saved in DNG (Adobe Digital Negative) format and are compatible with many standard applications such as draw or RawTherapee. The original image is saved to a file with the same name but an extension of .ng, thus becoming test.dng.
These DNG files contain metadata related to image capture, including black level, white balance information, and the color matrix used by the ISP to generate JPEGs. This makes these DNG files more convenient to use for "manual" original conversion with some of the above tools in the future. Use exiftool to display all metadata encoded into a DNG file:
File Name                       : test.dng
Directory                       : .
File Size                       : 24 MB
File Modification Date/Time     : 2021:08:17 16:36:18+01:00
File Access Date/Time           : 2021:08:17 16:36:18+01:00
File Inode Change Date/Time     : 2021:08:17 16:36:18+01:00
File Permissions                : rw-r--r--
File Type                       : DNG
File Type Extension             : dng
MIME Type                       : image/x-adobe-dng
Exif Byte Order                 : Little-endian (Intel, II)
Make                            : Raspberry Pi
Camera Model Name               : /base/soc/i2c0mux/i2c@1/imx477@1a
Orientation                     : Horizontal (normal)
Software                        : rpicam-still
Subfile Type                    : Full-resolution Image
Image Width                     : 4056
Image Height                    : 3040
Bits Per Sample                 : 16
Compression                     : Uncompressed
Photometric Interpretation      : Color Filter Array
Samples Per Pixel               : 1
Planar Configuration            : Chunky
CFA Repeat Pattern Dim          : 2 2
CFA Pattern 2                   : 2 1 1 0
Black Level Repeat Dim          : 2 2
Black Level                     : 256 256 256 256
White Level                     : 4095
DNG Version                     : 1.1.0.0
DNG Backward Version            : 1.0.0.0
Unique Camera Model             : /base/soc/i2c0mux/i2c@1/imx477@1a
Color Matrix 1                  : 0.8545269369 -0.2382823821 -0.09044229197 -0.1890484985 1.063961506 0.1062747385 -0.01334283455 0.1440163847 0.2593136724
As Shot Neutral                 : 0.4754476844 1 0.413686484
Calibration Illuminant 1        : D65
Strip Offsets                   : 0
Strip Byte Counts               : 0
Exposure Time                   : 1/20
ISO                             : 400
CFA Pattern                     : [Blue,Green][Green,Red]
Image Size                      : 4056x3040
Megapixels                      : 12.3
Shutter Speed                   : 1/20
We have noticed that there is only one calibration light source (determined by the AWB algorithm, although it is always labeled as "D65"), and dividing the ISO number by 100 gives the analog gain being used.
- Ultra-long exposure
In order to capture long-exposure images, disable AEC/AGC and AWB, as these algorithms will force the user to wait many frames while converging.
The way to disable them is to provide explicit values. Additionally, the immediate option can be used to skip the entire preview phase that is captured.
Therefore, to perform an exposure capture of 100 seconds, use:
rpicam-still -o long_exposure.jpg --shutter 100000000 --gain 1 --awbgains 1,1 --immediate
For reference, the maximum exposure times of the three official Raspberry Pi cameras can be found in this table.
rpicam-vid
rpicam-vid can help us capture video on our Raspberry Pi device. Rpicam-vid displays a preview window and writes the encoded bitstream to the specified output. This will produce an unpacked video bitstream that is not packaged in any container format (such as an mp4 file).
- rpicam-vid uses H.264 encoding
For example, the following command writes a 10-second video to a file named test.h264:
rpicam-vid -t 10s -o test.h264
You can use VLC and other video players to play the result files:
VLC test.h264
On the Raspberry Pi 5, you can output directly to the MP4 container format by specifying the MP4 file extension of the output file:
rpicam-vid -t 10s -o test.mp4
- Encoder
rpicam-vid supports dynamic JPEG as well as uncompressed and unformatted YUV420:
rpicam-vid -t 10000 --codec mjpeg -o test.mjpeg
rpicam-vid -t 10000 --codec yuv420 -o test.data
The codec option determines the output format, not the extension of the output file.
The segment option splits the output file into segments-sized chunks (in milliseconds). By specifying extremely short segments (1 millisecond), this allows for the convenient decomposition of a moving JPEG stream into individual JPEG files. For example, the following command combines a 1 millisecond segment with a counter in the output filename to generate a new filename for each segment:
rpicam-vid -t 10000 --codec mjpeg --segment 1 -o test%05d.jpeg
- Capture high frame rate video
To minimize frame loss for high frame rate (> 60fps) video, try the following configuration adjustments:
- Set the target level of H.264 to 4.2 with the parameter --level 4.2
- Disable software color denoising processing by setting the denoise option to cdn_off.
- Disable the display window for nopreview to release additional CPU cycles.
- Set force_turbo=1 in /boot/firmware/config.txt to ensure that the CPU clock is not throttled during video capture. For more information, see the force_turbo documentation.
- Adjust the ISP output resolution parameter to --width 1280 --height 720 or lower to achieve the frame rate target.
- On the Raspberry Pi 4, you can overclock the GPU to improve performance by adding a frequency of gpu_freq=550 or higher in /boot/firmware/config.txt. For detailed information, please refer to the Overclocking documentation.
The following command demonstrates how to implement a 1280×720 120fps video:
rpicam-vid --level 4.2 --framerate 120 --width 1280 --height 720 --save-pts timestamp.pts -o video.264 -t 10000 --denoise cdn_off -n
- Integration of Libav with picam-vid
Rpicam-vid can encode audio and video streams using the ffmpeg/libav codec backend. You can save these streams to a file, or stream them over the network.
To enable the libav backend, pass libav to the codec option:
rpicam-vid --codec libav --libav-format avi --libav-audio --output example.avi
- UDP
To use a Raspberry Pi as a server for streaming video over UDP, use the following command, replacing the < IP -addr> placeholder with the IP address of the client or multicast address, and replacing the <port> placeholder with the port you wish to use for streaming:
rpicam-vid -t 0 --inline -o udp://<ip-addr>:<port>
Use a Raspberry Pi as a client to view video streams over UDP, using the following command, replace the <port> placeholder with the port you want to stream:
vlc udp://@:<port> :demux=h264
Alternatively, use ffplay on the client side to stream with the following command:
ffplay udp://<ip-addr-of-server>:<port> -fflags nobuffer -flags low_delay -framedrop
- TCP
Video can also be transmitted over TCP. Use Raspberry Pi as a server:
rpicam-vid -t 0 --inline --listen -o tcp://0.0.0.0:<port>
Use the Raspberry Pi as the client to view the video stream over TCP, use the following command:
vlc tcp/h264://<ip-addr-of-server>:<port>
Alternatively, use the ffplay stream at 30 frames per second on the client side with the following command:
ffplay tcp://<ip-addr-of-server>:<port> -vf "setpts=N/30" -fflags nobuffer -flags low_delay -framedrop
- RTSP
To transfer video via RTSP using VLC, using the Raspberry Pi as the server, use the following command:
rpicam-vid -t 0 --inline -o - | cvlc stream:///dev/stdin --sout '#rtp{sdp=rtsp://:8554/stream1}' :demux=h264
To view the video stream on the RTSP using the Raspberry Pi as a client, use the following command:
ffplay rtsp://<ip-addr-of-server>:8554/stream1 -vf "setpts=N/30" -fflags nobuffer -flags low_delay -framedrop
Or on the client side use the following command to stream with VLC:
vlc rtsp://<ip-addr-of-server>:8554/stream1
If you need to close the preview window on the server, use the nopreview command.
Use inline flags to enforce stream header information into each inner frame, which helps the client understand the stream when the beginning is missed.
rpicam-raw
rpicam-raw records the video directly from the sensor as the original Bayer frame. It doesn't show the preview window. To record a two-second raw clip to a file called test.raw, run the following command:
rpicam-raw -t 2000 -o test.raw
RPICAM-RAW outputs raw frames without any format information. The application prints the pixel format and image size to the terminal window to help the user parse the pixel data.
By default, rpicam-raw outputs raw frames in a single, potentially very large file. Use the segment option to direct each raw frame to a separate file, using the %05d directive to make each frame filename unique:
rpicam-raw -t 2000 --segment 1 -o test%05d.raw
Using a fast storage device, rpicam-raw can write 18MB frames from a 12-megapixel HQ camera at a speed of 10fps to the disk. rpicam-raw is unable to format the output frame as a DNG file; To do this, use the rpicam-still option at a frame rate lower than 10 to avoid frame drops:
rpicam-raw -t 5000 --width 4056 --height 3040 -o test.raw --framerate 8
For more information on the original format, see mode documentation.
rpicam-detect
Note: The Raspberry Pi operating system does not include rpicam-detect. If you already have TensorFlow Lite installed, you can build rpicam-detect. For more information, see the instructions on building rpicam-apps in build. Don't forget to pass -DENABLE_TFLITE=1 when running cmake.
rpicam-detect displays a preview window and monitors the content using a Google MobileNet v1 SSD (Single Shot Detector) neural network that has been trained to recognize about 80 classes of objects using the Coco dataset. Rpicam-detect can recognize people, cars, cats and many other objects.
Whenever rpicam-detect detects a target object, it captures a full-resolution JPEG. Then return to monitoring preview mode.
For general information about model usage, please refer to the TensorFlow Lite Object Detector section. For example, when you are out, you can keep an eye on your cat:
rpicam-detect -t 0 -o cat%04d.jpg --lores-width 400 --lores-height 300 --post-process-file object_detect_tf.json --object cat
rpicam Parameter Settings
- --help -h prints all the options, along with a brief description of each option
rpicam-hello -h
- --version outputs the version strings for libcamera and rpicam-apps
rpicam-hello --version
Example output:
rpicam-apps build: ca559f46a97a 27-09-2021 (14:10:24)
libcamera build: v0.0.0+3058-c29143f7
- --list-cameras lists the cameras connected to the Raspberry Pi and their available sensor modes
rpicam-hello --list-cameras
The identifier for the sensor mode has the following form:
S<Bayer order><Bit-depth>_<Optional packing> : <Resolution list>
Cropping is specified in the native sensor pixels (even in pixel binning mode) as (<x>, <y>)/<Width>×<Height>. (x, y) specifies the position of the width × height clipping window in the sensor array.
For example, the following output shows information for an IMX219 sensor with index 0 and an IMX477 sensor with index 1:
Available cameras
-----------------
0 : imx219 [3280x2464] (/base/soc/i2c0mux/i2c@1/imx219@10)
    Modes: 'SRGGB10_CSI2P' : 640x480 [206.65 fps - (1000, 752)/1280x960 crop]
                             1640x1232 [41.85 fps - (0, 0)/3280x2464 crop]
                             1920x1080 [47.57 fps - (680, 692)/1920x1080 crop]
                             3280x2464 [21.19 fps - (0, 0)/3280x2464 crop]
           'SRGGB8' : 640x480 [206.65 fps - (1000, 752)/1280x960 crop]
                      1640x1232 [41.85 fps - (0, 0)/3280x2464 crop]
                      1920x1080 [47.57 fps - (680, 692)/1920x1080 crop]
                      3280x2464 [21.19 fps - (0, 0)/3280x2464 crop]
1 : imx477 [4056x3040] (/base/soc/i2c0mux/i2c@1/imx477@1a)
    Modes: 'SRGGB10_CSI2P' : 1332x990 [120.05 fps - (696, 528)/2664x1980 crop]
           'SRGGB12_CSI2P' : 2028x1080 [50.03 fps - (0, 440)/4056x2160 crop]
                             2028x1520 [40.01 fps - (0, 0)/4056x3040 crop]
4056x3040 [10.00 fps - (0, 0)/4056x3040 crop]- --camera selects the camera you want to use. Specify an index from the list of available cameras.
rpicam-hello --list-cameras 0
rpicam-hello --list-cameras 1
- --config -c specifies a file that contains the command parameter options and values. Typically, a file named example_configuration.txt specifies options and values as key-value pairs, with each option on a separate line.
timeout=99000
verbose=
Notice: Omission of prefixes -- for parameters is typically used in command lines. For flags that are missing values, such as verbose in the example above, a trailing = must be included.
Then you can run the following command to specify a timeout of 99,000 milliseconds and detailed output:
rpicam-hello --config example_configuration.txt
- --time -t, the default delay of 5000 milliseconds
rpicam-hello -t
Specifies how long the application runs before shutting down. This applies to both the video recording and preview windows. When capturing a still image, the application displays a preview window with a timeout millisecond before outputting the captured image.
rpicam-hello -t 0
- --preview sets the position (x,y coordinates) and size (w,h dimensions) of the desktop or DRM preview window. There is no impact on the resolution or aspect ratio of the image requested from the camera
Pass the preview window dimensions in the following comma-separated form: x,y,w,h
rpicam-hello --preview 100,100,500,500
- --fullscreen -f forces the preview window to use the entire screen, with no borders or title bars. Scale the image to fit the entire screen. Values are not accepted.
rpicam-hello -f
- --qt-preview uses the Qt preview window, which consumes more resources than other options, but supports X window forwarding. Not compatible with full-screen flags. Values are not accepted.
rpicam-hello --qt-preview
- --nopreview makes the application not display a preview window. Values are not accepted.
rpicam-hello --nopreview
- --info-text
Default values: "#%frame (%fps fps) exp %exp ag %ag dg %dg"
When running in a desktop environment, set the provided string as the title of the preview window. The following image metadata substitutions are supported:
| Command | Description |
|---|---|
| %frame | Frame sequence number |
| %fps | Instantaneous frame rate |
| %exp | Shutter speed at which an image is captured, in ms |
| %ag | Image analog gain controlled by photosensitive chip |
| %dg | Image number gain controlled by ISP |
| %rg | Gain of the red component of each pixel point |
| %bg | Gain of the blue component of each pixel point |
| %focus | The corner point measure of the image, the larger the value, the clearer the image |
| %lp | Diopter of the current lens (distance in 1/meter) |
| %afstate | Autofocus status (idle, scanning, focused, failed) |
rpicam-hello --info-test "Focus measure: %focus"
- --width
- --height
Each parameter accepts a number that defines the size of the image displayed in the preview window in pixels.
For rpicam-still, rpicam-jpeg, and rpicam-vid, specify the output resolution.
For rpicam-raw, specify the original frame resolution. For a camera with a 2×2 bin readout mode, specify a resolution that is equal to or less than the bin mode to capture 2×2 bin original frames.
For rpicam-hello, there is no effect.
Record a 1080p video
rpicam-vid -o test.h264 --width 1920 --height 1080
Capture a JPEG at a resolution of 2028×1520. If used with an HQ camera, the 2×2 bin mode is used, so the original file (test. ng) contains 2028×1520 original Bayer images.
rpicam-still -r -o test.jpg --width 2028 --height 1520
- --viewfinder-width
- --viewfinder-height
Each parameter accepts a number that defines the size of the image displayed in the preview window in pixels. The size of the preview window is not affected, as the image is resized to fit. Captured still images or videos are not affected.
rpicam-still --viewfinder-width 1920 --viewfinder-height 1080
- --mode allows the camera mode to be specified in the following colon-separated format: <width>:<height>:<bit-depth>:<packing> and if the provided values do not match exactly, the system will select the closest available option for the sensor. You can use the packed(P) or unpacked(U) packaging format, which affects the format of the stored video and static images, but does not affect the format of the frames transmitted to the preview window.
Bit-depth and packing are optional. By default, Bit-depth is 12, and Packing is set to P (packed).
For information on the bit depth, resolution, and packing options available for the sensors, please refer to list-cameras.
As shown below:
- 4056:3040:12:P - 4056×3040 resolution, 12 bits/pixel, packed.
- 1632:1224:10 - 1632×1224 resolution, 10 bits/pixel.
- 2592:1944:10:U - 2592×1944 resolution, 10 bits/pixel, unpacked.
- 3264:2448 - 3264×2448 resolution.
- --viewfinder-mode is the same as the mode option, but it applies to the data passed to the preview window. For more information, see mode documentation.
- --lores-width and --lores-height
Provide a second low-resolution image stream from the camera, scaled down to a specified size. Each accepts a number to define the dimensions of a low-resolution stream (in pixels). Available in preview and video modes. Static capture is not provided. For RPICAM-vid, disable additional color denoising processing. It is useful for image analysis combined with Image post-processing.
rpicam-hello --lores-width 224 --lores-height 224
- --hflip flips the image horizontally. Values are not accepted.
rpicam-hello --hflip -t 0
- --vflip flips the image vertically. Values are not accepted.
rpicam-hello --vflip -t 0
- --rotation rotates the image extracted from the sensor. Only values of 0 or 180 are accepted.
rpicam-hello --rotation 0
- --roi crops the image extracted from the entire sensor domain. Accepts four decimal values, ranged 0 to 1, in the following format: <x>,<y>,<w>,<h>. Each of these values represents the percentage of available width and height as a decimal between 0 and 1.
These values define the following proportions:
<x>: X coordinates to skip before extracting an image
<y>: Y coordinates to skip before extracting an image
<w>: image width to extract
<h>: image height to extract
The default is 0,0,1,1 (starting with the first X coordinate and the first Y coordinate, using 100% of the image width and 100% of the image height).
Examples:
rpicam-hello --roi 0.25, 0.25, 0.5, 0.5 selects half of the total number of pixels cropped from the center of the image (skips the first 25% of the X coordinates and the first 25% of the Y coordinates, uses 50% of the total width of the image and 50% of the total height of the image).
rpicam-hello --roi 0,0,0.25,0.25 selects a quarter of the total number of pixels cropped from the top left corner of the image (skips the first 0% of the X coordinate and the first 0% of the Y coordinate, uses 25% of the width of the image and 25% of the height of the image).
- --HDR default: Off, run the camera in HDR mode. If no value is passed, it is assumed to be auto. Accept one of the following values:
- off - disables HDR.
- auto - enables HDR on supported devices. If available, use the sensor's built-in HDR mode. If the sensor does not have a built-in HDR mode, the onboard HDR mode is used (if available).
- single-exp enables HDR on supported devices. If available, use the sensor's built-in HDR mode. If the sensor does not have a built-in HDR mode, the onboard HDR mode is used (if available).
rpicam-hello --hdr
Use the onboard HDR mode, if available, even if the sensor has a built-in HDR mode. If the onboard HDR mode is not available, HDR is disabled.
Raspberry Pi 5 and higher versions of devices have the onboard HDR mode.
To check the HDR mode built into the sensor, add this option to the list of cameras.
Camera Control Options
The following options control the image processing and algorithms that affect the image quality of the camera.
- sharpness
Sets the image clarity. Values from the following ranges are accepted:
- 0.0 refers to not applying sharpening
- Values greater than 0.0 but less than 1.0 apply less sharpening than the default value
- 1.0 applies the default sharpening amount
- Values greater than 1.0 apply additional sharpening
rpicam-hello --sharpness 0.0
- contrast
Specifies the image contrast. Values from the following ranges are accepted:
- 0.0 applies minimum contrast ratio
- Values greater than 0.0 but less than 1.0 apply a contrast that is less than the default value
- 1.0 applies the default contrast ratio
- Values greater than 1.0 apply additional contrast
rpicam-hello --contrast 0.0
- brightness
Specifies the image brightness, which is added as an offset of all pixels in the output image. Values from the following ranges are accepted:
- -1.0 refers to minimum brightness (black)
- 0.0 applies standard brightness
- 1.0 applies maximum brightness (white)
For more uses, refer to ev.
rpicam-hello --brightness 1.0
- saturation
Specifies the image color saturation. Values from the following ranges are accepted:
- 0.0 applies minimum saturation (grayscale)
- Values greater than 0.0 but less than 1.0 apply saturation less than the default value
- 1.0 applies the default saturation
- Values greater than 1.0 apply additional saturation
rpicam-hello --saturation 0.6
- ev
Specifies the exposure value (EV) compensation for the image. A numeric value is accepted that is passed along the following spectrum to the target value of the automatic exposure/gain control (AEC/AGC) processing algorithm:
- -10.0 applies the minimum target value
- 0.0 applies standard target value
- 10.0 applies the maximum target value
rpicam-hello --ev 10.0
- shutter
Specifies the exposure time using the shutter, measured in microseconds. When you use this option, the gain can still be varied. If the camera's frame rate is too high, it doesn't allow the specified exposure time (for example, with a frame rate of 1 fps and an exposure time of 10,000 microseconds), the sensor will use the maximum exposure time allowed by the frame rate.
For a list of minimum and maximum shutter times for official cameras, see camera hardware documentation. Values higher than the maximum will result in undefined behavior.
rpicam-hello --shutter 10000
- gain
The effect of analoggain is the same as gain
Sets the combined analog and digital gain. When the sensor drive can provide the required gain, only analog gain is used. When the analog gain reaches its maximum, the ISP applies the digital gain. Accepts a numeric value.
For a list of analogue gain limits, for official cameras, see the camera hardware documentation.
Sometimes, digital gain can exceed 1.0 even when the analogue gain limit is not exceeded. This can occur in the following situations:
Either of the colour gains drops below 1.0, which will cause the digital gain to settle to 1.0/min(red_gain,blue_gain). This keeps the total digital gain applied to any colour channel above 1.0 to avoid discolouration artefacts.
Slight variances during Automatic Exposure/Gain Control (AEC/AGC) changes.
rpicam-hello --gain 0.8
- metering default value: centre
Sets the metering mode of the Automatic Exposure/Gain Control (AEC/AGC) algorithm. Accepts the following values:
- centre - centre weighted metering
- spot - spot metering
- average - average or whole frame metering
- custom - custom metering mode defined in the camera tuning file
For more information on defining a custom metering mode, and adjusting region weights in existing metering modes, see the Raspberry Tuning guide for the Raspberry Pi cameras and libcamera.
rpicam-hello --metering centre
- exposure
Sets the exposure profile. Changing the exposure profile should not affect the image exposure. Instead, different modes adjust gain settings to achieve the same net result. Accepts the following values:
- sport: short exposure, larger gains
- normal: normal exposure, normal gains
- long: long exposure, smaller gains
You can edit exposure profiles using tuning files. For more information, see the Tuning guide for the Raspberry Pi cameras and libcamera.
rpicam-hello --exposure sport
- awb
Sets the exposure profile. Changing the exposure profile should not affect the image exposure. Instead, different modes adjust gain settings to achieve the same final result. Accepts the following values: Available white balance modes:
| Mode | Color temperature |
|---|---|
| auto | 2500K ~ 8000K |
| incadescent | 2500K ~ 3000K |
| tungsten | 3000K ~3500K |
| fluorescent | 4000K ~ 4700K |
| indoor | 3000K ~ 5000K |
| daylight | 5500K ~ 6500 K |
| cloudy | 7000K ~ 8500K |
| custom | A custom range defined in the tuning file |
These values are only approximate: values could vary according to the camera tuning.
No mode fully disables AWB. Instead, you can fix colour gains with awbgains.
For more information on AWB modes, including how to define a custom one, see the Tuning guide for the Raspberry Pi cameras and libcamera.
rpicam-hello --awb auto
- awbgains
Sets a fixed red and blue gain value to be used instead of an Auto White Balance (AWB) algorithm. Set non-zero values to disable AWB. Accepts comma-separated numeric input in the following format: <red_gain>,<blue_gain>
rpicam-jpeg -o test.jpg --awbgains 1.5,2.0
- denoise
Default value: auto
Sets the denoising mode. Accepts the following values:
- auto: Enables standard spatial denoise. Uses extra-fast colour denoise for video, and high-quality colour denoise for images. Enables no extra colour denoise in the preview window.
- off: Disables spatial and colour denoise.
- cdn_off: Disables colour denoise.
- cdn_fast: Uses fast colour denoise.
- cdn_fast: Uses high-quality colour denoise. Not appropriate for video/viewfinder due to reduced throughput.
- auto: Enables standard spatial denoise. Uses extra-fast colour denoise for video, and high-quality colour denoise for images. Enables no extra colour denoise in the preview window.
Even fast colour denoise can lower framerates. High quality colour denoise significantly lowers framerates.
rpicam-hello --denoise off
- tuning-file
Specifies the camera tuning file. The tuning file allows you to control many aspects of image processing, including the Automatic Exposure/Gain Control (AEC/AGC), Auto White Balance (AWB), colour shading correction, colour processing, denoising and more. Accepts a tuning file path as input. For more information about tuning files, see Tuning Files.
- autofocus-mode
Default value: default Specifies the autofocus mode. Accepts the following values:
- default: puts the camera into continuous autofocus mode unless lens-position or autofocus-on-capture override the mode to manual
- manual: does not move the lens at all unless manually configured with lens-position
- auto: only moves the lens for an autofocus sweep when the camera starts or just before capture if autofocus-on-capture is also used
- continuous: adjusts the lens position automatically as the scene changes
This option is only supported for certain camera modules.
rpicam-hello --autofocus-mode auto
- autofocus-range
Default value: normal
Specifies the autofocus range. Accepts the following values:
- normal: focuses from reasonably close to infinity
- macro: focuses only on close objects, including the closest focal distances supported by the camera
- full: focus on the entire range, from the very closest objects to infinity
This option is only supported for certain camera modules.
rpicam-hello autofocus-range normal
- autofocus-speed
Default value: normal
Specifies the autofocus speed. Accepts the following values:
- normal: changes the lens position at normal speed
- fast: changes the lens position quickly
This option is only supported for certain camera modules.
rpicam-hello --autofocus-speed normal
- autofocus-window
Specifies the autofocus window within the full field of the sensor. Accepts four decimal values, ranged 0 to 1, in the following format: <x>,<y>,<w>,<h>. Each of these values represents the percentage of available width and height as a decimal between 0 and 1.
These values define the following proportions:
<x>: X coordinates to skip before applying autofocus
<y>: Y coordinates to skip before applying autofocus
<w>:autofocus area width
<w>:autofocus area height
The default value uses the middle third of the output image in both dimensions (1/9 of the total image area).
Examples:
rpicam-hello—autofocus-window 0.25,0.25,0.5,0.5
selects exactly half of the total number of pixels cropped from the centre of the image (skips the first 25% of X coordinates, skips the first 25% of Y coordinates, uses 50% of the total image width, uses 50% of the total image height).
rpicam-hello—autofocus-window 0,0,0.25,0.25
selects exactly a quarter of the total number of pixels cropped from the top left of the image (skips the first 0% of X coordinates, skips the first 0% of Y coordinates, uses 25% of the image width, uses 25% of the image height).
This option is only supported for certain camera modules.
- lens-position
Default value: default Moves the lens to a fixed focal distance, normally given in dioptres (units of 1 / distance in metres). Accepts the following spectrum of values:
- 0.0: moves the lens to the "infinity" position
- Any other number: moves the lens to the 1 / number position. For example, the value 2.0 would focus at approximately 0.5m
- normal: move the lens to a default position which corresponds to the hyperfocal position of the lens
Lens calibration is imperfect, so different camera modules of the same model may vary.
- verbose
Alias: -v
Default value: 1 Sets the verbosity level. Accepts the following values:
- 0: no output
- 1: normal output
- 2: verbose output
rpicam-hello --verbose 1
For more details, click here for reference.
Preface
In Raspberry Pi images after Bullseye version, the underlying Raspberry Pi driver has switched from Raspicam to libcamera. libcamera is an open-source software stack (hereinafter referred to as "drivers") that facilitates third-party porting and development of their own camera drivers. As of December 11, 2023, the official picamera2 library has been provided for libcamera, which is convenient for users to call it in Python programs
Call Camera
The libcamera software stack provides six commands for users to preview and test the camera interface.
libcamera-hello
This is a simple "hello world" program that previews the camera and displays the camera feed on the screen.
- Usage example
libcamera-hello
This command will preview the camera on the screen for about 5 seconds, and the user can use the -t <duration> parameter to set the preview time, where the unit of <duration> is milliseconds, if it is set to 0, it will keep previewing. For example:
libcamera-hello -t 0
- Tuning file
The libcamera driver of Raspberry Pi will call a tuning file for different camera modules, and various parameters are provided in the tuning file, and when the camera is called, libcamera will call the parameters in the tuning file, and the image will be processed in combination with the algorithm and finally output into a preview screen. Since the libcamera driver can only automatically detect the photosensitive chip signal, but the final display effect of the camera will be affected by the entire module, the tuning file is used to flexibly handle the cameras of different modules and adjust to improve image quality.
If the camera output image is not ideal when using the default tuning file, the user can call a custom tuning file to adjust the image. For example, if you are using the official NOIR version camera, compared to the regular Raspberry Pi Camera V2, the NOIR camera may require different white balance parameters. In such cases, you can switch by calling the tuning file.
libcamera-hello --tuning-file /usr/share/libcamera/ipa/raspberrypi/imx219_noir.json
Users can copy the default tuning file and modify it according to their needs.
Note: The use of tuning files applies to other libcamera commands, which will not be described in subsequent commands
- Preview window
Most libcamera commands will display a preview window on the screen. Users can customize the preview window's title information using the --info-text parameter. They can also call some camera parameters using %directives and display them in the window
For example, if you use HQ Camera: The focal length of the camera can be displayed on the window via --info-txe "%focus"
libcamera-hello --info-text "focus %focus"
Note: For more information about parameter setting, please refer to the subsequent section on command parameter settings
libcamera-jpeg
libcamera-jpeg is a simple static image capture program, unlike the complex features of libcamera-still, libcamera-jpeg code is more concise and has many of the same functions to complete image capture.
- Take a full-pixel JPEG image
libcamera-jpeg -o test.jpg
This command will display a preview serial port for about 5 seconds, and then take a full-pixel JPEG image and save it as a test.jpg
The user can set the preview time with the -t parameter, and the resolution of the captured image can be set with --width and --height. For example:
libcamera-jpeg -o test.jpg -t 2000 --width 640 --height 480
- Exposure control
All libcamera commands allow users to set shutter speed and gain, for example:
libcamera-jpeg -o test.jpg -t 2000 --shutter 20000 --gain 1.5
This command will capture an image, with an exposure of 20ms and a camera gain set to 1.5 times. The set gain parameter will prioritize adjusting the analog gain inside the photosensitive chip. If the set gain exceeds the maximum analog gain value built-in in the driver program, the system will first set the analog gain of the chip to the maximum value, and the remaining gain multiples will be implemented through digital gain.
Note: The digital gain is realized by ISP (Image Signal Processing), not directly adjusting the chip's built-in registers. Under normal circumstances, the digital gain is usually close to 1.0, unless the following three situations occur:
- Gain requirement exceeds the analog gain range: When the analog gain cannot meet the set gain requirement, digital gain will be used for compensation.
- The gain of a certain color channel is less than 1: The digital gain can also be used to adjust the color gain. When the gain value of a certain color channel (such as red or blue) is less than 1, the system will apply a uniform digital gain, with a final value of 1/min (red_gain, blue_gain)
- Automatic exposure/gain control (AEC/AGC) adjustment: When AEC or AGC changes, the digital gain may be adjusted accordingly to eliminate brightness changes caused by parameter fluctuations. This change usually quickly returns to the "normal value".
The AEC/AGX algorithm of Raspberry Pi allows the program to specify exposure compensation, which adjusts the brightness of the image by setting the aperture value. For example:
libcamera-jpeg --ev -0.5 -o darker.jpg
libcamera-jpeg --ev 0 -o normal.jpg
libcamera-jpeg --ev 0.5 -o brighter.jpg
libcamera-still
libcamera-still and libcamera-jpeg are very similar in functionality, but libcamera-still inherits more of the functionality originally provided by raspistill. For example, users can still use commands similar to the following to take a picture:
- Test command
libcamera-still -o test.jpg
- Encoder
libcamera-still supports image files in different formats, it can support png and bmp encoding, and it also supports saving binary dumps of RGB or YUV pixels directly to a file without encoding or any image format. If RGB or YUV data is saved directly, the program must know the pixel arrangement of the file when reading such files.
libcamera-still -e png -o test.png
libcamera-still -e bmp -o test.bmp
libcamera-still -e rgb -o test.data
libcamera-still -e yuv420 -o test.data
Note: The format of image saving is controlled by the -e parameter, if the -e parameter setting is not called, the format of the output file name will be saved by default.
- Raw image capture
A raw image is an image output directly from an image sensor that has not been processed by any ISP or CPU. For color camera sensors, generally speaking, the output format of the original image is Bayer. Note that the original image is different from the bit-encoded RGB and YUV images we talked about earlier, and RGB and YUV are also ISP processed images.
The command to take a raw image:
libcamera-still -r -o test.jpg
The raw image is usually saved in DNG (Adobe Digital Negative) format, which is compatible with most standard programs such as dcraw or RawTherapee. The raw image is saved as a file with the same name with a .dng extension, e.g., if you run the above command, it will be saved as test.dng and a jpeg file will be generated at the same time. DNG files contain metadata related to image acquisition, such as white balance data, ISP color matrix, etc. The following metadata encoding information is displayed with the exiftool tool:
File Name                       : test.dng
Directory                       : .
File Size                       : 24 MB
File Modification Date/Time     : 2021:08:17 16:36:18+01:00
File Access Date/Time           : 2021:08:17 16:36:18+01:00
File Inode Change Date/Time     : 2021:08:17 16:36:18+01:00
File Permissions                : rw-r--r--
File Type                       : DNG
File Type Extension             : dng
MIME Type                       : image/x-adobe-dng
Exif Byte Order                 : Little-endian (Intel, II)
Make                            : Raspberry Pi
Camera Model Name               : /base/soc/i2c0mux/i2c@1/imx477@1a
Orientation                     : Horizontal (normal)
Software                        : libcamera-still
Subfile Type                    : Full-resolution Image
Image Width                     : 4056
Image Height                    : 3040
Bits Per Sample                 : 16
Compression                     : Uncompressed
Photometric Interpretation      : Color Filter Array
Samples Per Pixel               : 1
Planar Configuration            : Chunky
CFA Repeat Pattern Dim          : 2 2
CFA Pattern 2                   : 2 1 1 0
Black Level Repeat Dim          : 2 2
Black Level                     : 256 256 256 256
White Level                     : 4095
DNG Version                     : 1.1.0.0
DNG Backward Version            : 1.0.0.0
Unique Camera Model             : /base/soc/i2c0mux/i2c@1/imx477@1a
Color Matrix 1                  : 0.8545269369 -0.2382823821 -0.09044229197 -0.1890484985 1.063961506 0.1062747385 -0.01334283455 0.1440163847 0.2593136724
As Shot Neutral                 : 0.4754476844 1 0.413686484
Calibration Illuminant 1        : D65
Strip Offsets                   : 0
Strip Byte Counts               : 0
Exposure Time                   : 1/20
ISO                             : 400
CFA Pattern                     : [Blue,Green][Green,Red]
Image Size                      : 4056x3040
Megapixels                      : 12.3
Shutter Speed                   : 1/20
- Ultra-long exposure
If we want to take an ultra long exposure image, we need to disable AEC/AGC and white balance, otherwise these algorithms will cause the image to wait for many more frames of data as it converges. Disabling these algorithms requires setting explicit values separately, and users can skip the preview process through the -- immediate setting.
Here is the command to take an image with a 100 second exposure:
libcamera-still -o long_exposure.jpg --shutter 100000000 --gain 1 --awbgains 1,1 --immediate
Note: The maximum exposure times for several official cameras are shown in the table.
| Module | Maximum exposure time (s) |
|---|---|
| V1(OV5647) | 6 |
| V2(IMX219) | 11.76 |
| V3(IMX708) | 112 |
| HQ(IMX477) | 670 |
libcamera-vid
libcamera-vid is a video recording program that uses the Raspberry Pi's hardware H.264 encoder by default. After running this program, a preview window will be displayed on the screen, and the bitstream will be encoded and output to the specified file. For example, recording a 10 second video.
libcamera-vid -t 10000 -o test.h264
If you want to view videos, you can use VLC to play them.
vlc test.h264
Note: The recorded video stream is unpacked, users can use --save-pts to set the output timestamp, which is convenient for converting the bitstream to other video formats.
libcamera-vid -o test.h264 --save-pts timestamps.txt
If you want to output an mkv file, you can use the following command:
mkvmerge -o test.mkv --timecodes 0:timestamps.txt test.h264
- Encoder
The Raspberry Pi supports JPEG as well as YUV420 without compression and formatting:
libcamera-vid -t 10000 --codec mjpeg -o test.mjpeg
libcamera-vid -t 10000 --codec yuv420 -o test.data
The --codec option sets the output format, not the extension of the output file.
The -- segment parameter can be used to segment the output file into segments (in milliseconds), which is suitable for splitting JPEG video streams into individual JPEG files with relatively short processing times (approximately 1ms).
libcamera-vid -t 10000 --codec mjpeg --segment 1 -o test%05d.jpeg
- UDP video streaming transmission
UDP can be used for video streaming, running on the Raspberry Pi server:
libcamera-vid -t 0 --inline -o udp://<ip-addr>:<port>
Where <ip-addr> needs to be replaced with the actual client IP address or multicast address.
On the client, enter the following commands to fetch and display the video stream (use one of the two commands):
vlc udp://@:<port> :demux=h264
vlc udp://@:<port> :demux=h264
Note: The port needs to be consistent with the one you set on the Raspberry Pi.
- TCP video streaming transmission
TCP can be used for video streaming, running on the Raspberry Pi server:
libcamera-vid -t 0 --inline --listen -o tcp://0.0.0.0:<port>
The client runs:
vlc tcp/h264://<ip-addr-of-server>:<port> #Just pick one of the two commands
ffplay tcp://<ip-addr-of-server>:<port> -vf "setpts=N/30" -fflags nobuffer -flags low_delay -framedrop
- RTSP video streaming transmission
On Raspberry Pi, VLC is commonly used to process RTSP video streams,
libcamera-vid -t 0 --inline -o - | cvlc stream:///dev/stdin --sout '#rtp{sdp=rtsp://:8554/stream1}' :demux=h264
On the playback end, you can run any of the following commands:
vlc rtsp://<ip-addr-of-server>:8554/stream1
ffplay rtsp://<ip-addr-of-server>:8554/stream1 -vf "setpts=N/30" -fflags nobuffer -flags low_delay -framedrop
Among all preview commands, if you want to close the preview window on the Raspberry Pi, you can use the parameter - n (-- nopeview) to set it. Additionally, please note the setting of the -inline parameter, which will force the header information of the video stream to be included in every I (intra) frame. This setting allows the client to correctly parse the video stream even if the video header is lost.
- High frame rate mode
If you use the libcamera-vid command to record a high frame rate (generally higher than 60fps) and reduce frame drops, pay attention to the following points:
- Set the target level for H.264: The encoding level for H.264 needs to be set to 4.2, which can be achieved by adding the -- level 4.2 parameter.
- Turn off color noise reduction function: When recording high frame rate videos, the color noise reduction function must be turned off to reduce additional performance consumption. You can use the parameter -- denoise cdn_off to turn it off.
- Close preview window (applicable for frame rates above 100fps): If the frame rate setting exceeds 100fps, it is recommended to close the preview window to free up more CPU resources and avoid frame loss. It can be set using the parameter -n.
- Enable forced Turbo mode: Add the force_turbo=1 setting in the/boot/config.txt file to ensure that the CPU clock frequency is not limited during video recording, thereby improving performance.
- Adjusting ISP output resolution: Lowering the resolution can reduce resource usage, for example, setting the resolution to 1280x720 using the parameters - width 1280- height 720, or adjusting it to a lower resolution based on the camera model.
- Overclocking GPU (applicable to Raspberry Pi 4 or higher models): You can overclock the GPU by adding a value of gpu_freq=550 (or higher) in the/boot/config.txt file to improve performance and meet high frame rate requirements.
For example:
The following command is used to record a video with a resolution of 1280x720 and a frame rate of 120fps:
libcamera-vid --level 4.2 --framerate 120 --width 1280 --height 720 --save-pts timestamp.pts -o video.264 -t 10000 --denoise cdn_off -n
libcamera-raw
libcamera-raw is similar to a video recording program, except that libcamera-raw records data in Bayer format that is directly output by the sensor, i.e., raw image data. libcamera-raw does not show the preview window. For example, recording a 2-second raw data clip.
libcamera-raw -t 2000 -o test.raw
The program will dump the original frame directly without format information, and the program will print the pixel format and image size directly on the terminal, and the user can view the pixel data according to the output data.
By default, the program saves the original frame as a file, which is usually quite large and can be split by the --segement parameter.
libcamera-raw -t 2000 --segment 1 -o test%05d.raw
If the memory conditions are good (such as using SSD), libcamera-raw row can write official HQ Camera data (approximately 18MB per frame) to the hard drive at a speed of about 10 frames per second. To achieve this speed, the program writes raw frames that have not been formatted and cannot be saved as DNG files like libcamera-still. If you want to ensure that there is no frame loss, you can use -- framerate to reduce the frame rate.
libcamera-raw -t 5000 --width 4056 --height 3040 -o test.raw --framerate 8
General Command Setting Options
The general command setting options apply to all of libcamera's commands
--help, -h
Print the program help information, you can print the available setting options for each program command, and then exit.
--version
Print the software version, print the software version of libcamera and libcamera-app, and exit.
--list-cameras
Display the recognized supported cameras. For example:
Available cameras
-----------------
0 : imx219 [3280x2464] (/base/soc/i2c0mux/i2c@1/imx219@10)
    Modes: 'SRGGB10_CSI2P' : 640x480 [206.65 fps - (1000, 752)/1280x960 crop]
                             1640x1232 [41.85 fps - (0, 0)/3280x2464 crop]
                             1920x1080 [47.57 fps - (680, 692)/1920x1080 crop]
                             3280x2464 [21.19 fps - (0, 0)/3280x2464 crop]
           'SRGGB8' : 640x480 [206.65 fps - (1000, 752)/1280x960 crop]
                      1640x1232 [41.85 fps - (0, 0)/3280x2464 crop]
                      1920x1080 [47.57 fps - (680, 692)/1920x1080 crop]
                      3280x2464 [21.19 fps - (0, 0)/3280x2464 crop]
1 : imx477 [4056x3040] (/base/soc/i2c0mux/i2c@1/imx477@1a)
    Modes: 'SRGGB10_CSI2P' : 1332x990 [120.05 fps - (696, 528)/2664x1980 crop]
           'SRGGB12_CSI2P' : 2028x1080 [50.03 fps - (0, 440)/4056x2160 crop]
                             2028x1520 [40.01 fps - (0, 0)/4056x3040 crop]
                             4056x3040 [10.00 fps - (0, 0)/4056x3040 crop]
According to the printed information, IMX219 camera suffix 0, IM new 477 camera suffix 1. When calling the camera, the corresponding suffix can be specified.
--camera
Specify the camera, and the corresponding suffix can refer to the printing information of the command --list-camera.
For example: libcamera-hello -c config.txt
In the settings file, set parameters one by one in the format of key=value:
timeout=99000
verbose=
--config, -c
In general, we can directly set camera parameters through commands. Here, we use the -- config parameter to specify a settings file and directly read the settings parameters from the file to set the camera preview effect.
--timeout, -t
The -t option sets the running time for the libcamera program. If the command is for video recording, the timeout option sets the recording duration. If the command is for taking an image, the timeout option sets the preview time before capturing and outputting the image.
If no timeout is set when running the libcamera program, the default timeout value is 5000 (5 seconds). If the timeout is set to 0, the program will run indefinitely.
For example: libcamera-hello -t 0
--preview, -p
The -p option sets the preview window size and position (if qualified, the setting will be valid in both X and DRM versions of the window), set the format to --preview <x, y, w, h> where x and y set the position of the preview window on the display, and w and h set the width and height of the preview window.
The settings of the preview window do not affect the resolution and aspect ratio of the camera image preview. The program will scale the preview image to fit the preview window while maintaining the original aspect ratio.
For example: libcamera-hello -p 100,100,500,500
--fullscreen, -f
The -f option sets the preview window to be displayed in full screen, and the preview window and border in full screen display mode. Like -p, it does not affect the resolution and aspect ratio, and will be automatically adapted.
For example: libcamera-still -f -o test.jpg
--qt-preview
Use a preview window based on the QT framework. Normally, this setting is not recommended because the preview program does not use zero-copy buffer sharing or GPU acceleration, which can lead to high resource consumption. The QT preview window supports X forwarding (not supported by the default preview program).
The Qt preview window does not support the --fullscreen setting option. If the user wants to use Qt preview, it is recommended to keep the preview window small to avoid high resource consumption affecting the normal operation of the system.
For example: libcamera-hello --qt-preview
--nopreview, -n
Do not preview the image. This setting will turn off the image preview function.
Example: libcamera-hello -n
--info-text
Set the preview window title and information display (only effective in X graphical windows) using the format --info-text <string>. To call this option, there are multiple parameters that can be set, and the parameters are usually called in the form of % command. The program calls the corresponding values in the graphical metadata according to the commands.
If no window information is specified, the default --info-text setting is "#%frame (%fps fps) exp %exp ag %ag dg %dg"
For example: libcamera-hello --info-test "Focus measure: %focus Available parameters:
| Command | Description |
|---|---|
| %frame | Frame sequence number |
| %fps | Instantaneous frame rate |
| %exp | Shutter speed at which an image is captured, in ms |
| %ag | Image analog gain controlled by photosensitive chip |
| %dg | Image number gain controlled by ISP |
| %rg | Gain of the red component of each pixel point |
| %bg | Gain of the blue component of each pixel point |
| %focus | The corner point measure of the image, the larger the value, the clearer the image |
| %lp | Diopter of the current lens (distance in 1/meter) |
| %afstate | Autofocus status (idle, scanning, focused, failed) |
--width
--height
These two parameters set the width and height of the image respectively. For the libcamera-still, libcamera-jpeg and libcamera-vid commands, these two parameters can set the resolution of the output image/video.
If the libcamera-raw command is used, these two parameters will affect the size of the metadata frame obtained. The camera has a 2x2 block reading mode. If the set resolution is smaller than the block mode, the camera will obtain the metadata frame according to the 2x2 block size.
libcamera-hello cannot specify the resolution.
For example:
libcamera-vid -o test.h264 --width 1920 --height 1080 records 1080p video.
libcamera-still -r -o test.jpg --width 2028 --height 1520 takes a JPEG image with a resolution of 2028x1520.
--viewfinder-width
--viewfinder-height
This setting option is also used to set the resolution of the image, except that only the size of the image for the preview is set. It does not affect the resolution of the final output image or video. The device that previews the size of the image does not affect the size of the preview window, and it will be adapted according to the window.
For example: libcamera-hello --viewfinder-width 640 --viewfinder-height 480
--rawfull
This setting forces the photosensitive chip to activate --width and --height settings, outputting static images and videos in full resolution read mode. This setting libcamera-hello is invalid.
With this setting, the frame rate is sacrificed. In full-resolution mode, frame reading speeds will be slower.
For example: libcamera-raw -t 2000 --segment 1 --rawfull -o test%03d.raw example command captures multiple frames of metadata in full resolution mode. If you are using the HQ camera. The size of each frame is 18MB. If --rawfull is not set, the HQ camera defaults to 2x2 mode, and the data size of each frame is only 4.5MB.
--mode
This parameter is more universal than rawfull and is used to set the camera mode. When using it, you need to specify the width, height, bit depth, and packaging mode, and separate them with colons. The set values do not necessarily have to be completely accurate, the system will automatically match the closest values, and the bit depth and packaging mode can be set (default is 12 and P represents packaging).
- 4056:3040:12:P - 4056x3040 resolution, 12bit per pixel, packaged. Packaging means that the original image data will be packed in the buffer, in which case, two pixel points will only occupy 3 bytes, saving memory.
- 1632:1224:10 - 1632x1224 resolution, 10bit per pixel, default packaging. In the 10-bit packaging mode, 4 pixel data points will occupy 5 bytes.
- 2592:1944:10:U - 2592x1944 resolution, 10 bits per pixel, not packaged. Without packaging, each speed limit will occupy 2 bytes of memory, in which case, the highest 6 bits will be set to 0.
- 3262:2448 - 3264x2448 resolution, default using 12 bits and packed mode. However, if the camera model, such as the Camera V2 (IMX219) does not support 12 bits mode, the system will automatically select 10 bits mode.
--viewfinder-mode #Specify sensor mode, given as <width>:<height>:<bit-depth>:<packing>
--mode parameter is used to set the camera mode when recording videos and taking static images. If you want to set it during preview, you can use the --viewfinder-mode parameter.
--lores-width
--lores-height
These two options set low resolution images. Low-resolution data streams compress images, causing a change in the aspect ratio. When recording videos with libcamera-vid, if the low resolution is set, the color denoising and other functions will be disabled.
For example: libcamera-hello --lores-width 224 --lores-height 224 Note that low resolution settings are usually combined with image post-processing; otherwise, they are not very effective.
--hflip   #Flip the image horizontally
--vflip    #Flip the image vertically
--rotation     #Depending on the angle given, flip the image horizontally or vertically <angle>
These three options are used to flip the image. --rotation parameter currently only supports 0 and 180, which is equivalent to --hflip and --vflip.
For example: libcamera-hello --vflip --hflip
--roi #Crop image<x, y, w, h>
--roi allows users to crop their desired image area from the full image provided by the sensor according to coordinates, which is essentially digital scaling. Note that the coordinate values should be within the valid range. For example, --roi 0, 0, 1, 1 is an invalid command.
Example: libcamera-hello --roi 0.25,0.25,0.5,0.5 example command crops 1/4 of the image from the center of the image.
--hdr Run the camera in HDR mode (supported cameras only)
The hdr parameter is used to set the wide dynamic mode of the camera. This setting will only take effect if the camera supports wide dynamic range. You can use--list-camera to see if the camera supports hdr mode.
--sharpness #Set the image sharpness <number>
Adjust the image sharpness through <number> values. If set to 0, no sharpening is applied. If the value is set higher than 1.0, the extra sharpening amount is used.
For example: libcamera-still -o test.jpg --sharpness 2.0
--contrast #Set the image contrast <number>
For example: libcamera-still -o test.jpg --contrast 1.5
--brightness #Set the image brightness<number>
The setting range is -1.0~1.0
Example: libcamera-still -o test.jpg --brightness 0.2
--saturation #Set the image color saturation<number>
Example: libcamera-still -o test.jpg --saturation 0.8
--ev #Set EV compensation<number>
Set the EV compensation of the image in aperture units, the setting range is -10 ~ 10, the default value is 0. The program runs using AEC/AGC algorithms.
Example: libcamera-still -o test.jpg --ev 0.3
--shutter #Set exposure time, unit is ms <number>
Note: If the frame rate of the camera is too fast, it may not work according to the set shutter time, if this happens, you can try to reduce the frame rate with --framerate.
Example: libcamera-hello --shutter 30000
--gain  #Set the gain value (combination of numerical gain and analog gain) <number>
--analoggain  #--Synonymous with gain
--analoggain and --gain are the same, and using --analoggain is only for compatibility with the raspicam program.
--metering #Set the metering mode <string>
To set the metering mode of the AEC/AGC algorithm, the available parameters are:
- centre - center metering (default)
- spot - spot metering
- averag - average or full-frame metering
- custom - custom metering mode, which can be set by the tuning file
Example: libcamera-still -o test.jpg --metering spot
--exposure #Set exposure configuration file <string>
The exposure mode can be set to normal or sport. The reporting profile files of these two modes does not affect the overall exposure of the image, but in the case of sport mode, the program shortens the exposure time and increases the gain to achieve the same exposure effect.
- sport: short exposure time, large gain
- normal: normal exposure, normal gain
- long: long exposure time, small gain
Example: libcamera-still -o test.jpg --exposure sport
--awb #Set white balance mode<string>
Available white balance modes:
| Mode | Color temperature |
|---|---|
| auto | 2500K ~ 8000K |
| incadescent | 2500K ~ 3000K |
| tungsten | 3000K ~3500K |
| fluorescent | 4000K ~ 4700K |
| indoor | 3000K ~ 5000K |
| daylight | 5500K ~ 6500 K |
| cloudy | 7000K ~ 8500K |
| custom | A custom range defined in the tuning file |
For example: libamera-still -o test.jpg --awb tungsten
--awbgains #Set fixed color gain<number,number>
Set the red and blue gains.
For example: libcamera-still -o test.jpg --awbgains 1.5, 2.0
--denoise #Set the denoising mode <string>
Supported denoising modes:
- Auto - Default mode, uses standard spatial denoising, uses fast color denoising for video, and uses high-quality color denoising for static images. Preview images will not use any color denoising
- off—Turns off spatial denoising and color denoising
- cdn_off - Turn off color denoising
- cdn_fast - Use fast color denoising
- cdn_hq - Uses high-quality color denoising, not applicable for video recording
For example: libcamera-vid -o test.h264 --denoise cdn_off
--tuning-file #Specify the camera tuning file <string>
For more instructions on tuning files, please refer to the official tutorial
For example: libcamera-hello --tuning-file ~/my~camera-tuning.json
--autofocus-mode Specify the autofocus mode <string>
Set the autofocus mode.
- default - By default, the camera will start continuous autofocus mode, unless --lens-position or --autofocus-on-capture manual focus is set
- manual - Manual focus mode, you can set the focus position by --lens-position
- auto - Only focuses when the camera is turned on; does not adjust focus in other situations (If the libcamera-still command is used, autofocus will only occur before taking a photo when the --autofocus-on-capture option is used)
- continuous - The camera will automatically adjust the focus position according to the scene changes
--autofocus-range Specify the autofocus range <string>
Set the autofocus range.
- normal - Default item, from nearest to infinity
- macro - Macro mode, only focus on close objects
- full - Full distance mode, adjust to infinity for nearest objects
--autofocus-speed Specify the autofocus speed <string>
Set the focus speed.
- normal - Default item, normal speed
- fast - Fast focus mode
--autofocus-window --autofocus-window
To display the focus window, you need to set x, y, width, height, where the coordinate values are set according to the scale of the image. For example, -autofocus-window 0.25,0.25,0.5,0.5 will set a window that is half the size of the image and is in the center.
--lens-position Set the lens to a given position <string>
Set the focus position.
- 0.0 -- Set the focus position to infinity
- number --Set the focus position to 1/number, where the number is any value you set, for example, if set to 2, it means the focus will be on a position of 0.5m
- default -- Focus to the default position relative to the lens hyperfocal length
--output, -o #Output filename <string>
Set the file name of the output image or video. In addition to setting the file name, you can also specify the udp or tcp server address for the output to output the image to the server. If you are interested, you can check the relevant setup instructions for subsequent tcp and udp.
For example: libcamera-vid -t 100000 -o test.h264
--wrap #Package the output file counter<number>
For example: libcamera-vid -t 0 --codec mjpeg --segment 1 --wrap 100 -o image%d.jpg
--flush #Refresh the output file immediately
--flush will write each frame image to the hard disk immediately while updating, reducing latency.
Example: libcamera-vid -t 10000 --flush -o test.h264
Still Picture Shooting Setting Parameters
--qiality, -q  #Set JPEG image quality <0 ~ 100>
--exif, -x #Add additional EXIF flags
--timelapse  #The time interval for taking pictures with time delay, the unit is ms
--framestart #The starting value of the frame count
--datetime  #Name the output file in date format
--timestamp #Name the output file with the system timestamp
-- restart  #Set the JPEG restart time interval
--keypress, -k  #Set Enter button to take a photo mode
--signal, -s  #Set signal to trigger photography
--thumb #Set thumbnail parameters <w:h:q>
--ebcoding, -e  #Sets the image encoding type jpg / png / bmp / rgb / yuv420
--raw, -r  #Save the original image
--latest #Associate the symbol to the latest saved file
--autofocus-on-capture  #Set to perform a focus action before taking a photo
Video Recording Image Setting Parameters
--quality, -q  #Set the JPEG quality <0 - 100>
--bitrate, -b  #Set H.264 bitrate
--intra, -g #Set internal frame period (only supports H.264)
--profile #Set H.264 configuration
--level  #Set H.264 level
--codec  #Set encoding type h264/mjpeg/yuv420
--keypress, -k  #Set Enter to pause and record
--signal, -s  #Set signal pause and recording
--initial #Start the program while recording or pausing
--split #Split the video and save it to another file
--segment #Split the video into multiple video segments
--circular  #Write the video into a circular buffer
--inline #Write data header in each I-frame (only supports H.264)
--listen #Wait for TCP connection
--frames #Set the number of frames recorded
- For more camera settings instructions, please refer to the Official camera documentation
Raspberry Pi Code Calling Camera
The Raspberry Pi official provides the picamera2 library, which is a Python library for the libcamera driver.
Note: Picamera2 only supports Raspberry Pi OS Bullseye mirroring.
Library Installation
Install picamera2, Picamera2 is now pre-installed in the latest versions of the Raspberry Pi OS Bullseye image, you can update the library via the terminal by doing the following:
sudo apt update
sudo apt upgrade
sudo apt install -y python3-picamera2
Use CSI Camera
Test CSI Camera
Before use, you need to open the terminal and enter the following command to check whether the camera is working properly
libcamera-hello -t 0
Implement Preview Window
Preview Window Parameters
- x - the x-offset of the preview window
- y - the y-offset of the preview window
- width - the width of the preview window
- height - the height of the preview window
- transform - allows camera images to be horizontally and/or vertically flipped on the display
All parameters are optional, and if omitted, the default value will be chosen. The following example will open an 800x600 pixel preview window at position (100, 200) on the display and enable horizontal mirroring for the preview image:
from picamera2 import Picamera2, Preview
from libcamera import Transform
picam2 = Picamera2()
picam2.start_preview(Preview.QTGL, x=100, y=200, width=800, height=600,
transform=Transform(hflip=1))
picam2.start()
Supported Transformations
- Transform () - Identity transformation, which is the default
- Transform (hflip=1) - flip horizontally
- Transform (vflip=1) - flip vertically
- Transform(hflip=1) - flip horizontally and vertically (equivalent to 180-degree rotation)
Notice: The display transformation here has no effect on the actual image. In the example above, the start_preview() function must be called before calling picam2.start(). If the camera's image aspect ratio is different from that of the preview window, they will be transformed into letter-boxed or pillar-boxed styles to maintain the appropriate aspect ratio.
NULL Preview
Normally it is the preview window that actually drives the libcamera system by receiving camera images, passing themto the application, and then recycling those buffers back to libcamera once the user no longer needs them. The consequence is then that even when no preview images are being displayed, something still has to run in order toreceive and then return those camera images. This is exactly what the NULL preview does. It displays nothing, it merely drives the camera system. If the system has not yet started the preview, you must open the backup preview window in advance. Actually, every time the camera system is started (picam2.start()), NULL Preview is automatically enabled. You can start the NULL preview explicitly like this:
from picamera2 import Picamera2, Preview
picam2 = Picamera2()
picam2.start_preview(Preview.NULL)
Enable and Disable Preview
The first parameter to the start_preview function can take the following values:
- None - no preview of any kind is started. The application would have to supply its own code to drive the camera system.
- False - the NULL preview is started.
- True - one of the three other previews is started.
It is not recommended to start and stop the preview window simultaneously, as frames from the camera are likely to be discarded during this period. The Start function accepts a show_preview parameter which can take on any one of these same values. This is just a convenient shorthand that allows the amount of boilerplate code to be reduced. Note that stopping the camera(Picamera2.stop) does not stop the preview window, so the stop_preview function would have to be called explicitly before it. For example, the following script would start the camera system running, run for a short while, and then attempt to auto detect which preview window to use in order actually to start displaying the images:
from picamera2 import Picamera2, Preview
import time
picam2 = Picamera2()
config = picam2.create_preview_configuration()
picam2.configure(config)
picam2.start() #Start camera capture
time.sleep(2) #Delay of 2 seconds for camera initialization completion
picam2.stop_preview() #Stop the camera preview to prevent the camera from being used up and the camera fails to be turned on
picam2.start_preview(True) #Start camera preview
time.sleep(2) #Close the camera in two seconds
High-level API for Picamera2
Picamera2 has some high-level and very convenient functions for capturing images and video recordings. You can capture an image with just a few lines of code:
from picamera2 import Picamera2
picam2 = Picamera2()
picam2.start_and_capture_file("test.jpg")
You can also capture multiple images with the start_and_capture_files function. Or, to record a five-second video:
from picamera2 import Picamera2
picam2 = Picamera2()
picam2.start_and_record_video("test.mp4", duration=5)
If you want to understand the underlying code, you can refer to the following code:
from picamera2 import Picamera2, Preview
import time
picam2 = Picamera2() #Create an instance of Picamera2
camera_config = picam2.create_preview_configuration() # Create camera preview configuration
picam2.configure(camera_config) # Configure the camera
picam2.start_preview(Preview.QTGL) # Start camera preview (using QTGL preview window manager)
picam2.start() # Start the camera
time.sleep(2) # Wait for 2 seconds to ensure the camera has started
picam2.capture_file("test.jpg")  # Take a photo and save it as "test.jpg"
Configure Camera
Picamera2 provides a number of configuration-generating methods that can be used to provide suitable configurationsfor common use cases:
- Picamera2. create_preview_configuration will generate a configuration for displaying camera preview images on the display, or prior to capturing a still image
- Picamera2. create_still_configuration will generate a configuration suitable for capturing a high-resolution still image
- Picamera2. create_video_configuration will generate a configuration suitable for recording video files
So, for example, to set up the camera to start delivering a stream of preview images you might use:
from picamera2 import Picamera2
picam2 = Picamera2()
config = picam2.create_preview_configuration()
picam2.configure(config)
picam2.start()
General Parameter Configuration
- transform - whether camera images are horizontally or vertically mirrored, or both (giving a 180 degree rotation).
- Transforms can be passed to all the configuration-generating methods using the transform keyword parameter. Picamera2 only supports the four transforms shown above. Other transforms (involving image transposition) exist butare not supported. If not specified, the transformation always defaults to an identity transformation. The code is as follows:
from picamera2 import Picamera2
from libcamera import Transform
picam2 = Picamera2()
preview_config = picam2.create_preview_configuration(transform=Transform(hflip=True))
- colour_space - the colour space of the output images. The main and lores streams must always share the samecolour space. The raw stream is always in a camera-specific colour space.
- The implementation of colour spaces in libcamera follows that of the Linux V4L2 API quite closely. Specific choices are provided for each of colour primaries, the transfer function, the YCbCr encoding matrix and the quantisation (or range). In addition, libcamera provides convenient shorthand forms for commonly used colour spaces:
>>> from libcamera import ColorSpace
>>> ColorSpace.Sycc()
<libcamera.ColorSpace 'sYCC'>
>>> ColorSpace.Rec709()
<libcamera.ColorSpace 'Rec709'>
These are in fact the only colour spaces supported by the Pi's camera system. The required selections can be passed to all configuration generation methods that use the color_space keyword parameter:
from picamera2 import Picamera2
from libcamera import ColorSpace
picam2 = Picamera2()
preview_config = picam2.create_preview_configuration(colour_space=ColorSpace.Sycc())
When omitted, Picamera2 will choose the default value based on the example used:
•create_preview_configuration and create_still_configuration will use the sYCC colour space by default (by which we mean sRGB primaries and transfer function and full-range BT.601 YCbCr encoding).
•create_video_configuration will choose sYCC if the main stream is requesting an RGB format. For YUV formats it will choose SMPTE 170M if the resolution is less than 1280x720, otherwise Rec.709.
- buffer_count - the number of buffers allocated for the camera system. A set of buffers represents that each requested stream has a buffer.
- The number defines how many sets of buffers (one for each requested stream) are allocated for the camera system to use. Allocating more buffer can mean the camera will run more smoothly with fewer dropped frames, though the downside is that there may not be enough available memory, especially at high resolutions.
•create_preview_configuration requests four sets of buffers
•create_still_configuration requests just one set of buffers (as these are typically large full resolution-buffers)
•create_video_configuration requests six buffers, as the extra work involved in encoding and outputting the video streams makes it more susceptible to jitter or delays, which is alleviated by the longer queue of buffers.
The number of buffers can be overridden in all the configuration-generating methods using the buffer_count keyword parameter:
from picamera2 import Picamera2
picam2 = Picamera2()
preview_config = picam2.create_still_configuration(buffer_count=2)
- queue - whether the system is allowed to queue frames for capturing requests.
- By default, Picamera2 keeps hold of the last frame to be received from the camera and, when you make a capture request, this frame may be returned to you. This can be useful for burst captures, particularly when an application is doing some processing that can take slightly longer than a frame period. In these cases, the queued frame can be returned immediately rather than remaining idle until the next camera frame arrives. But this does mean that the returned frame can come from slightly before the moment of the capture request, by up to a frame period. If this behaviour is not wanted, please set the queue parameter to False. For example:
from picamera2 import Picamera2
picam2 = Picamera2()
preview_config = picam2.create_preview_configuration(queue=False)
Note that, when the buffer_count is set to one, as is the case by default for still capture configurations, then no frames are ever queued up (because holding on to the only buffer would completely stall the camera pipeline).
- display - this names which (if any) of the streams are to be shown in the preview window. It does not actually affect the camera images in any way, only what Picamera2 does with them.
- Normally we would display the main stream in the preview window. In some circumstances it may be preferable to display a lower resolution image (from the lores stream) instead. We could use:
from picamera2 import Picamera2
picam2 = Picamera2()
config = picam2.create_still_configuration(lores={"size": (320, 240)}, display="lores")
This would request a full resolution main stream, but then also a QVGA lores stream which would be displayed (recall that the main stream is always defined even when the application does not explicitly request it). The display parameter may take the value None which means that no images will be rendered to the preview window. In fact this is the default choice of the create_still_configuration method.
- encode - this names which (if any) of the streams are to be encoded if a video recording is started. This too does not affect the camera images in any way, only what Picamera2 does with them.
- This is similar to the display parameter, in that it names the stream (main or lores) that will be encoded if a video recording is started. By default we would normally encode the main stream, but a user might have an application where they want to record a low resolution video stream instead:
from picamera2 import Picamera2
picam2 = Picamera2()
config = picam2.create_video_configuration(main={"size": (2048, 1536)}, lores={"size": (320,
240)}, encode="lores")
This would enable a QVGA stream to be recorded, while allowing 2048x1536 still images to be captured simultaneously. The encode parameter may also take the value None, which is again the default choice of the create_still_configuration method.
Autofocus Function
- Only applicable to cameras with autofocus
Autofocus controls obey the same general rules as all other controls. These controls should work correctly so long as the version of libcamera being used (such as that supplied by Raspberry Pi) implements libcamera's published autofocus API correctly, and the attached camera module actually has autofocus (such as the Raspberry Pi Camera Module 3). Camera modules that do not support autofocus (including earlier Raspberry Pi camera modules and the HQ camera) will not advertise these options as being available (in the Picamera2.camera_controls property), and attempting to set them will fail. For example, to put the camera into continuous autofocus mode:
from picamera2 import Picamera2
from libcamera import controls
import time
picam2 = Picamera2()
config = picam2.create_preview_configuration()
picam2.configure(config)
picam2.start(show_preview=True)
picam2.set_controls({"AfMode": controls.AfModeEnum.Continuous})
time.sleep(2)
USB Camera
Picamera2 has limited supported for USB cameras such as webcams. You can connect several USB cameras and CSI2cameras (the latter to a Pi's dedicated camera ports) at the same time. You can create the Picamera2 object in the usual way, but only the main stream will be available. The supported formats will depend on the camera, but Picamera2 can in principle deal with both MJPEG and YUYV cameras, and where the camera supports both you can select by requesting the format "MJPEG" or "YUYV". USB cameras can only use the software-rendered Qt preview window (Preview.QT). None of the hardware assisted rendering is supported. MJPEG streams can be rendered directly, but YUYV would require OpenCV to be installed in order to convert the image into a format that Qt understands. Both cases will use a significant extra amount of CPU. The capture_buffer method will give you the raw camera data for each frame (a JPEG bitstream from an MJPEG camera, or an uncompressed YUYV image from a YUYV camera). A simple example:
from picamera2 import Picamera2, Preview
picam2 = Picamera2()
config = picam2.create_preview_configuration({"format": "MJPEG"})
picam2.configure(config)
picam2.start_preview(Preview.QT)
picam2.start()
jpeg_buffer = picam2.capture_buffer()
If you have multiple cameras and need to discover which camera to open, please use the Picamera2.global_camera_info method. In general, users should assume that other features, such as video recording, camera controls that are supported on Raspberry Pi cameras, and so forth, are not available. Hot-plugging of USB cameras is also not supported - Picamera2 should be completely shut down and restarted when cameras are added or removed.
- For more details, please click Picamera2 manual
FAQ
Question: What is the role of the blue filter that comes with the RPi NoIR Camera V2?
Please see the Raspberry Pi official documentation: https://www.raspberrypi.org/blog/whats-that-blue-thing-doing-here/
Support
Monday-Friday (9:30-6:30) Saturday (9:30-5:30)
Email: services01@spotpear.com
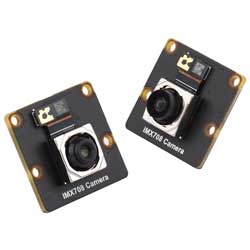
[Tutorial Navigation]
- Hardware Connection
- About the Model
- Test Camera
- Test Camera (Bullseye System)
- Test Camera (Bookworm System)
- Preface
- Call Camera
- libcamera-hello
- libcamera-jpeg
- libcamera-still
- libcamera-vid
- libcamera-raw
- General Command Setting Options
- Still Picture Shooting Setting Parameters
- Video Recording Image Setting Parameters
- Raspberry Pi Code Calling Camera
- Library Installation
- Use CSI Camera
- Test CSI Camera
- Implement Preview Window
- Preview Window Parameters
- High-level API for Picamera2
- Configure Camera
- Autofocus Function
- USB Camera
- Resources
- FAQ
- Support