


- sales/support
Google Chat:---
- sales
+86-0755-88291180
- sales01
sales@spotpear.com
- sales02
dragon_manager@163.com
- support
tech-support@spotpear.com
- CEO-Complaints
zhoujie@spotpear.com
- Only Tech-Support
WhatsApp:13246739196
- Purchase/Shipping/Refund
WhatsApp:13424403025
Raspberry Pi Compute module 4CM4 IO Board User Guide
Write Image for Compute Module Boards eMMC version
1. The switch go to slave
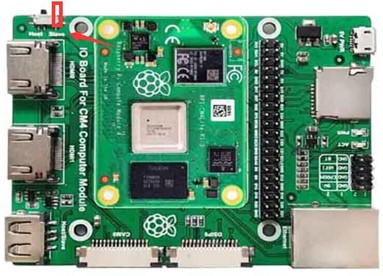
2. Connect USB to your computer by USB Adapter
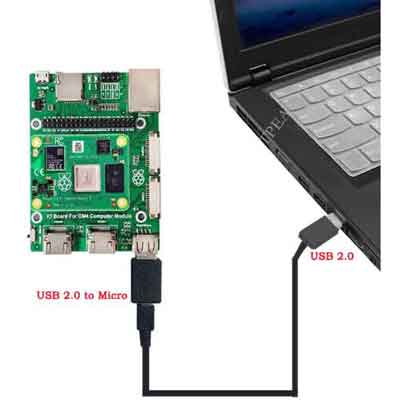
3. Install and run the rpiboot, the computer recognizes the CM4 as a U disk, and then you can write an image to the CM4.
CM4 Camera and DSI configuration
1. Put dt-blob.bin to /boot/
CM4 USB enable
USB2.0 is closed by default, if you need to open it, you need to add dtoverlay=dwc2,dr_mode=host at config.txt
TAG:
Raspberry Pi Buzzer
Desktop
Raspberry Pi Compute Module 4 CM4 IO Board Dual Gigabit Ethernet Mini Router Board
ESP32 S3 Development Board 2.1 inch Round Rotary Knob LCD Smart Screen 2.1inch Display 480x480 LVGL for Arduino
Round Rotary LCD touch screen 1.28inch 1.6inch 2.1inch Knob central control lighting LCD
Raspberry Pi PICO
Jetson Nano 5G module
Raspberry Pi 5 Sound Card
Spotpear
Raspberry Pi 5 Camera
7.5 inch Passive NFC e-Paper BW Display 7.5inch E-ink Screen No Need Battery Wireless Powered Data Transfer
spotpear
SPI Communication
ESP32 P4 Development Board 7-inch LCD Display 1024×600 7inch Touchscreen ESP32-C6 WiFi6 AI Deepseek
NVIDIA Jetson
Milk-V Duo S Extend Partition on SD Card or eMMC
NanoKVM-Lite
LCD1602 I2C Module PWM Adjustable backlight 3.3V/5V For Arduino/ Raspberry Pi/ Pico/ Jetson Nano/ ESP32
Raspberry Pi UGV Rover ROS2 PT AI OpenCV Robot Car MediaPipe
0.85inch LCD
TAG:
ESP32-C6 Zero B Mini Wide Voltage Board Supports WiFi 6 and Bluetooth 5
Raspberry Pi 5 Rainbow Acrylic Case Colorful Translucent Acrylic Case Supports Installing Official Active Cooler
etc.
Mobile Robot
ESP32-C6 WiFi 6 ESP32-C6-Zero Super-Mini ESP32-C6FH4 WiFi 6 Bluetooth 5
XIAO MG24 MG24-Sense EFR32MG24 Ultra-Low-Power IMU Micphone Antenna Matter zigbee BLE Seeed Studio Arduino
2.42inch OLED Display
Raspberry Pi AF Camera
Milk-V Duo Distributor
ESP32 1.54 inch ePaper Watch
Raspberry Pi
Raspberry Pi 5 PCIe to M.2 NVMe SSD
GPU Monitor Screen
Jetson Nano Cooler
Raspberry Pi Buzzer
Raspberry Pi 5 5-layer Case
Industrial UART To WiFi
OLED-LCD-HAT-A
MPS2280 POE Raspberry Pi 5 PCIe M.2 NVMe SSD Pi5 2280 2242 2230
Raspberry Pi Autofocus Camera