


- sales/support
Google Chat:---
- sales
+86-0755-88291180
- sales01
sales@spotpear.com
- sales02
dragon_manager@163.com
- support
tech-support@spotpear.com
- CEO-Complaints
zhoujie@spotpear.com
- Only Tech-Support
WhatsApp:13246739196
- Purchase/Shipping/Refund
WhatsApp:13424403025
- HOME
- >
- ARTICLES
- >
- Common Moudle
- >
- Camera
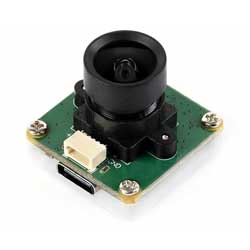
OS05A10 5MP USB Camera (A) User Guide
Specifications
- Pixels: 5MP
- Sensor chip: OS05A10
- DSP: Auto gain/exposure/white balance
- Camera:
- CCD size: 1/2.7inch
- Aperture (F): 2.7
- Focal length (EFL): 2.88mm
- Field of View (FOV): 96° (D)
- Distortion: < -0.2%
- Focus mode: Fixed focus
- Interface type: USB2.0/SH1.0 4P
- Image:
- Supported image formats: MJPG, YUY2
- Static image resolution: 2592 × 1944
- Video recording (MJPG):
- 30 FPS 2592 × 1944
- 30 FPS 1920 × 1080
- 30 FPS 1280 × 720
- Operating voltage: 5V ± 5%
- Operating temperature: 0°C ~ 50°C
- Dimensions: 25.00 × 25.00 × 22.1 (mm)
- Supported systems: Windows, Linux, macOS
Working with Windows PC
Test Software
Currently, a camera app is generally pre-installed on most Windows 10 systems. You can simply open this built-in Windows camera app to perform testing.
If you are using Windows 7 or cannot find the camera app in the system, you can download and install the AMCAP test software provided by us from Resources->Software.
Test Steps
- Window camera software
- Search for "Camera" to open the software
- Click the gear icon in the upper left corner to open the settings interface, where you can set the resolution for taking pictures or videos

- Click the video or capture icon on the right to switch between recording and shooting
- AMCap software
- Download and install AMCap software
- You can click on the Option option and select Video Capture Pin... or Still Capture Pin... to set the parameters of the image and video

Working with Raspberry Pi
Preview with Plugins
- Open the Raspberry Pi terminal, enter the command to install the luvcview software
- sudo apt-get install luvcview -y
- After installation, enter the command on the terminal to open the software for USB camera testing
- sudo luvcview -s 1920x1080

Preview with Scripts
- Install opencv
sudo apt-get install python3-opencv
- Download the demo and test
wget https://files.waveshare.com/wiki/common/Usb_camera_examples.zip
unzip Usb_camera_examples.zip
cd Usb_camera_examples
sudo python3 Usb_camera_examples.py
Working with Jetson Nano Developer Kit
Preview with Commands
- Open the Jetson Nano Developer Kit terminal (open with Ctrl+Alt+T or mouse click)
- Input the following command to preview:
- nvgstcapture-1.0 --camsrc=0
- After inputting, a preview window will open

Preview with Scripts
- Install opencv
sudo apt-get install python3-opencv
- Download the demo and test
wget https://files.waveshare.com/wiki/common/Usb_camera_examples.zip
unzip Usb_camera_examples.zip
cd Usb_camera_examples
sudo python3 Usb_camera_examples.py
Note: In practical application, you may need to call with a program, and you can refer to Opencv and other related image processing library materials by yourself
Resources
Documents
Software
FAQ
Question: If the hand touches the back of the PCB, will the camera display abnormalities?
Answer:
- Avoid touching the components on the PCB backside to prevent affecting electrical performance
Question: Does the module get hot during use?
Answer:
- During use, the module heats up significantly and may feel hot, which is normal.
Question: Why can't I control parameters like brightness, contrast, etc.?
Answer:
- If you are using Mac and Opencv, some parameter settings cannot be used, it is recommended to use Linux and V4L2 drivers.
Support
Monday-Friday (9:30-6:30) Saturday (9:30-5:30)
Email: services01@spotpear.com
TAG:
Raspberry Pi 5 5V5A
Arduino Thermal imaging
STM32 downloader
SpotPear
Raspberry Pi 7 inch HMI industrial DSI Display LCD 7inch TouchScreen Computer 720×1280
Raspberry Pi 500 (US) refined personal computer.built into a high-quality Keyboard
USB IR Infrared Thermal Imaging Camera C 45°/88° 160x120 For Phone/PC High Temp Warning/Take Photo /Recording video
Raspberry Pi 5 PD Power
ESP32 ST7789
Raspberry Pi 5
TVBOX Kit Luckfox Pico Ultra And 4inch LCD RGB Captive TouchScreen Display
ESP32 S3 R8 MP3 Board 2.8inch LCD TouchScreen Display Speaker/SD-Card/Battery/QMI8658-6-Axis-Sensor
ESP32 Thermal imaging
Sensor
ESP32-S3 LCD Driver Board RGB/SPI N8R8 For 2.1/2.8/4inch Captive TouchScreen Display Round
Dual-MCU-Board
ADXL354C Dev Board
ESP32 0.85inch LCD
Core3566104000
Industrial Modbus RTU 8 ch Relay Module
[Tutorial Navigation]
- Specifications
- Working with Windows PC
- Working with Raspberry Pi
- Working with Jetson Nano Developer Kit
- Resources
- FAQ
- Question: If the hand touches the back of the PCB, will the camera display abnormalities?
- Question: Does the module get hot during use?
- Question: Why can't I control parameters like brightness, contrast, etc.?
- Support