- sales/support
Google Chat:---
- sales
+86-0755-88291180
- sales01
sales@spotpear.com
- sales02
dragon_manager@163.com
- support
tech-support@spotpear.com
- CEO-Complaints
zhoujie@spotpear.com
- Only Tech-Support
WhatsApp:13246739196
- Purchase/Shipping/Refund
WhatsApp:13424403025
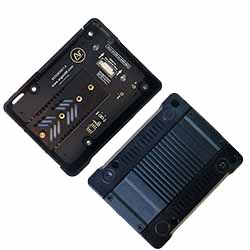
Argon-NEO-M.2-NVME-PCIE-Expansion-Board User Guide
PI5-CASE-ARGON-NEO
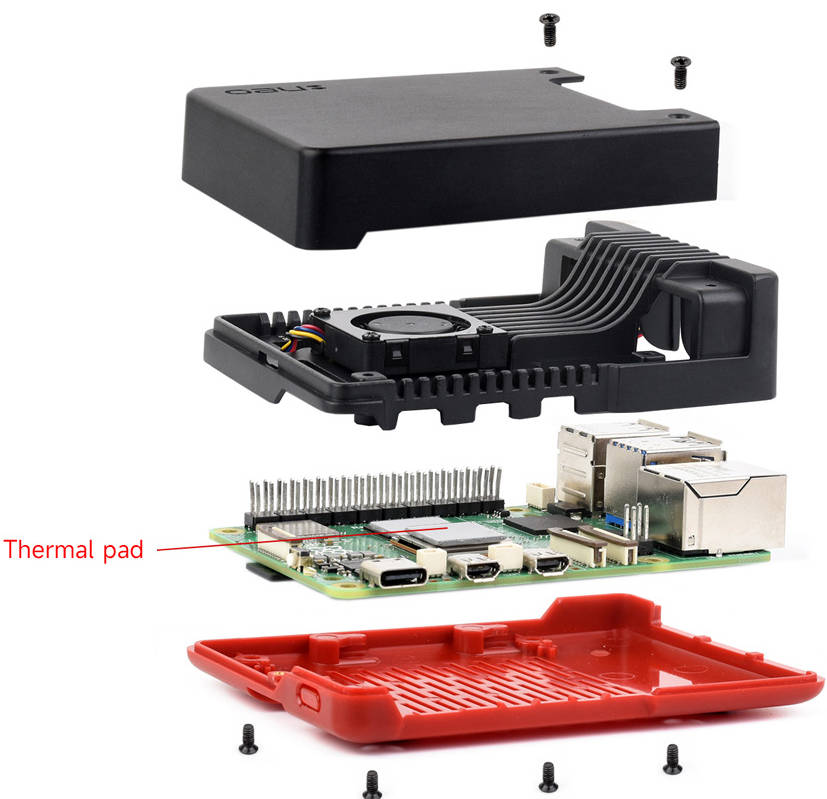
Note: Please assemble the case before inserting the SD card!!!
User Manual
Assembly Guide
How to Assemble PI5-CASE-ARGON-NEO Case
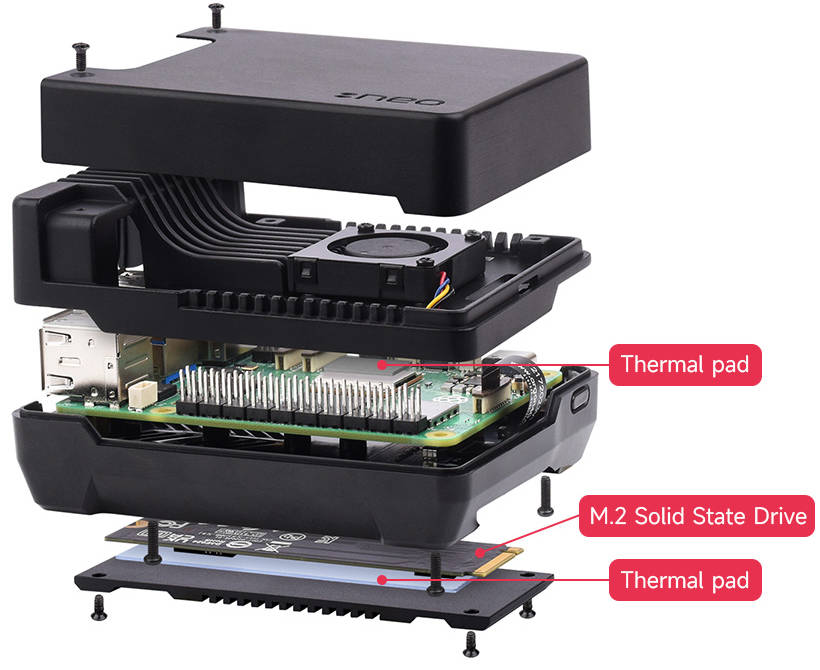
How to Assemble PI5-CASE-ARGON-NEO-M.2 Case
Software Setting
Program Bookworm System
- Insert the TF card onto the PC and then click here to program the corresponding system imager.
- After writing the image, save it and then remove the TF card.
- Insert the TF card into the card slot after assembling the case.
- Connect the matched power adapter to boot the system.
- Note: Due to the case thickness, please ensure that the Type-C connector is fully inserted. Otherwise, poor contact at the Type-C interface will prevent the device from powering on normally.
Install ARGON NEO Power Button and Fan Control Script
Step 1: Configure EEPROM to Improve Power Supply and Boot From NVMe
- Connect to the network, please ensure Raspberry Pi Time is updated and execute the following code at the terminal:
curl https://download.argon40.com/argon-eeprom.sh | bash
sudo reboot
Step 2: Install Argon Control Script and Config.txt Setting
- Connect the network and execute the following code at the terminal:
curl https://download.argon40.com/argonneo5.sh | bash
sudo reboot- To modify the setting, you can input the following commands:
argonone-config
- To delete the driver demo, you can input the following commands:
argonone-uninstall
- Note: Please reboot the system to make the setting effective after modifying the configuration or uninstalling any items.
FAQ
Answer:
1. Check the hardware connection: please ensure that the PCIe cable is oriented correctly and fully inserted into the connector.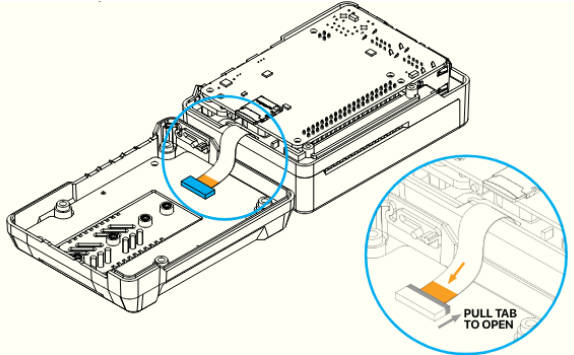
2. Check software driver: configure the EEPROM setting to improve the power supply and boot from NVMe.
- Connect to the network and ensure that Raspberry Pi Time is updated and execute the following code at the terminal:
curl https://download.argon40.com/argon-eeprom.sh | bash
sudo reboot
Note: Please reboot the system to make the setting effective.
Answer:
AData Legend 700
AData Legend 800
AData XPG SX8200 Pro
Axe Memory Generic Drive
Crucial P2 M.2
Crucial P3 M.2
Crucial P3 Plus M.2
Inland PCIe NVMe SSD
Kingston KC3000
Kioxia Exceria NVMe SSD
Kioxia Exceria G2 NVMe SSD
Lexar NM620
Lexar NM710
Netac NV2000 NVMe SSD
Netac NV3000 NVMe SSD
Origin Inception TLC830 Pro NVMe
Patriot P300
Patriot P310
PNY CS1030
Sabrent Rocket 4.0
Sabrent Rocket Nano
Samsung 980
Samsung 980 Pro (500GB/1TB)
Team MP33
Western Digital Black SN750 SE (Phison Controller)
Support
Monday-Friday (9:30-6:30) Saturday (9:30-5:30)
Mobile: +86 13434470212
Email: services01@spotpear.com
TAG:
DeepSeek XiaoZhi AI Voice Chat Robot BOX ESP32-S3 Development Board 1.85 inch Round LCD N16R8
Raspberry Pi Autofocus Camera
SpotPear
Jetson Nano Case
ESP32-S3 Display
Raspberry Pi 5 Serial
RP2040
BPI
Milk V
ESP32 C6 Development Board 1.43 inch AMOLED QSPI Display 1.43inch TouchScreen Dual MIC AudioI Deepseek N16R8
Raspberry-Pi-Pico-W-webserver
Industrial-grade isolated 2-way RS485 hub repeater One RS485 TO Two RS485
X1012 Raspberry Pi 5 POE And PCIe to M.2 NVMe SSD Board Pi5 2280 Power over Ethernet
Spotpear
LuckFox Core3566
DeepSeek AI Voice Chat ESP32 S3 Development Board 1.83 inch TouchScreen Display 240x284
ESP32 S3 Development Board 1.85 inch Round LCD Display 360×360 QMI8658 Sensor / MIC / SD /MP3 Audio /Battery Port LVGL/HMI For Arduino
SpotPear
USB to UART
Raspberry Pi Pico