- sales/support
Google Chat:---
- sales
+86-0755-88291180
- sales01
sales@spotpear.com
- sales02
dragon_manager@163.com
- support
tech-support@spotpear.com
- CEO-Complaints
zhoujie@spotpear.com
- Only Tech-Support
WhatsApp:13246739196
- Purchase/Shipping/Refund
WhatsApp:13424403025
- HOME
- >
- ARTICLES
- >
- Common Moudle
- >
- GSM-GPS
EC200U-EU-C4-P01 User Guide
Overview
Introduction
The EC200U-EU C4-P01 development board is equipped with EC200U-EU LTE Cat 1 wireless communication module, with maximum data rate up to 10 Mbps downlink and 5 Mbps uplink, supports multi-mode & multi-band and is cost-effective. Designed in the compact and unified form factor, compatible with Quectel multi-mode LTE Standard EC20-CE. Onboard Type-C port for easy development with just a USB Type-C cable. Onboard 40PIN GPIO pin header which is compatible with most Raspberry Pi HATs.
Features
- Equipped with EC200U-EU LTE Cat 1 wireless communication module, multi-mode & multi-band support.
- Onboard 40PIN GPIO header, compatible with most Raspberry Pi HATs.
- 5 LEDs for indicating module operating status.
- Supports TCP, UDP, PPP, NITZ, PING, FILE, MQTT, NTP, HTTP, HTTPS, SSL, FTP, FTPS, CMUX, MMS protocols, etc.
- Supports GNSS positioning (GPS, GLONASS, BDS, Galileo, QZSS).
- Onboard Nano SIM card slot and eSIM card slot, dual card single standby.
- Onboard MIPI connector for connecting MIPI screen and is fully compatible with Raspberry PI peripherals.
- Onboard camera connector, supports customized SPI cameras with a maximum of 300,000 pixels.
- Provides tools such as QPYcom, Thonny IDE plugin, and VSCode plugin, etc. for easy learning and development.
- Comes with online development resources and manual (example in QuecPython).
Parameters
| Model | BG95-M3 | EC200U-EU | EC200U-AU |
|---|---|---|---|
| Applicable Region | Global | Europe, Middle East, Africa, Australia, New Zealand, Brazil | Australia/Latin America |
| FREQUENCY BAND | |||
| LTE-FDD | Cat M1: B1, B2, B3, B4, B5, B8, B12, B13, B18, B19, B20, B25, B26, B27, B28, B66, B85 Cat NB2: B1, B2, B3, B4, B5, B8, B12, B13, B18, B19, B20, B25, B28, B66, B71, B85 | B1, B3, B5, B7, B8, B20, B28 | B1, B2, B3, B4, B5, B7, B8, B28, B66 |
| LTE-TDD | N/A | B38, B40, B41 | |
| GSM / GPRS / EDGE | 850, 900, 1800, 1900 MHz | GSM: B2, B3, B5, B8 | |
| GNSS | GPS, GLONASS, BDS, Galileo, QZSS | ||
| Bluetooth | N/A | Bluetooth 4.2 (BR/EDR) | |
| Wi-Fi Scan | N/A | 2.4 GHz 11b (Rx) | |
| DATA TRANSMISSION | |||
| CAT 1 | N/A | LTE-FDD: DL 10 Mbps; UL 5 Mbps LTE-TDD: DL 8.96 Mbps; UL 3.1 Mbps | |
| NB-IoT | Cat NB2: DL 127 Kbps; UL 158.5 KbpsCat NB1: DL 32 Kbps; UL 70 Kbps | N/A | |
| Cat-M | DL 588 Kbps; UL 1119 Kbps | N/A | |
| GSM / GPRS / EDGE | EDGE: DL 296 Kbps; UL 236.8 Kbps GPRS: DL 107 Kbps; UL 85.6 Kbps | GSM: DL 85.6 Kbps; UL 85.6 Kbps | |
| OTHERS | |||
| Type-C USB Port | Supports AT commands testing, GNSS positioning, firmware upgrading, etc. | ||
| Communication Protocol | PPP, TCP, UDP, SSL, TLS, FTP(S),HTTP(S), NITZ, PING, MQTT, LwM2M, CoAP, IPv6 | TCP, UDP, PPP, NITZ, PING, FILE, MQTT, NTP, HTTP, HTTPS, SSL, FTP, FTPS, CMUX, MMS | |
| SIM Card | Nano SIM card (supports 1.8V only) | Nano SIM and eSIM, dual card single standby | |
| Indicator | SIM_CHK: lights up when a SIM card is inserted into the card slot NET: Network indicator PSM: Sleep indicator PWM: PWM function indicator PWR: Power indicator | P01: Module Pin 1, default as EC200A-XX PWM0 P05: Module Pin 5, NET_MODE indicator SCK1: SIM1 detection indicator, lights up when SIM1 card is inserted SCK2: SIM2 detection indicator, lights up when SIM2 card is inserted PWR: Power indicator | |
| Buttons | PWK: Power ON/OFF PON: PSM wake-up BOOT: Forcing into firmware flashing mode USB ON/OFF: USB power consumption detection switch | PWK: Power ON/OFF RST: Reset BOOT: Forcing into firmware flashing mode USB ON/OFF: USB power consumption detection switch | |
| Antenna Connectors | LTE main antenna + DIV antenna + GNSS antenna | LTE main antenna + DIV / WIFI (scanning only) / Bluetooth antenna + GNSS antenna | |
| Operating Temperature | -30 ~ 75°C | ||
| Storage Temperature | -45 ~ 90°C | ||
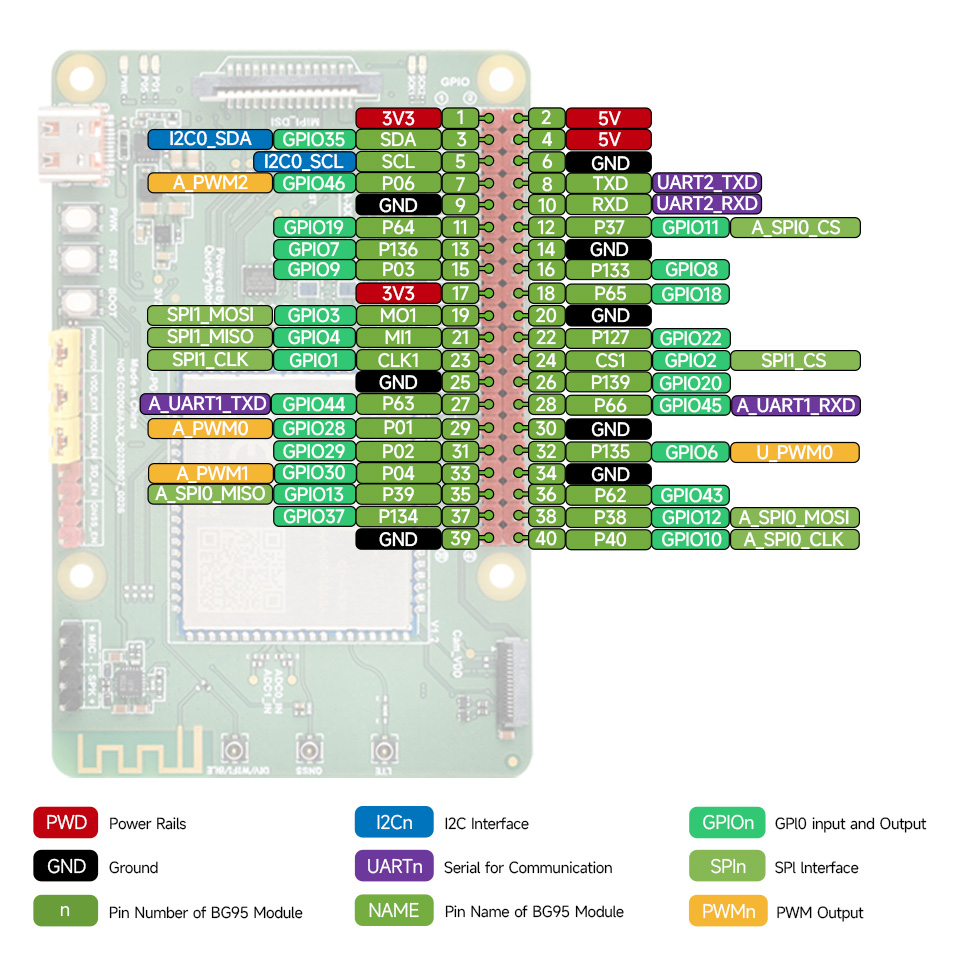
Pinout Definition
Qpycom Development
Hardware Preparation
- Power Supply: Connect the development board to the USB interface of the PC with a USB Type-C cable.
- Short the two pins of PWR_AUTO, the board auto turns on, or long press the PWR button to boot upon supplying power. It is recommended that the time interval between power-on and pressing the PWR button is not less than 30ms.
- After following the above steps, wait for the power indicator PWR on the board to light up.
Driver Installation
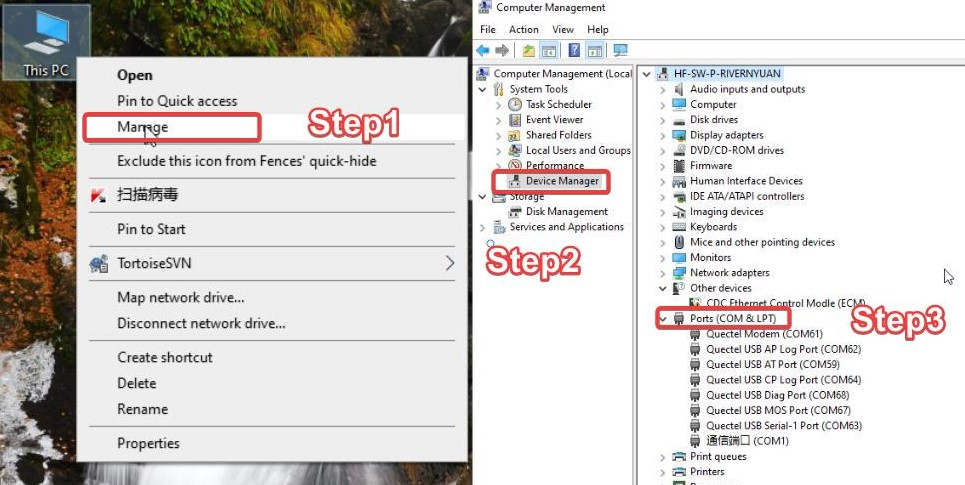
- Download and unzip the driver. Find "setup.exe" or "setup.bat", and double-click on it to run. After installation, opening Device Manager will show that the yellow exclamation mark on the "Ports" in "Device Manager" has disappeared, indicating successful installation and normal communication capability.
- It is normal that the Mobile ECM Network Adapter or CDC Ethernet Control Modle (ECM) is not recognized, which will not affect the firmware programming or development.
- Right-click on "This PC", and select "Manager" -> "Device Manager" -> "Ports (COM&LPT)".
- Following the steps as shown in the figure, if you can refresh and see serial ports starting with "Quectel USB" in the list, it indicates the successful installation of the USB drivers:
Download QPYcom
Please download QPYcom. After decompression, double-click the Qpycom.exe file to open it. No installation is required.
Download and Flash Firmware
The module typically comes with standard AT firmware or QuecOpen firmware at the factory. If you want to develop based on QuecPython, you'll need to manually flash it with the dedicated QuecPython firmware.
- Get the Firmware
Click on the download button in the download column. Upon successful download, you will get a compressed file (zip package) named after the firmware name. You'll need to extract this file. After extraction, you'll obtain two files: one in pac format, which is the QuecPython firmware for EC200U-XX, and the other in md format, which is the update log.
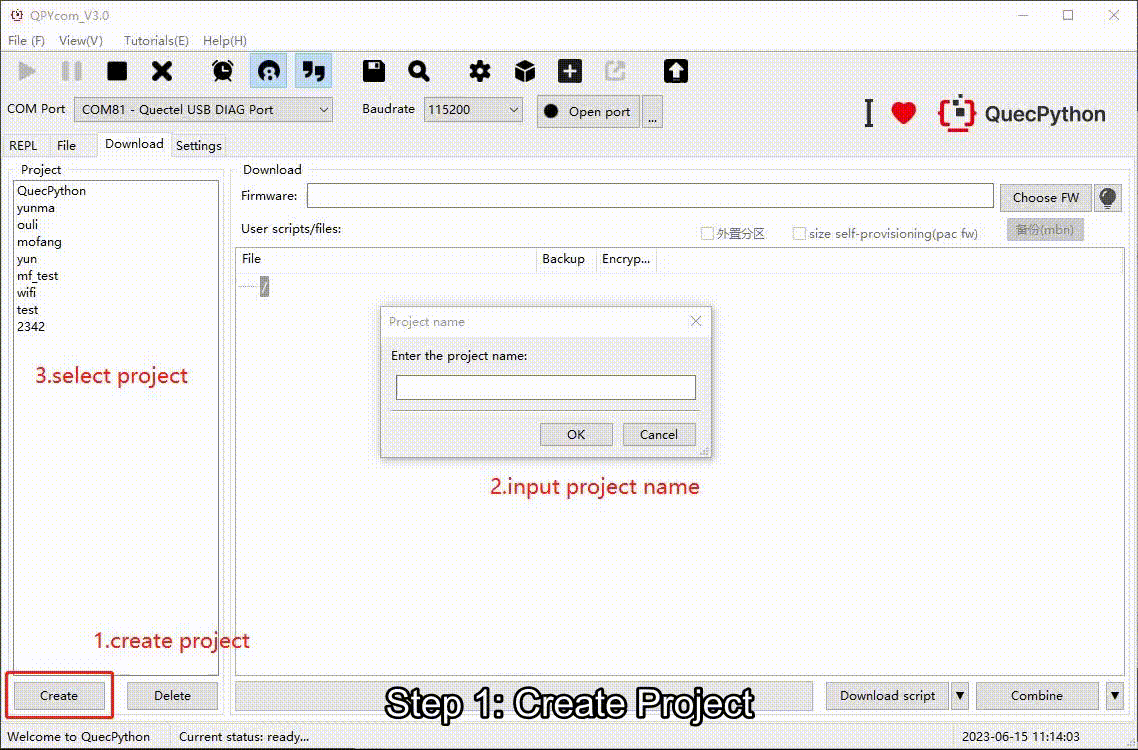
- Create Project
Firstly, ensure that the module is connected properly and powered on. Open the QPYcom tool and navigate to the download page. Click on "Create Project" to create a new firmware project. You can customize the project name. Once the configuration is complete, make sure to save it persistently.
- Select Firmware
Select the firmware to be downloaded (please select the one according to your module), the unzipped PAC file for EC200U-XX series modules.
- Set Download Mode
- Click on the dropdown arrow to the right of "Download script" and select "Download FW" from the options.
- Flash Firmware
After clicking "Download FW," the firmware download process will begin. You'll see a progress bar and percentage display indicating the progress. Wait for the download to complete, and a pop-up window will notify you of successful download. For certain firmware like BC25, you may need to open the firmware download serial port before clicking "Download FW." If you click directly, it will prompt you to open the serial port.
Entry Test
Edit the First Script
Create helloworld.py file and output "hello world", print "hello world", and the script as shown below:
print("hello world")
Download the above file to the module and then run it on the QPYcom.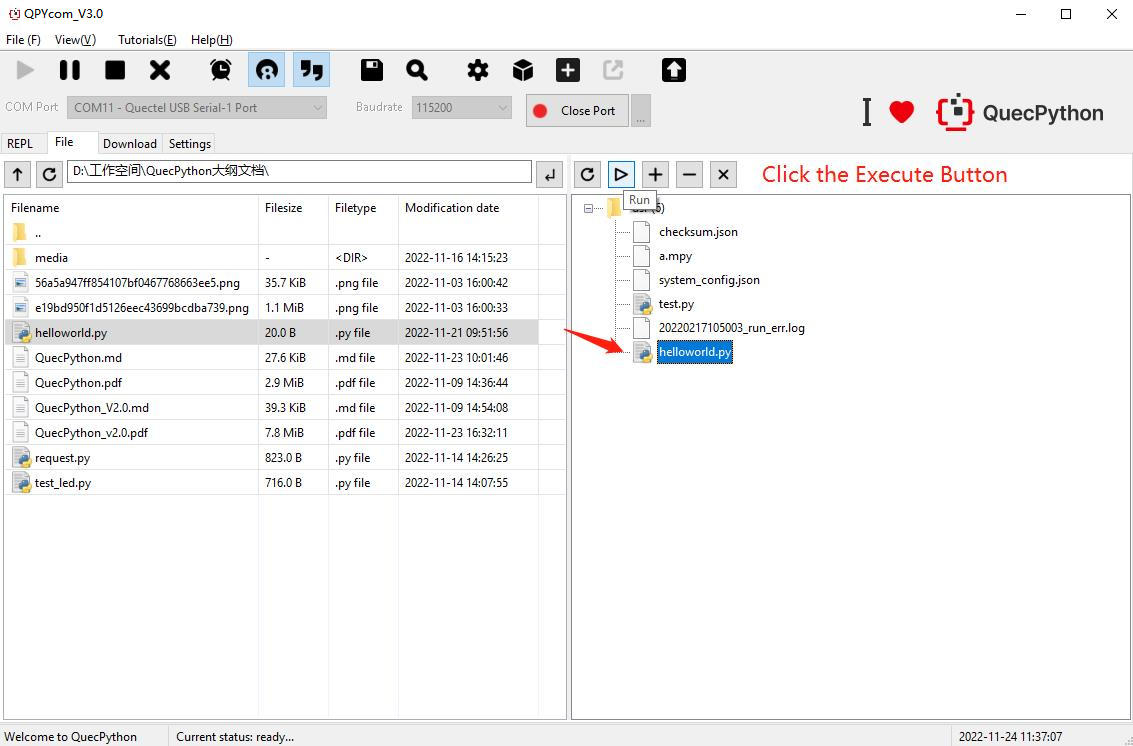
File Transmission Between PC and Module
- Step 1: Open Serial Port
Select the module's COM port and click the "Open Serial Port" button.
- Step 2: Downloading via the Tool Buttons
You can upload and delete files using the "+" and "-" buttons at the top right of the file page.
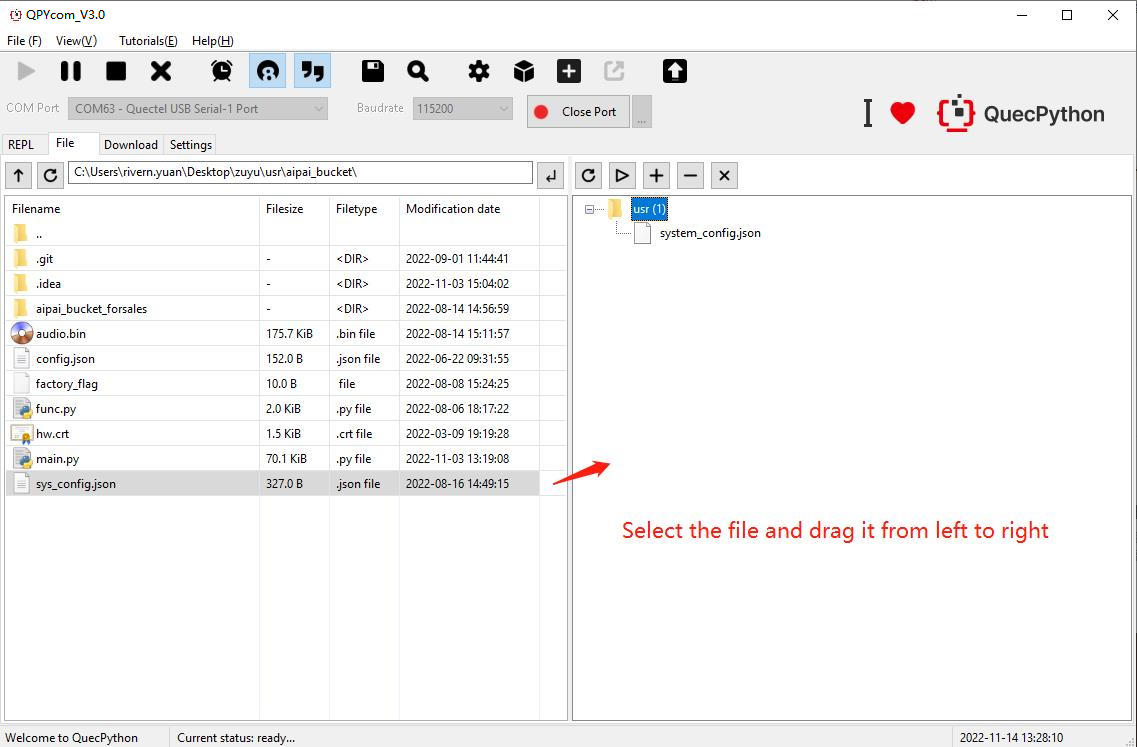
- Step 3: Downloading via Drag-and-Drop
You can also drag and drop local files displayed on the left side of the file page directly into the module on the right side (you can also drag and drop folders).
- Step 4: Download Progress and Result
During the download process, the status bar will display the file name being downloaded and the progress.
Execute the Script
- Step 1: Download the script.
Download the script file to be executed to the module following the above steps.
- Step 2: Run the script through repl.
After opening the serial port, execute the script file by entering the following code in the QPYcom interaction page.
import example
example.exec("/usr/helloworld.py") # filePath is the path of the file to run
- Step 3: Execute the script through GUI tool.
You can also execute script files through the QPYcom file page. In the tool's file page, select the script file you want to execute, then click the "▷" button. The result will be displayed as shown in the image.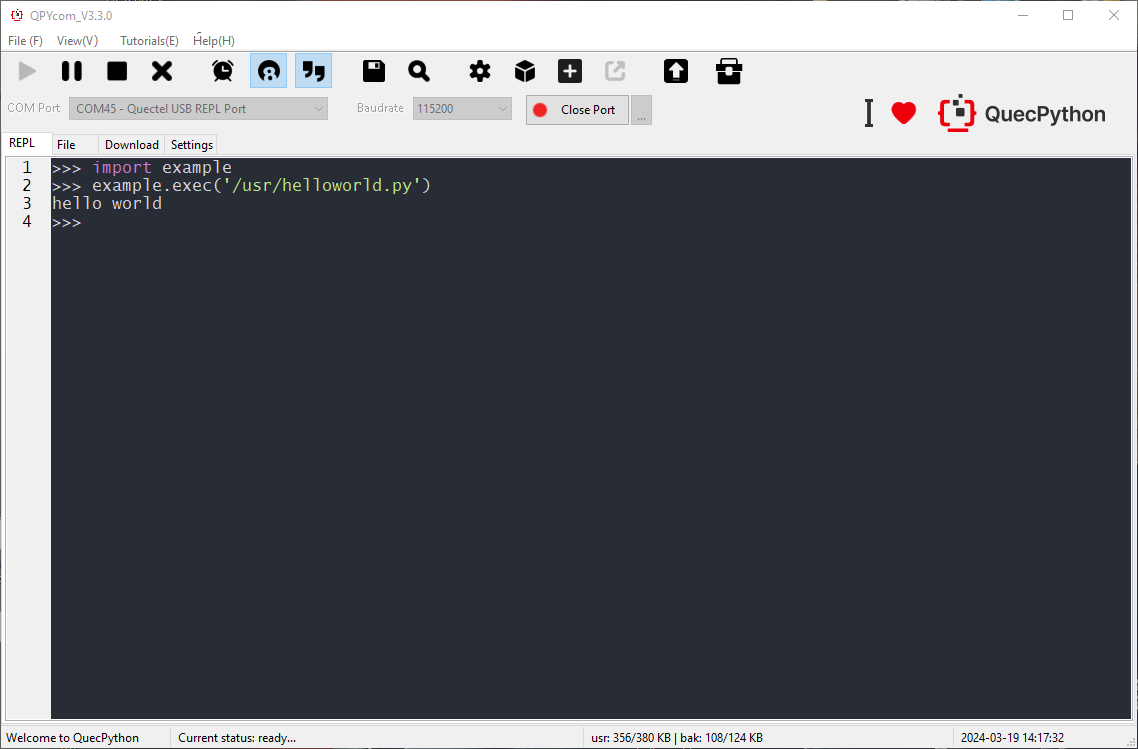
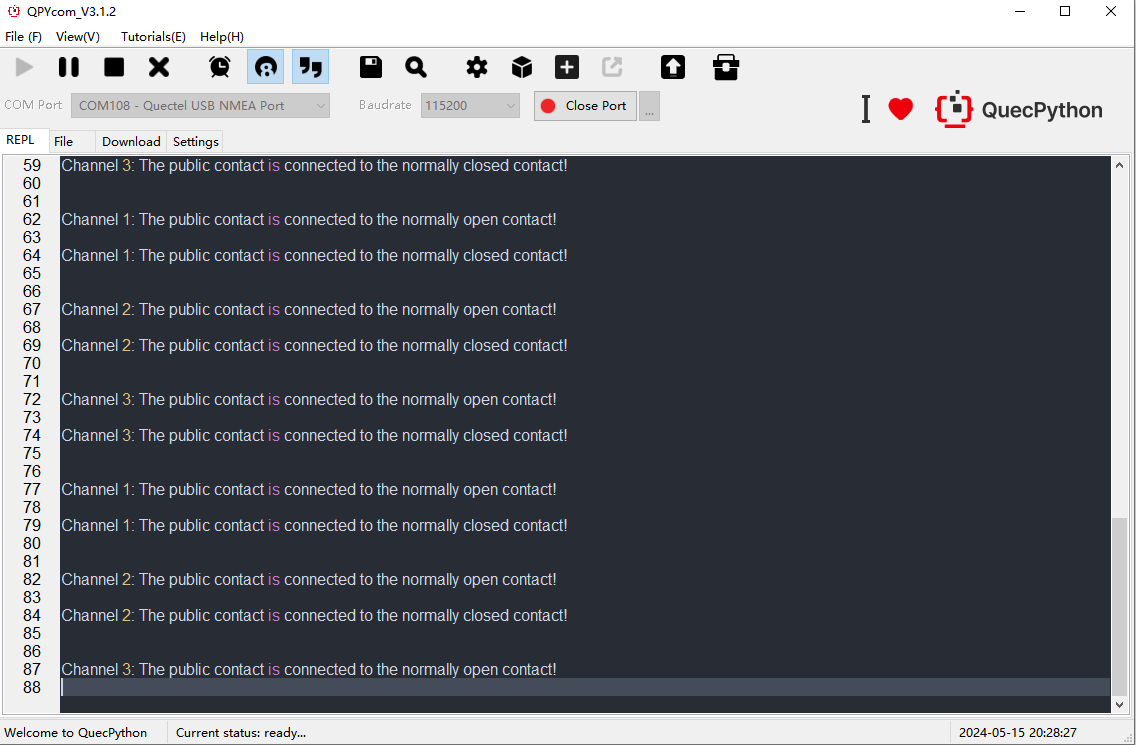
Relay Connection Test
- Hardware connection:
Connect the development board and the RPi Relay Board through 40PIN GPIO pins, and then connect the development board to the PC with a USB cable, as shown below: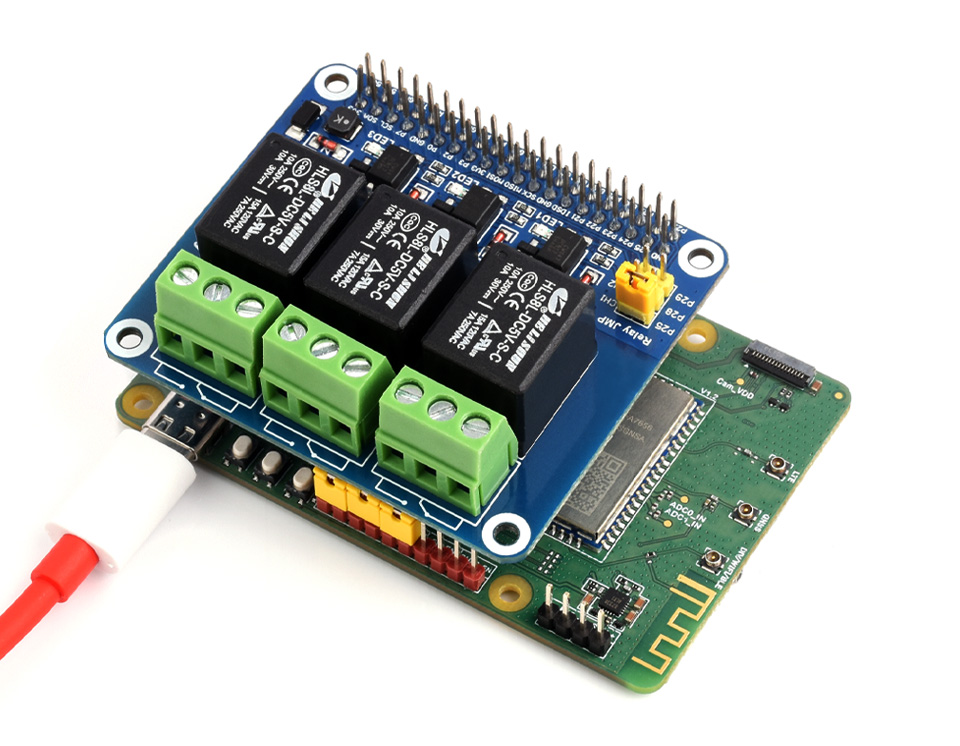
- Download the demo to the development board, run it and then the three relays will flip one by one.
Resource
Demo
Software
Datasheet
Support
Monday-Friday (9:30-6:30) Saturday (9:30-5:30)
Email: services01@spotpear.com