




- sales/support
Google Chat:---
- sales
+86-0755-88291180
- sales01
sales@spotpear.com
- sales02
dragon_manager@163.com
- support
tech-support@spotpear.com
- CEO-Complaints
zhoujie@spotpear.com
- Only Tech-Support
WhatsApp:13246739196
- Purchase/Shipping/Refund
WhatsApp:13424403025
3.5inch RPi LCD (A) Manual Configuration
For Bullseye 64-bit System
Install Imager
Please download the bullseye imager 64-bit from Raspberry Pi website.
1) Download it on the PC and unzip it to get the ".img" file.
2) Connect the TF card to the PC, open Win32DiskImager.exe software, select the system image downloaded in step 1, and click 'Write' to write the system image. Then, open the TF card file folder.
3) Download and unzip the waveshare35a.dtbo device tree file to add it to the /boot/overlay folder.
4) Connect the TF card to the Raspberry Pi, boot the Raspberry Pi, and log in to the Raspberry Pi terminal (you can connect the Raspberry Pi to the HDMI display or use SSH to remotely login).
Configure Driver File
Open the "config.txt" file under the boot directory, comment out "dtoverlay=vc4-kms-v3d", and add the following at the end of [all]:
dtparam=spi=on
dtoverlay=waveshare35a

hdmi_force_hotplug=1
max_usb_current=1
hdmi_group=2
hdmi_mode=1
hdmi_mode=87
hdmi_cvt 480 320 60 6 0 0 0
hdmi_drive=2
display_rotate=0
Config Touch
Add the following codes in the terminal:
sudo apt-get install xserver-xorg-input-evdev
sudo cp -rf /usr/share/X11/xorg.conf.d/10-evdev.conf /usr/share/X11/xorg.conf.d/45-evdev.conf
sudo apt-get install xinput-calibrator
sudo nano /usr/share/X11/xorg.conf.d/99-calibration.conf
Add the following content in 99-calibration.conf file:
Section "InputClass"
        Identifier      "calibration"
        MatchProduct    "ADS7846 Touchscreen"
        Option  "Calibration"   "3932 300 294 3801"
        Option  "SwapAxes"      "1"
        Option "EmulateThirdButton" "1"
        Option "EmulateThirdButtonTimeout" "1000"
        Option "EmulateThirdButtonMoveThreshold" "300"
EndSection
FBCP Porting
Network is required for this step:
sudo apt-get install cmake
wget  https://files.waveshare.com/upload/1/1e/Rpi-fbcp.zip
unzip Rpi-fbcp.zip
cd rpi-fbcp/
mkdir build
cd build/
cmake ..
make
sudo install fbcp /usr/local/bin/fbcp
Set Auto-start
sudo nano /etc/rc.local
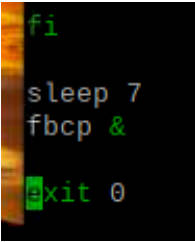
Add the following codes before "exit 0":
sleep 7
fbcp &
sudo reboot
Reboot it, and the screen displays normally.
For Bookworm System
For Raspberry Pi 4 & Raspberry Pi 5
Download and Compile fbcp
Open the Raspberry Pi terminal and execute:
sudo apt install libraspberrypi-dev -y
sudo apt-get install unzip -y
sudo apt-get install cmake -y
sudo wget https://files.waveshare.com/upload/1/1e/Waveshare35a.zip
sudo unzip ./Waveshare35a.zip
sudo cp waveshare35a.dtbo /boot/overlays/
sudo wget https://files.waveshare.com/upload/1/1e/Rpi-fbcp.zip
sudo unzip ./Rpi-fbcp.zip
cd rpi-fbcp/
sudo rm -rf build
sudo mkdir build
cd build
sudo cmake ..
sudo make -j4
sudo install fbcp /usr/local/bin/fbcp
Edit "config.txt" file:
sudo nano /boot/firmware/config.txt
Blocking the following sentence: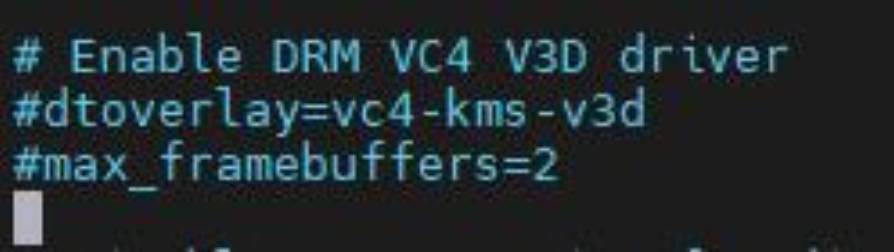
Add the following code at the end of config.txt:
dtparam=spi=on
dtoverlay=waveshare35a
hdmi_force_hotplug=1
max_usb_current=1
hdmi_group=2
hdmi_mode=1
hdmi_mode=87
hdmi_cvt 480 320 60 6 0 0 0
hdmi_drive=2
display_rotate=0
Set Auto-start startx and fbcp
- Open ".bash_profile". If there is no ".bash_profile" file, you can create one:
sudo nano ~/.bash_profile
Add the following code at the bottom of the ".bash_profile" file:
if [ "$(cat /proc/device-tree/model | cut -d ' ' -f 3)" = "5" ]; then
    # rpi 5B configuration
    export FRAMEBUFFER=/dev/fb1
    startx  2> /tmp/xorg_errors
else
    # Non-pi5 configuration
    export FRAMEBUFFER=/dev/fb0
    fbcp &
    startx  2> /tmp/xorg_errors
fi
- Open the "99-fbturbo.~" file, if it exists, you need to check fb is "fb0":
sudo nano /usr/share/X11/xorg.conf.d/99-fbturbo.~
Add the following code in "99-fbturbo.~" file:
Section "Device"
        Identifier      "Allwinner A10/A13 FBDEV"
        Driver          "fbturbo"
        Option          "fbdev" "/dev/fb0"

        Option          "SwapbuffersWait" "true"
EndSection
Set CLI Auto-login
sudo raspi-config nonint do_boot_behaviour B2
sudo raspi-config nonint do_wayland W1
sudo reboot
After rebooting, the main screen can normally display.
Note 1: Please ensure the username of the Raspberry Pi is "pi", otherwise, it cannot automatically log in.
Note 2: After setting the above configuration, it may take a while to reboot the system and load SSH.
Configure Touch
- Install calibrator software:
sudo apt-get install xserver-xorg-input-evdev
sudo cp -rf /usr/share/X11/xorg.conf.d/10-evdev.conf /usr/share/X11/xorg.conf.d/45-evdev.conf
sudo apt-get install xinput-calibrator
- Edit "99-calibration.conf configuration" file:
sudo nano /usr/share/X11/xorg.conf.d/99-calibration.conf
Add the following content to the "99-calibration.conf" configuration file:
Section "InputClass"
        Identifier      "calibration"
        MatchProduct    "ADS7846 Touchscreen"
        Option  "Calibration"   "3932 300 294 3801"
        Option  "SwapAxes"      "1"
        Option "EmulateThirdButton" "1"
        Option "EmulateThirdButtonTimeout" "1000"
        Option "EmulateThirdButtonMoveThreshold" "300"
EndSection
Reboot to take effect.
sudo reboot
For All Raspberry Pi Versions
The operation must be based on bookworm-lite system. 64-bit lite, 32-bit lite
Download Needed Software
- Update system:
sudo apt update && sudo apt upgrade && sudo apt full-upgrade -y
- Install xorg service:
sudo apt-get install --no-install-recommends xserver-xorg -y
sudo apt-get install --no-install-recommends xinit -y
- Install Desktop Manager:
sudo apt install lightdm -y
- Install Raspberry Pi official GUI:
sudo apt install raspberrypi-ui-mods -y
- Install browser (optional):
sudo apt install chromium-browser -y
Download Driver
Open the Raspberry Pi terminal and execute:
sudo apt install libraspberrypi-dev -y
sudo apt-get install unzip -y
sudo apt-get install cmake -y
sudo wget https://files.waveshare.com/upload/1/1e/Waveshare35a.zip
sudo unzip ./Waveshare35a.zip
sudo cp waveshare35a.dtbo /boot/overlays/
sudo wget https://files.waveshare.com/upload/1/1e/Rpi-fbcp.zip
sudo unzip ./Rpi-fbcp.zip
cd rpi-fbcp/
sudo rm -rf build
sudo mkdir build
cd build
sudo cmake ..
sudo make -j4
sudo install fbcp /usr/local/bin/fbcp
Edit config.txt file:
sudo nano /boot/config.txt
Block the following sentences:
Add the following codes at the end of "config.txt":
dtparam=spi=on
dtoverlay=waveshare35a
hdmi_force_hotplug=1
max_usb_current=1
hdmi_group=2
hdmi_mode=87
hdmi_cvt 640 480 60 6 0 0 0
hdmi_drive=2
display_rotate=0
Set Auto-start startx and fbcp
- Open ".bash_profile". If there is not ".bash_profile" file, you can create one:
sudo nano ~/.bash_profile
Add the following code at the bottom of ".bash_profile" file:
if [ "$(cat /proc/device-tree/model | cut -d ' ' -f 3)" = "5" ]; then
    # rpi 5B configuration
    export FRAMEBUFFER=/dev/fb1
    startx  2> /tmp/xorg_errors
else
    # Non-pi5 configuration
    export FRAMEBUFFER=/dev/fb0
    fbcp &
    startx  2> /tmp/xorg_errors
fi
- Open the "99-fbturbo.~" file, if it exists, you need to check fb is "fb0":
sudo nano /usr/share/X11/xorg.conf.d/99-fbturbo.~
Add the following code in "99-fbturbo.~" file:
Section "Device"
        Identifier      "Allwinner A10/A13 FBDEV"
        Driver          "fbturbo"
        Option          "fbdev" "/dev/fb0"

        Option          "SwapbuffersWait" "true"
EndSection
Set CLI Auto-login
sudo raspi-config nonint do_boot_behaviour B2
sudo raspi-config nonint do_wayland W1
sudo reboot
After rebooting, the main screen can normally display.
Note 1: Please ensure the username of the Raspberry Pi is "pi", otherwise, it cannot automatically log in.
Note 2: After setting the above configuration, it may take a while to reboot the system and load SSH.
Configure Touch
- Install calibrator software:
sudo apt-get install xserver-xorg-input-evdev
sudo cp -rf /usr/share/X11/xorg.conf.d/10-evdev.conf /usr/share/X11/xorg.conf.d/45-evdev.conf
sudo apt-get install xinput-calibrator
- Edit "99-calibration.conf" file:
sudo nano /usr/share/X11/xorg.conf.d/99-calibration.conf
Add the following content to "99-calibration.conf" file:
Section "InputClass"
        Identifier      "calibration"
        MatchProduct    "ADS7846 Touchscreen"
        Option  "Calibration"   "3932 300 294 3801"
        Option  "SwapAxes"      "1"
        Option "EmulateThirdButton" "1"
        Option "EmulateThirdButtonTimeout" "1000"
        Option "EmulateThirdButtonMoveThreshold" "300"
EndSection
Reboot it to take effect:
sudo reboot
