


- sales/support
Google Chat:---
- sales
+86-0755-88291180
- sales01
sales@spotpear.com
- sales02
dragon_manager@163.com
- support
tech-support@spotpear.com
- CEO-Complaints
zhoujie@spotpear.com
- Only Tech-Support
WhatsApp:13246739196
- Purchase/Shipping/Refund
WhatsApp:13424403025
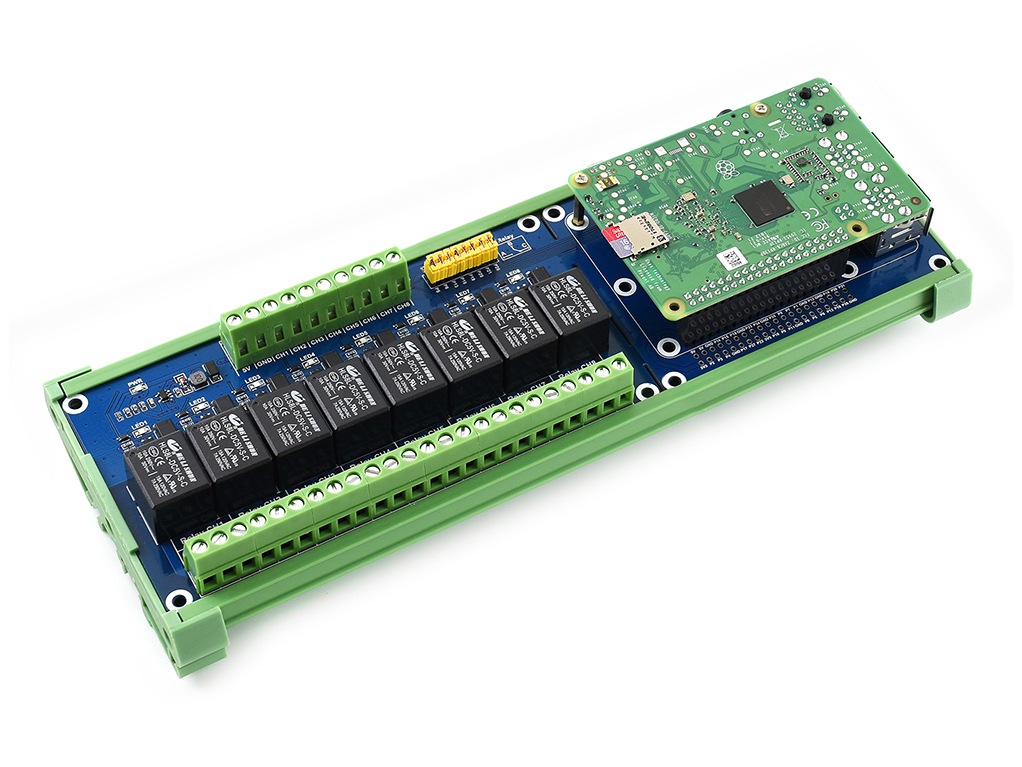
Raspberry Pi Relay Board (B) User Guide
Introduction
We provide Raspberry Pi and Jetson Nano demo for this module
Interface introduce
The correspondence between relay channels and Pi pins:
| Channel number | RPi pin number | wiringPi | BCM | Description |
| Channel label | 29 | P21 | 5 | Channel 1 |
| Channel label | 31 | P22 | 6 | Channel 2 |
| Channel label | 33 | P23 | 13 | Channel 3 |
| Channel label | 36 | P27 | 16 | Channel 4 |
| Channel label | 35 | P24 | 19 | Channel 5 |
| Channel label | 38 | P28 | 20 | Channel 6 |
| Channel label | 40 | P29 | 21 | Channel 7 |
| Channel label | 37 | P25 | 26 | Channel 8 |
【Note】The silk screen marking on the PCB corresponds to the BCM code.
The use of yellow jumpers
Relay_JMP is the relay control pin selection jumpers. When the jumpers are connected, the Raspberry Pi can be used to control the relays.
Using with Raspberry Pi
Install library
BCM2835
# Open the Raspberry Pi terminal and run the following commands
wget http://www.airspayce.com/mikem/bcm2835/bcm2835-1.68.tar.gz
tar zxvf bcm2835-1.68.tar.gz
cd bcm2835-1.68/
sudo ./configure && sudo make && sudo make check && sudo make install
# For more information, please refer to the official website: http://www.airspayce.com/mikem/bcm2835/
WiringPi
# Open the Raspberry Pi terminal and run the following commands
sudo apt-get install wiringpi
#For Raspberry Pi systems after May 2019 (If your system is earlier than this before, you may not need to execute), you may need to upgrade:
wget https://project-downloads.drogon.net/wiringpi-latest.deb
sudo dpkg -i wiringpi-latest.deb
gpio -v
# Run gpio -v and version 2.52 will appear. If it does not appear, the installation is wrong

# Bullseye branch system use the following command:
git clone https://github.com/WiringPi/WiringPi
cd WiringPi
./build
gpio -v
# Run gpio -v and version 2.60 will appear. If it does not appear, it means that there is an installation error
Python
# python2
sudo apt-get update
sudo apt-get install python-pip
sudo pip install RPi.GPIO
# python3
sudo apt-get update
sudo apt-get install python3-pip
sudo pip3 install RPi.GPIO
Test demo
Execute the following commands on the terminal, download the demo and extract it to the specified directory
wget https://www.waveshare.com/w/upload/b/b4/RPi_Relay_Board_B.zip
unzip -o RPi_Relay_Board_B.zip -d ./RPi_Relay_Board_B
sudo chmod 777 -R RPi_Relay_Board_B
cd RPi_Relay_Board_B/RaspberryPi/
BCM2835 demo
Enter the Linux terminal and execute the following command in the terminal:
cd bcm2835
make
sudo ./Relay_demo
Expected result: The relays on the module are closed in turn, and then disconnected in turn. Each relay has a corresponding indicator light, which can be known by observing the status of the indicator light. When the user wants to stop running the program, press Ctrl+C to stop the running of the program
WiringPi demo
Enter the Linux terminal and execute the following command in the terminal:
cd wiringPi
make
sudo ./Relay_demo
Expected result: The relays on the module are closed in turn, and then disconnected in turn. Each relay has a corresponding indicator light, which can be known by observing the status of the indicator light. When the user wants to stop running the program, press Ctrl+C to stop the running of the program
Python demo
Enter the Linux terminal and execute the following command in the terminal:
cd python
sudo python Relay_demo.py
Expected result: The relays on the module are closed in turn, and then disconnected in turn. Each relay has a corresponding indicator light, which can be known by observing the status of the indicator light. When the user wants to stop running the program, press Ctrl+C to stop the running of the program
Web control
The web page control of this demo is based on the python web framework to control the relay.
Enter the Linux terminal and execute the following command in the terminal:
sudo apt-get install python-bottle
cd python-bottle
sudo python main.py
Enter the IP address of the Raspberry Pi in the address bar of Google Chrome (other browsers may not be compatible), port number 8080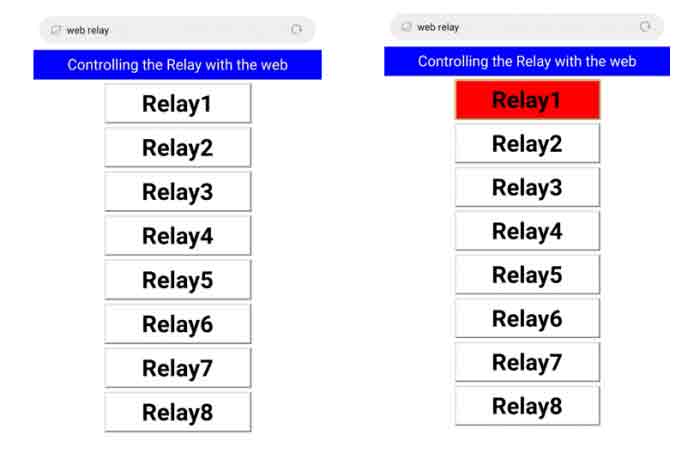
Using with Jetson nano
Install library
sudo apt-get update
sudo apt-get install python3-pip
sudo pip3 install Jetson.GPIO
sudo groupadd -f -r gpio
sudo usermod -a -G gpio your_user_name
sudo cp /opt/nvidia/jetson-gpio/etc/99-gpio.rules /etc/udev/rules.d/
sudo udevadm control --reload-rules && sudo udevadm trigger
Test demo
Download the program and enter the specified directory
sudo apt-get install p7zip
wget https://www.waveshare.com/w/upload/c/c2/RPi_Relay_Board_B.7z
7zr x RPi_Relay_Board_B.7z -r -o./RPi_Relay_Board_B
sudo chmod 777 -R RPi_Relay_Board_B
cd RPi_Relay_Board_B/JetsonNano/
C demo
Enter the Linux terminal and execute the following command in the terminal:
cd C
make
sudo ./main
Expected result: The relays on the module are closed in turn, and then disconnected in turn. Each relay has a corresponding indicator light, which can be known by observing the status of the indicator light. When the user wants to stop running the program, press Ctrl+C to stop the running of the program
Python demo
Enter the Linux terminal and execute the following command in the terminal:
cd python
sudo python relay_demo.py
Expected result: The relays on the module are closed in turn, and then disconnected in turn. Each relay has a corresponding indicator light, which can be known by observing the status of the indicator light. When the user wants to stop running the program, press Ctrl+C to stop the running of the program
Web control
The web page control of this demo is based on the python web framework to control the relay.
Enter the Linux terminal and execute the following command in the terminal:
sudo apt-get install python-bottle
cd python-bottle
sudo python main.py
Enter the IP address of the Raspberry Pi in the address bar of Google Chrome (other browsers may not be compatible), port number 8080