- sales/support
Google Chat:---
- sales
+86-0755-88291180
- sales01
sales@spotpear.com
- sales02
dragon_manager@163.com
- support
tech-support@spotpear.com
- CEO-Complaints
zhoujie@spotpear.com
- sales/support
WhatsApp:13246739196
Raspberry Pi Power Management HAT User Guide
Instruction
The Power Management HAT is a smart power bank designed for Raspberry Pi. With the embedded Arduino MCU and RTC, the HAT features auto power management function which allows the Pi to work more power-efficient and more safely.
Features
- Standard Raspberry Pi 40PIN GPIO extension header, supports Raspberry Pi series boards
- Onboard ATmega328P MCU, supports Arduino programming
- Onboard PCF8523 RTC chip, provides precise RTC information
- Onboard CP2102 UART converter, for UART communication or ATmega328P programming
- User-defined button, can be used for Raspberry Pi start up, safely shutdown, or other customized function
- Protection circuits such as: power supply anti-reverse, counter current proof, etc. ensures stable and safe operating
- Voltage/current monitoring circuit, monitors the Raspberry Pi operating voltage and current in real time
- Comes with development resources and manual
Specification
- Controller: ATmega328P-AU
- Communication interface: UART + GPIO
- Baudrate: 115200bps by default (programmable)
- Power supply interface: USB port or PH2.0 connector
- USB power input voltage: 5V
- PH2.0 power input voltage: DC 7~28V (regulated power supply or lithium battery)
- Embedded circuits: power supply anti-reverse, counter current proof, voltage monitoring, current monitoring
- Mounting hole size: 3.0mm
Working principle
The ATmega328O connect to Raspberry Pi by 2 GPIO. These pins are defined by firmware.
| Raspberry Pi side | Arduino (ATmega328P) side | ||
| GPIO of Pi | GPIO of Arduino | Functions Description | |
| GPIO20 | PC3 | Input: Raspberry Pi shutdown if the pin is High detected. You should set it to Low when working | Output: If it is set to High, Raspberry Pi will shutdown. You should set it to Low when Raspberry Pi is on. |
| GPIO21 | PD7 | Output: If this Pin is high, it means that Raspberry Pi is working. It turns to Low if Raspberry Pi is shutdown. | Input: If Raspberry Pi is working, it will be detected as High, and it will be detected to Low if Raspberry Pi is shutdown. |
- Raspberry Pi side
- Power on: GPIO21 is set to High after powering on
- Power off: Keep detecting the status of GPIO20, if it is high, Raspberry Pi shutdown and set GPIO21 to Low after shutdown.
- Arduino (ATmega328P) side
- Power on: Set PC3 to Low and power on Raspberry Pi. If PD7 is detected as High, it means that Raspberry Pi boots successfully.
- Power off: Set PC3 to High, Raspberry Pi shutdown after detecting it. Keep detecting the status of PD7, if PD7 is Low, it means that Raspberry Pi has shut down and it can cut off the power of Raspberry Pi.
Preparation
Software setup (Pi)
Open terminal of Raspberry Pi and set system-shutdown script.
- Download shell script
sudo wget https://github.com/waveshare/Power-Management-HAT/Power-Management-HAT-Setup.sh
- Set the permission of the script
sudo chmod a+x Power-Management-HAT-Setup.sh
- Run the script
sudo ./Power-Management-HAT-Setup.sh
Press Y when you get the prompt "Would you like to reboot now? y/n" to reboot Raspberry Pi. 
Software setup (PC)
- Install Arduino IDE: Please install Arduino IDE to your Windows PC and remember the installation path.
- Install Power Management HAT package
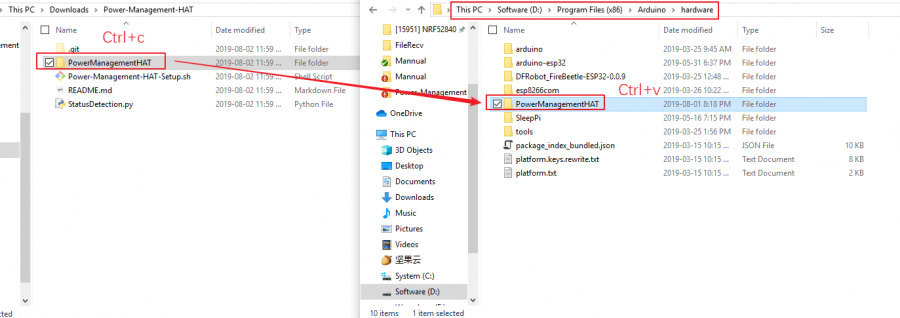
- Download package form Github. Copy the PowerManagementHAT folder (You may need to unzip it firstly) to hardware directory which is under the installation directory of Arduino IDE.
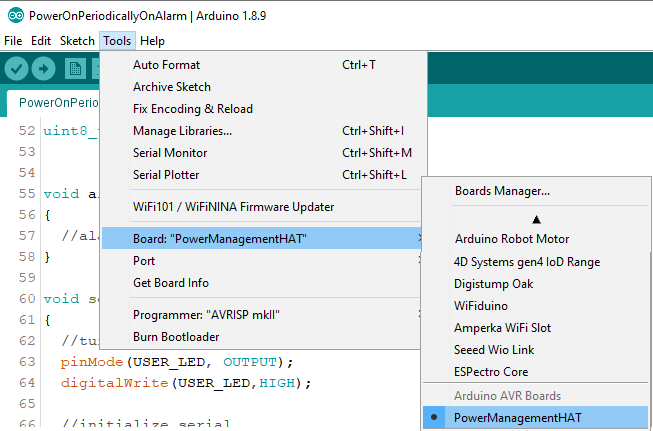
- Setup Arduino IDE
- Restart Arduino IDE.
- Connect USB interface of Power Management HAT to PC.
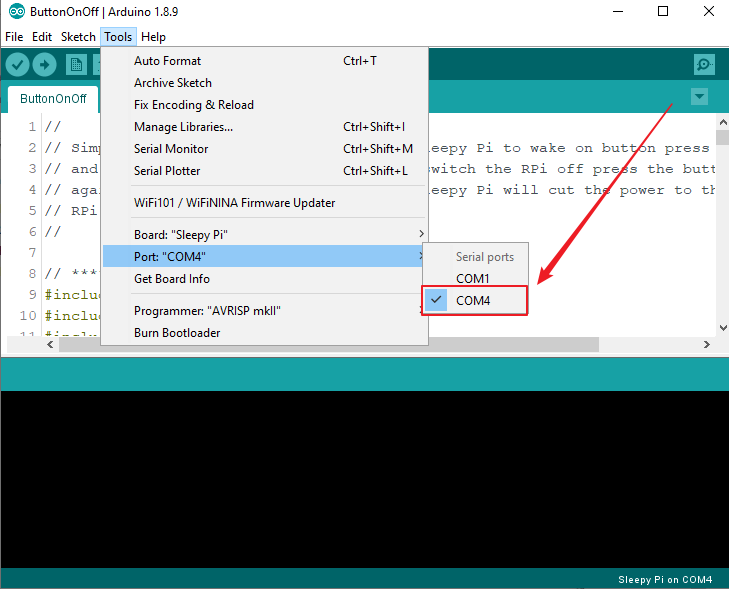
- Select the correct port
Hardware connection
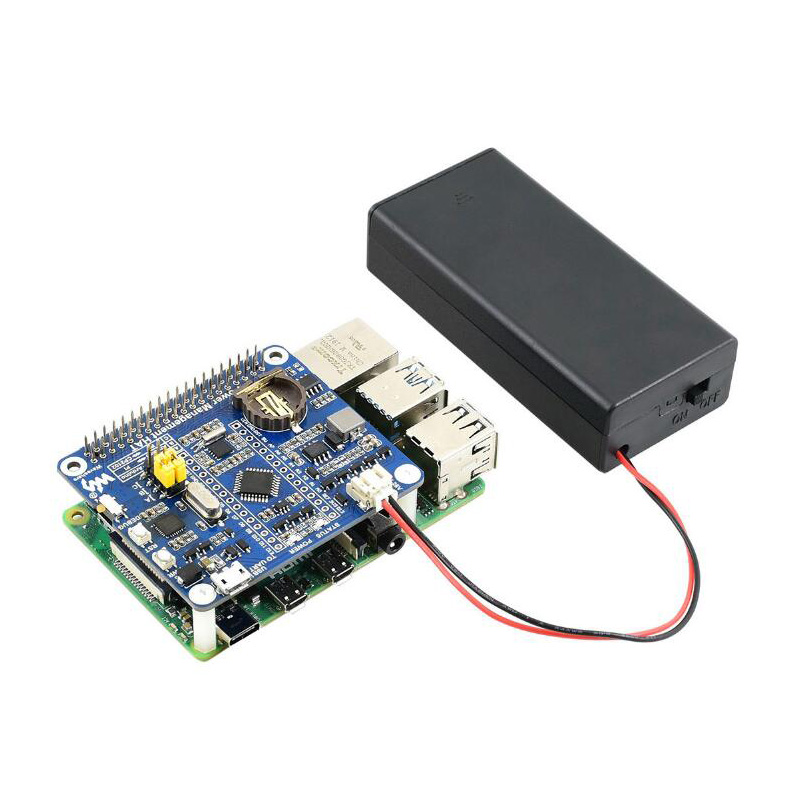
Attach Power Management HAT on Raspberry Pi. Then you can power Raspberry Pi by the Power Management HAT without an external power adapter.
Power management is powered by one of the ways below:
- You can power Power Management HAT by USB. If you connect batteries pack and plug USB power adapter at the same time, Management HAT is powered by the USB power adapter by default.
- You can power Power Management HAT by batteries pack, or use other DC power supply. (Voltage range:7V~28V)
Examples
ButtonBoot
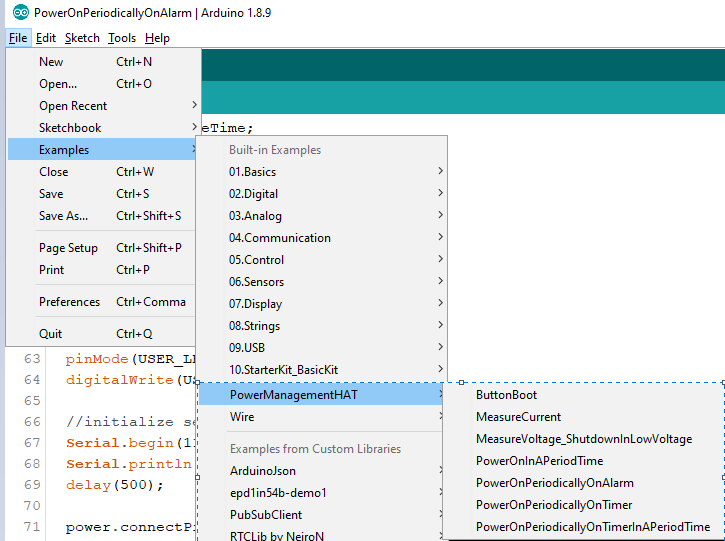
- Open Arduino IDE, and open ButtonBoot examples (File->Examples -> PowerManagementHAT->ButtonBoot)
- Compile and download the examples to Power Management HAT
- If Raspberry Pi has been shutdown
- Press Power button to start Raspberry Pi
- If Raspberry Pi has been started
- Long-press Power button for 2s~8s, Raspberry Pi will be first software shutdown and then cut off power
- Long-press Power button for more than 8s to directly cut off power of Raspberry Pi.
You can adjust it:
| Parameters | Description | Default value |
| SHUTDOWN_TIME_MS | The threshold of (press time) software shutdown | 2000 |
| CUT_POWER_TIME_MS | The threshold of (press time) power cut off | 8000 |
| USE_CURRENT_TO_CHECK_PI_STATUS | Determine the working status of Raspberry Pi by working current. Default Disable. | 0 |
| CURRENT_THRESHOLD_MA | If working current of Raspberry Pi is less than this threshold value, Raspberry Pi is determined as shutdown. Default disable | 85 |
MeasureCurrent
- Open Arduino IDE, and open MeasureCurrent examples (File->Examples -> PowerManagementHAT->MeasureCurrent)
- Compile and download the examples to Power Management HAT
- If Raspberry Pi has been shutdown
- Press Power button to start Raspberry Pi
- If Raspberry Pi has been started
- Long-press Power button for 2s~8s, Raspberry Pi will be first software shutdown and then cut off power
- Long-press Power button for more than 8s to directly cut off power of Raspberry Pi.
- Open serial monitor, the working current of Raspberry Pi are printed to serial port.
You can adjust
| Parameters | Description | Default value |
| SHUTDOWN_TIME_MS | The threshold of (press time) software shutdown | 2000 |
| CUT_POWER_TIME_MS | The threshold of (press time) power cut off | 8000 |
MeasureVoltage_ShutdownInLowVoltage
- Open Arduino IDE, and open MeasureVoltage_ShutdownInLowVoltage examples (File->Examples -> PowerManagementHAT->MeasureVoltage_ShutdownInLowVoltage)
- Compile and download the examples to Power Management HAT
- If Raspberry Pi has been shutdown
- Press Power button to start Raspberry Pi
- If Raspberry Pi has been started
- Long-press Power button for 2s~8s, Raspberry Pi will be first software shutdown and then cut off power
- Long-press Power button for more than 8s to directly cut off power of Raspberry Pi.
- Open serial monitor, the working current of Raspberry Pi are printed to serial port.
You can adjust
| Parameters | Description | Default value |
| SHUTDOWN_TIME_MS | The threshold of (press time) software shutdown | 2000 |
| CUT_POWER_TIME_MS | The threshold of (press time) power cut off | 8000 |
| ON_VOLTAGE_VOLT | The min voltage to start Raspberry Pi | 6.6 |
| OFF_VOLTAGE_VOLT | The threshold of Low-voltage shutdown | 6.3 |
| FORCE_OFF_VOLAGE_VOLT | threshold of emergency shutdown | 5.8 |
| LOW_VOLTAGE_TIME_MS | Waiting time of low-voltage shutdown | 30000 |
| OVERRIDE_TIME_MS | The delay time of low-voltage continuation | 3600000 |
【Note】:
- When the voltage of batteries is less than the OFF_VOLTAGE, if you press the Power button in 30000ms (LOW_Voltage_TIME_IN_MS), Raspberry can keep working for 3600000ms (OVERRIDE_TIME_MS). During this time, once the voltage is less than 5.8V (FORCE_OFF_VOLTAGE_VOLT), Management HAT will cut off Raspberry Pi immediately; Once the volage reach to On_VOLTAGE, the Raspberry Pi will be powered again.
- You can measure the capacity of batteries by their voltage. For a single battery, the full voltage is about 4.2V, the batteries may be damaged if its voltage is less than 3.0V.
If you connect batteries for power, you should make sure that the whole voltage of the batteries pack is larger than 5V. The batteries pack we provided allows 2 18650 batteries at the same time. The table below is for reference.
| 1S (DO NOT Support) | 2S (1S*2) | 3S(1S*3) | 4S(1S*4) | |
| ON_VOLTAGE_VOLT | 3.3 | 6.6 | 9.9 | 13.2 |
| OFF_VOLTAGE_VOLT | 3.15 | 6.3 | 9.45 | 12.6 |
| FORCE_OFF_VOLTAGE_VOLT | 2.0 | 5.8 | 8.7 | 11.6 |
PowerOnInAPeriodTime
- Open Arduino IDE, and open ButtonBoot examples (File->Examples -> PowerManagementHAT->PowerOnInPeriodTime)
- Compile and download the examples to Power Management HAT
- Raspberry Pi will be started in a certain period.
You can adjust:
| Parameters | Description | Default value |
| WAKE_UP_START_HOUR | Start time-hour | 8 |
| WAKE_UP_START_MINUTE | Start time-minute | 30 |
| SLEEP_START_HOUR | Shutdown time-hour | 18 |
| SLEEP_START_MINUTE | Shutdown time-minute | 30 |
PowerOnPeriodcallyOnTimer
- Open Arduino IDE, and open ButtonBoot examples (File->Examples -> PowerManagementHAT->PowerOnPeriodcallyOnTimer/PowerOnPeriodcallyOnAlarm)
- Compile and download the examples to Power Management HAT
- Raspberry Pi will be started periorlly.
| Examples | PowerOnPeriodicallyOnTimer | PowerOnPeriodicallyOnAlarm |
| Difference | Periodly power on Raspberry Pi by timer | Periodly power on Raspberry Pi by RTC alarm |
| Advantage | Simple | High precision (according to timer) |
| Parameters | Description | Default value |
| PERIODIC_TIMER_TIMEBASE | Unit of periodic | eTB_MINUTE |
| PERIODIC_TIMER_VALUE | Periodic value | 10 |
| RPI_STAY_AWAKE_TIME_MS | Working time | 60000 |
| Parameters | Description | Default value |
| RPI_WAKE_UP_CYCLE _MINUTE | Periodic value | 10 |
| RPI_STAY_AWAKE_TIME _MS | Working time | 60000 |
| CURRENT_THRESHOLD_MA | Threshold of current (if working current is less thant this value, Raspberry Pi is determined to be in shutdown status) | 110 |
PowerOnPeriodicallyOnTimerInAPeriodTime
- Open Arduino IDE, and open ButtonBoot examples (File->Examples -> PowerManagementHAT->PowerOnPeriodicallyOnTimerInAPeriodTime)
- Compile and download the examples to Power Management HAT
- Raspberry Pi will be power on periodly in certain time
| Parameters | Description | Default value |
| PERIODIC_TIMER_TIMEBASE | Periodic unit | eTB_MINUTE |
| PERIODIC_TIMER_VALUE | Periodic value | 5 |
| RPI_STAY_AWAKE_TIME _MS | Working time | 60000 |
| WAKE_UP_START_HOUR | Start time-hour | 8 |
| WAKE_UP_START_MINUTE | Start time-minute | 30 |
| SLEEP_START_HOUR | Shutdwon time-hour | 18 |
| SLEEP_START_MINUTE | Shutdown time | 30 |


