


- sales/support
Google Chat:---
- sales
+86-0755-88291180
- sales01
sales@spotpear.com
- sales02
dragon_manager@163.com
- support
tech-support@spotpear.com
- CEO-Complaints
zhoujie@spotpear.com
- Only Tech-Support
WhatsApp:13246739196
- Purchase/Shipping/Refund
WhatsApp:13424403025
SIM7670G-LTE-Cat-1-GNSS-HAT User Guide
Features
- Standard Raspberry Pi 40PIN GPIO headers, suitable for Raspberry Pi series boards.
- Support network communication protocols such as TCP/IP, HTTP(s), MQTT(s), FTP(s) and SSL.
- Support GNSS positioning, and obtain position information by satellite signal.
- Onboard USB interface can be used for testing AT commands, networking communication, etc.
- 3x onboard USB expansion ports, facilitate the connection of USB expansion devices.
- Onboard SIM card slot, support 1.8V and 3V SIM card.
- Onboard 2x module LED indicators, 4x USB LED indicators, easy to view module running status.
- Provide online resources and tutorials (such as Raspberry/JetsonNano/Arduino/ESP32 sample demos).
Hardware Description
Onboard Resources
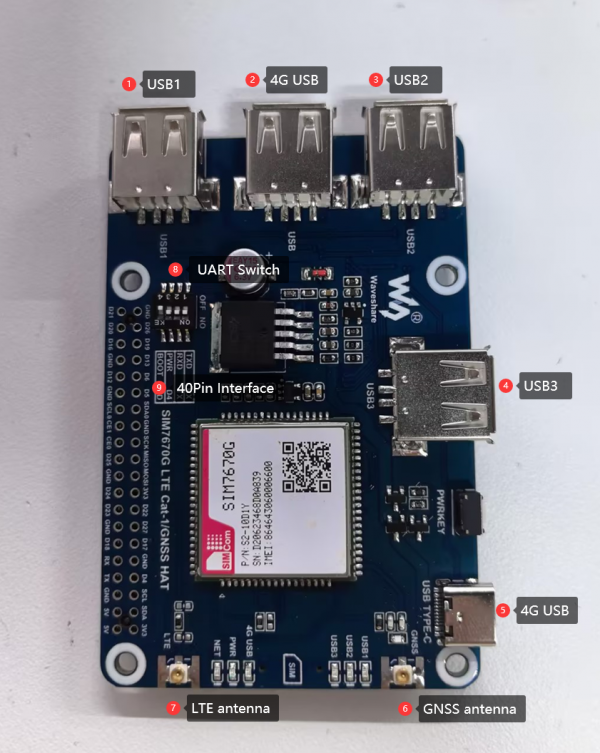
1. USB1 connector supports external USB device connection.
2. The main USB interface and power port are provided, enabling connection to Windows, Raspberry Pi and Jetson Nano for expanded USB connection.
3. USB2 connector supports external USB device connection.
4. USB3 connector supports external USB device connection.
5. Type-C, its function is the same as the USB connector function.
6. GNSS antenna, supports IPEX1 and SMA package.
7. LTE antenna, supports IPEX1 and SMA package.
8. 4Pin DIP switch, control SIM7670G module's UART interface to connect to the Raspberry Pi, use the pin to control the module ON/OFF, and enter programming mode.
9. Raspberry Pi GPIO 40Pin header.
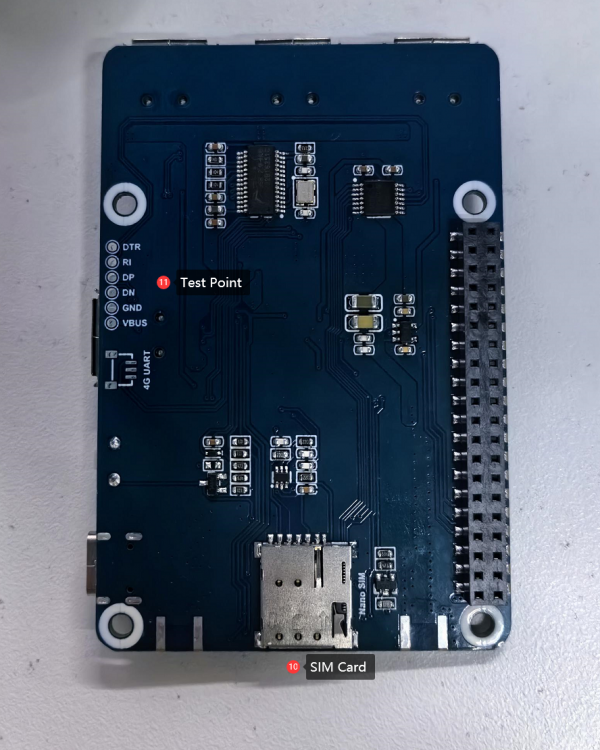
10. SIM Card slot (This SIM card slot does not support hot swapping. Please power off before replacing the SIM card.)
11. Reserve test points for external MCU to use module resources.
Connection
- Before using the module, you need to prepare the following things except Type C USB cable, GNSS antenna and LTE antenna:
a 4G SIM card (GPRS is available)
- In case of power failure, insert the activated 4G SIM card, and connect the USB cable to the computer.
- Connect one end of the Type C USB cable to the PC's USB port and the other end to the USB port of the SIM7670G LTE Cat-1/GNSS HAT. The PWR light will illuminate, and wait approximately 0 to 1 second for the module to start. The NET light will remain steady, indicating successful module startup. Wait for the module to automatically search for the network; the NET light will begin to flash.
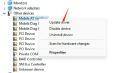
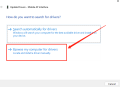
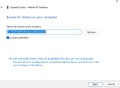
- Open the device manager; for first-time use, install the Windows driver. Refer to the following image for installation instructions:
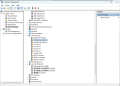
- After the driver is successfully installed, you can see more COM ports as shown below:

Dial-up Internet access using LTE Cat-1 network on Windows
After connecting the module to Windows using the Type-C to USB-A cable, use the serial port debugging assistant to open AT COM and send the following command to enable RNDIS internet access:
AT+DIALMODE=0
AT$MYCONFIG="usbnetmode",0
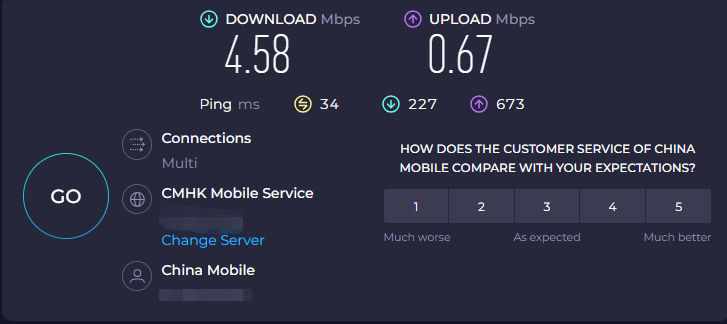
- To test the internet speed, open the speed testing website: www.speedtest.net. Click on the mouse to start the speed test. The following image is an actual screenshot of the speed test:
Note:
Theoretically, the SIM7670G module uses Cat-1 different networks with upstream and downstream rates as shown in the table below.
However, the actual speed measurement is affected by factors such as network coverage, network congestion, and base station conditions, so the data from different periods and different locations may vary.
| Network Format | Uplink | Downlink |
|---|---|---|
| LTE Cat-1 | 5Mbps | 10Mbps |
Serial Port Assistant Debugging
Common AT Commands
| Command | Description | Return Value |
|---|---|---|
| AT | AT Test Command | OK |
| ATE | ATE1 enables echo ATE0 disable echo | OK |
| AT+SIMCOMATI | Query module information | OK |
| AT+IPREX | Set module hardware serial port baudrate | +IPREX: OK |
| AT+CRESET | Reset module | OK |
| AT+CSQ | Query network signal quality, return signal value | +CSQ: 25,99 OK |
| AT+CPIN? | Query SIM card status, returning 'READY,' indicating the SIM card is recognized and functioning properly | +CPIN: READY |
| AT+COPS? | Query the current network operator; upon successful connection, it will return information about the network operator | +COPS: OK |
| AT+CREG? | Query network registration status | +CREG: OK |
| AT+CPSI? | Query UE (User Equipment) system information | |
| AT+CNMP | Network mode selection command: 2: Automatic 13: GSM only 14: WCDMA only 38: LTE only | OK |
- For more detailed AT commands, please refer to:
SIM767XX_Series_AT_Command_Manual_V1.01
HTTP Request
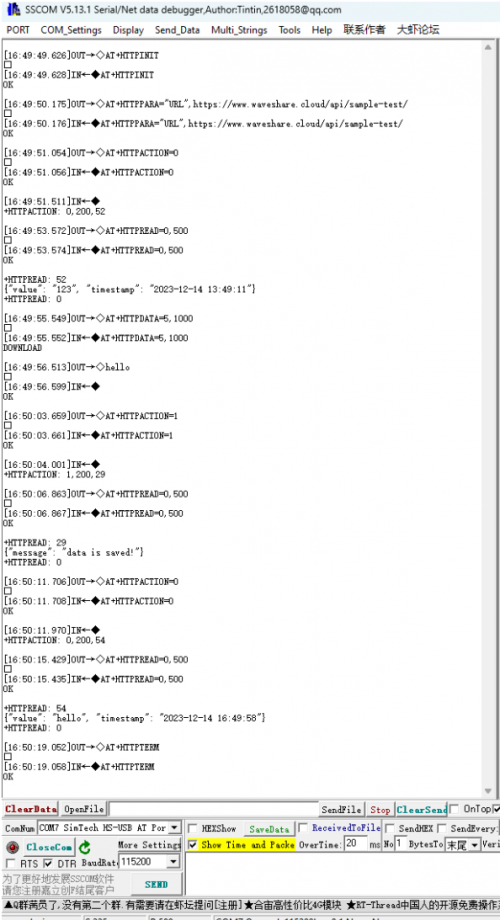
The common commands of the HTTP function as shown below:
AT+HTTPINIT  // Enable HTTP
AT+HTTPPARA="URL",https://www.waveshare.cloud/api/sample-test/ // Set target URL information
AT+HTTPACTION=0 // HTTP Get request
AT+HTTPREAD=0,500 // Output HTTP return value
AT+HTTPDATA=5,1000 // Set HTTP parameter
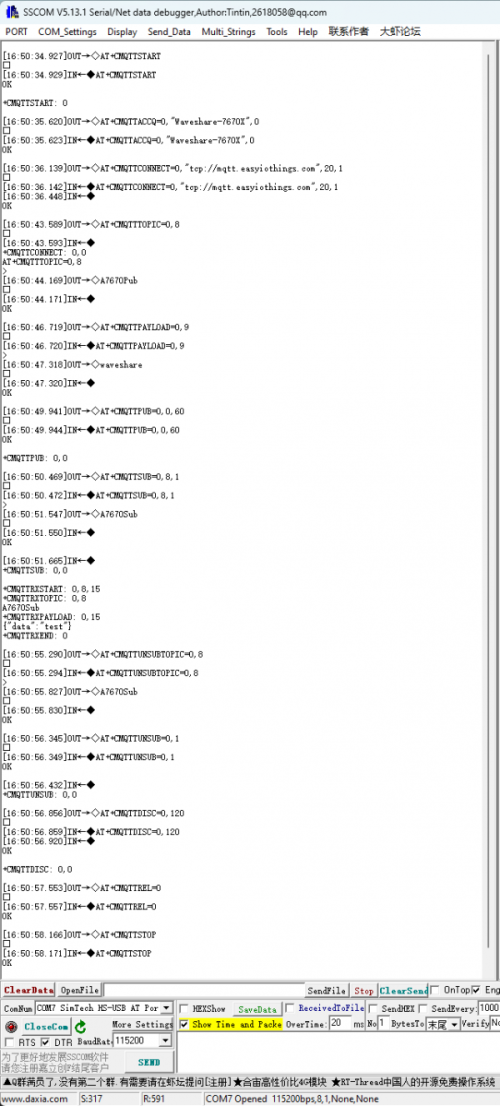
MQTT Request
The common commands for GNSS (Global Navigation Satellite System) satellite positioning are as follows:
AT+CMQTTSTART  // Enable MQTT
AT+CMQTTACCQ=0,"Waveshare-7670X",0 // Set up ClientID
AT+CMQTTCONNECT=0,"tcp://mqtt.easyiothings.com",20,1 // Connect to MQTT server
AT+CMQTTTOPIC=0,8 // Set up publishing topic.
AT+CMQTTPAYLOAD=0,9 // Set message content
AT+CMQTTPUB=0,0,60 // Post a message
AT+CMQTTSUB=0,8,1 //Subscribe to topics
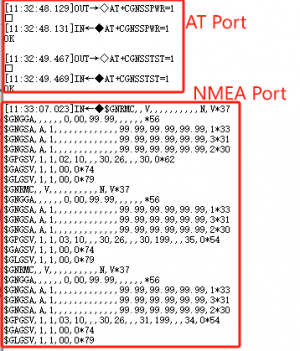
GNSS Satellite Positioning
The common commands for GNSS satellite positioning functionality are as follows:
AT+CGNSSPWR=1 // Activate GNSS
AT+CGNSSTST=1 // Enable information output
AT+CGNSSPORTSWITCH=0,1 // Switch NMEA data output port
AT+CGPSINFO // Retrieve satellite latitude and longitude data
Raspberry Pi User Guide
Hardware Preparation & Connection
- A Raspberry Pi 4B/Raspberry Pi 5
- A SIM7670G LTE Cat-1/GNSS HAT
- A USB-A plug
- A 4G communication card
- A LTE antenna
- A GPS ceramic antenna
Connect the above hardware as shown below: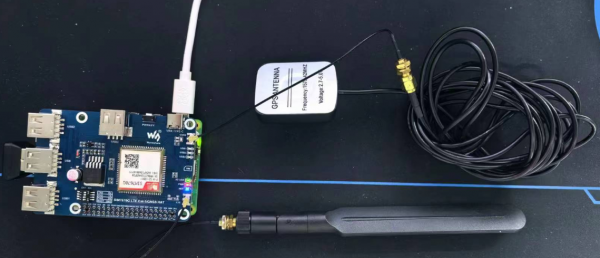
40-Pin UART communication requires the TXD and RXD of the 4-pin dip switches on the board to be turned on.
UART Configuration
Since the Raspberry Pi's serial port is by default used for terminal debugging, modifying the Raspberry Pi settings is necessary to use the serial port.
- Execute the following command to access the Raspberry Pi configuration:
sudo raspi-config
- Select Interfacing Options -> Serial -> no -> yes to disable the serial port debugging feature.

Sample Demo
Open the Raspberry Pi terminal and execute:
mkdir SIM7670G_Raspberry&&cd SIM7670G_Raspberry
python -m venv env
source env/bin/activate
pip install pynmea2 pyserial paho-mqtt
wget  https://files.waveshare.com/wiki/A7670E-Cat-1-GNSS-HAT/A7670E_Cat-1-GNSS_HAT_Raspberry_Code.zip
unzip A7670E_Cat-1-GNSS_HAT_Raspberry_Code.zip
GNSS
This demo uses the Pynmea library to parse NMEA 0183 formatted satellite data into latitude and longitude.
cd GNSS
python GNSS_example.py
After execution, there is a wait for GPS information retrieval, which can be slower due to reasons like hardware boot-up, weather conditions or weak satellite signals.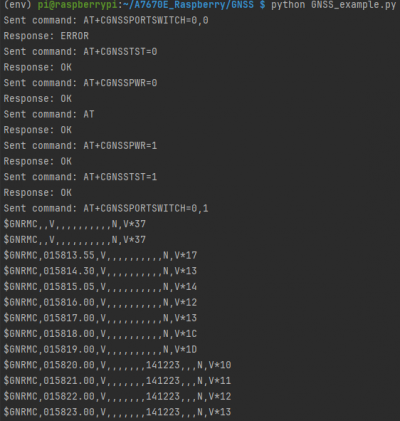

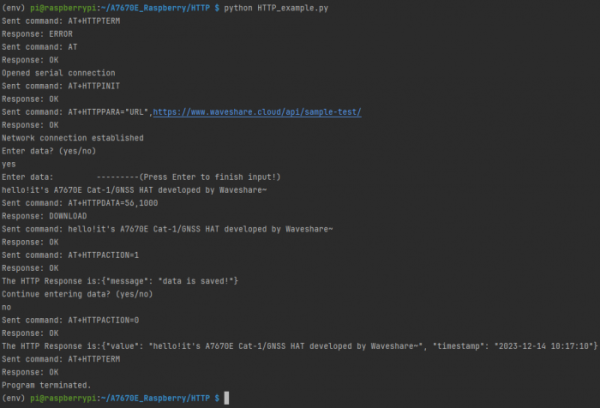
HTTP
This demo is for testing the HTTP interface:
cd HTTP
python HTTP_example.py
MQTT
This demo combines Waveshare Cloud platform and uploads the Raspberry Pi running status to the cloud through MQTT.
1. Register and log in to Waveshare Cloud, through the Devices|Attributes interface, select the Raspberry Pi device and enter the device name through One-Click Add.
2. Obtain MQTT-related parameters of this device from the device list.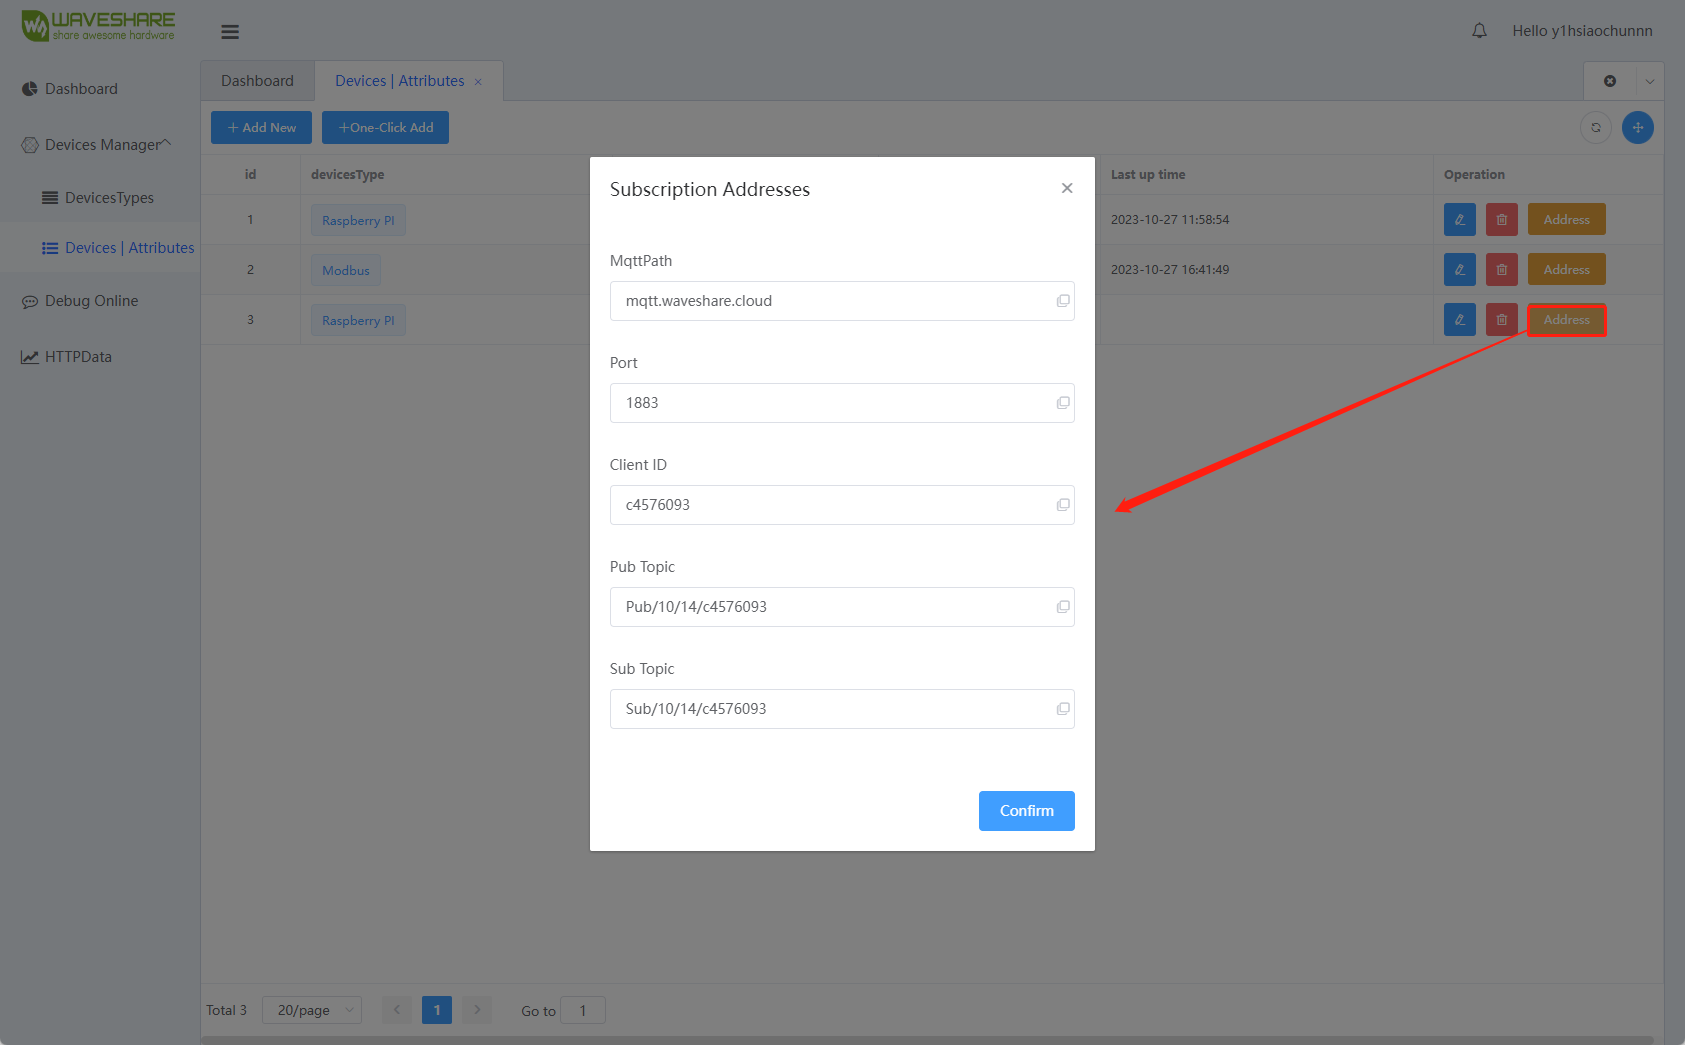
3. Fill parameter data into the code.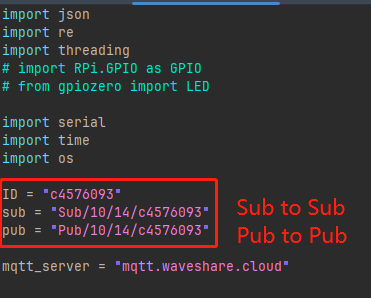
4. Execute the code on the cloud device.
python MQTT_example.py
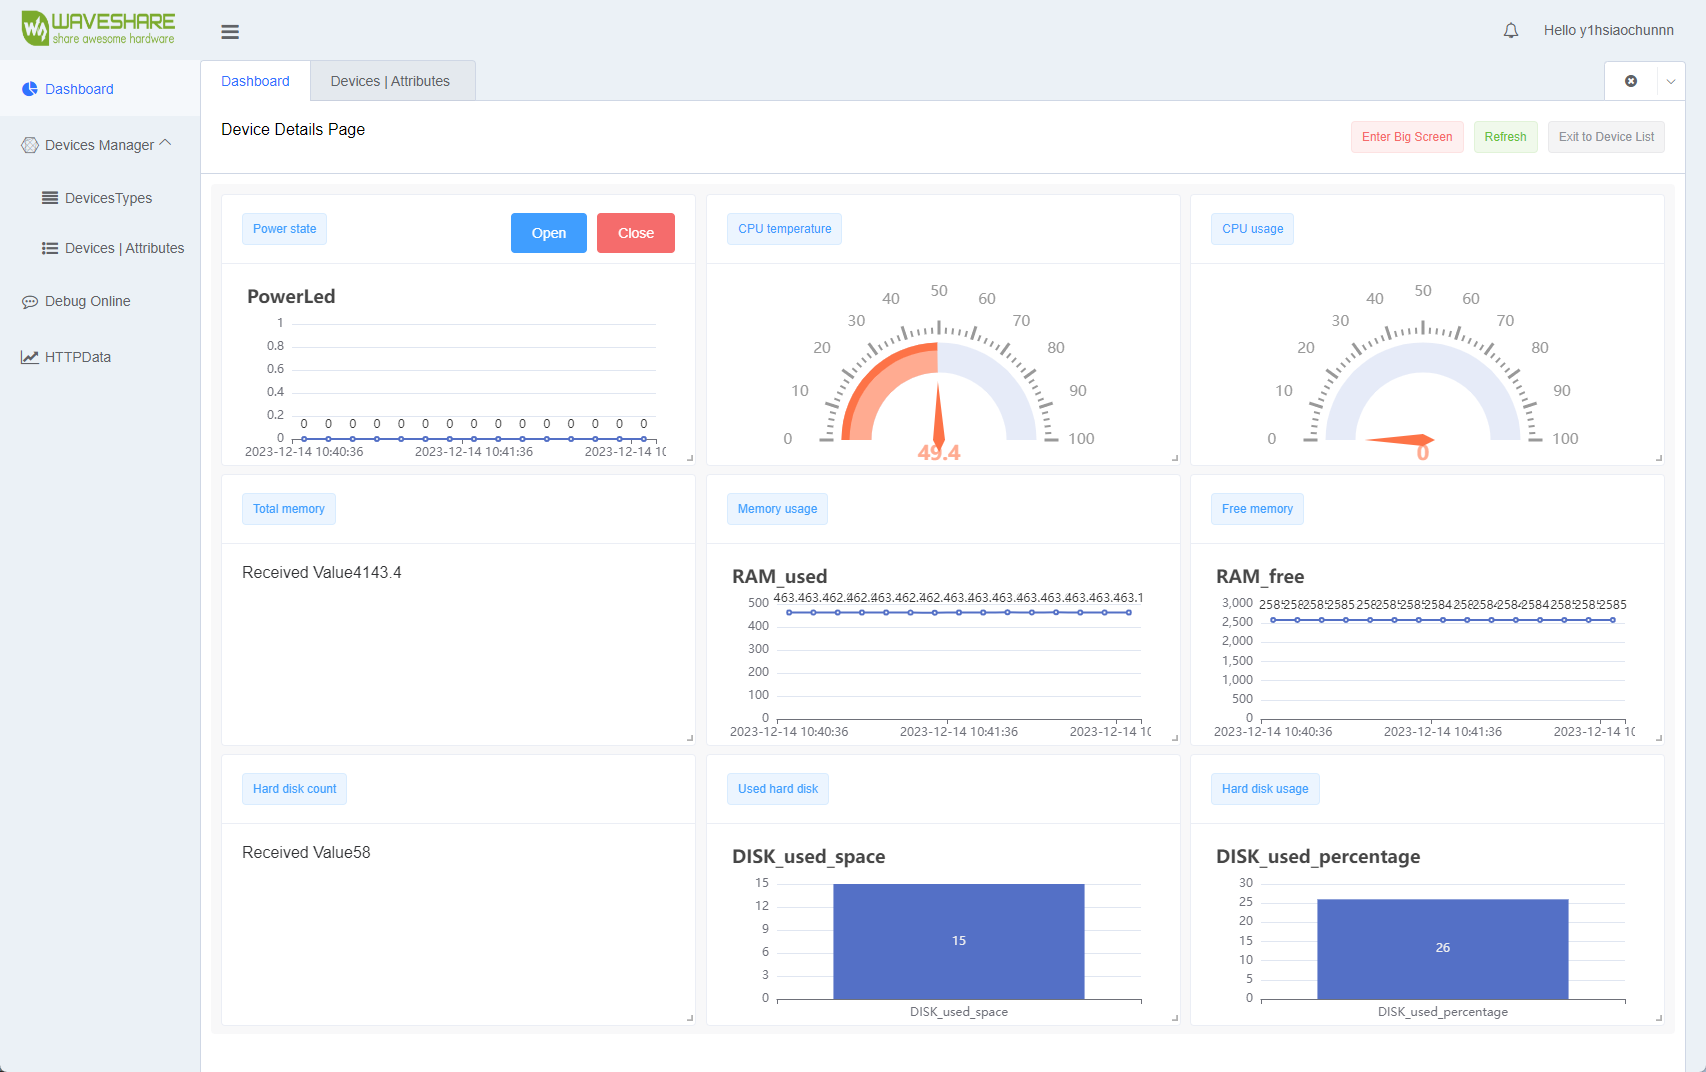
5. View specific device dashboard information through the dashboard.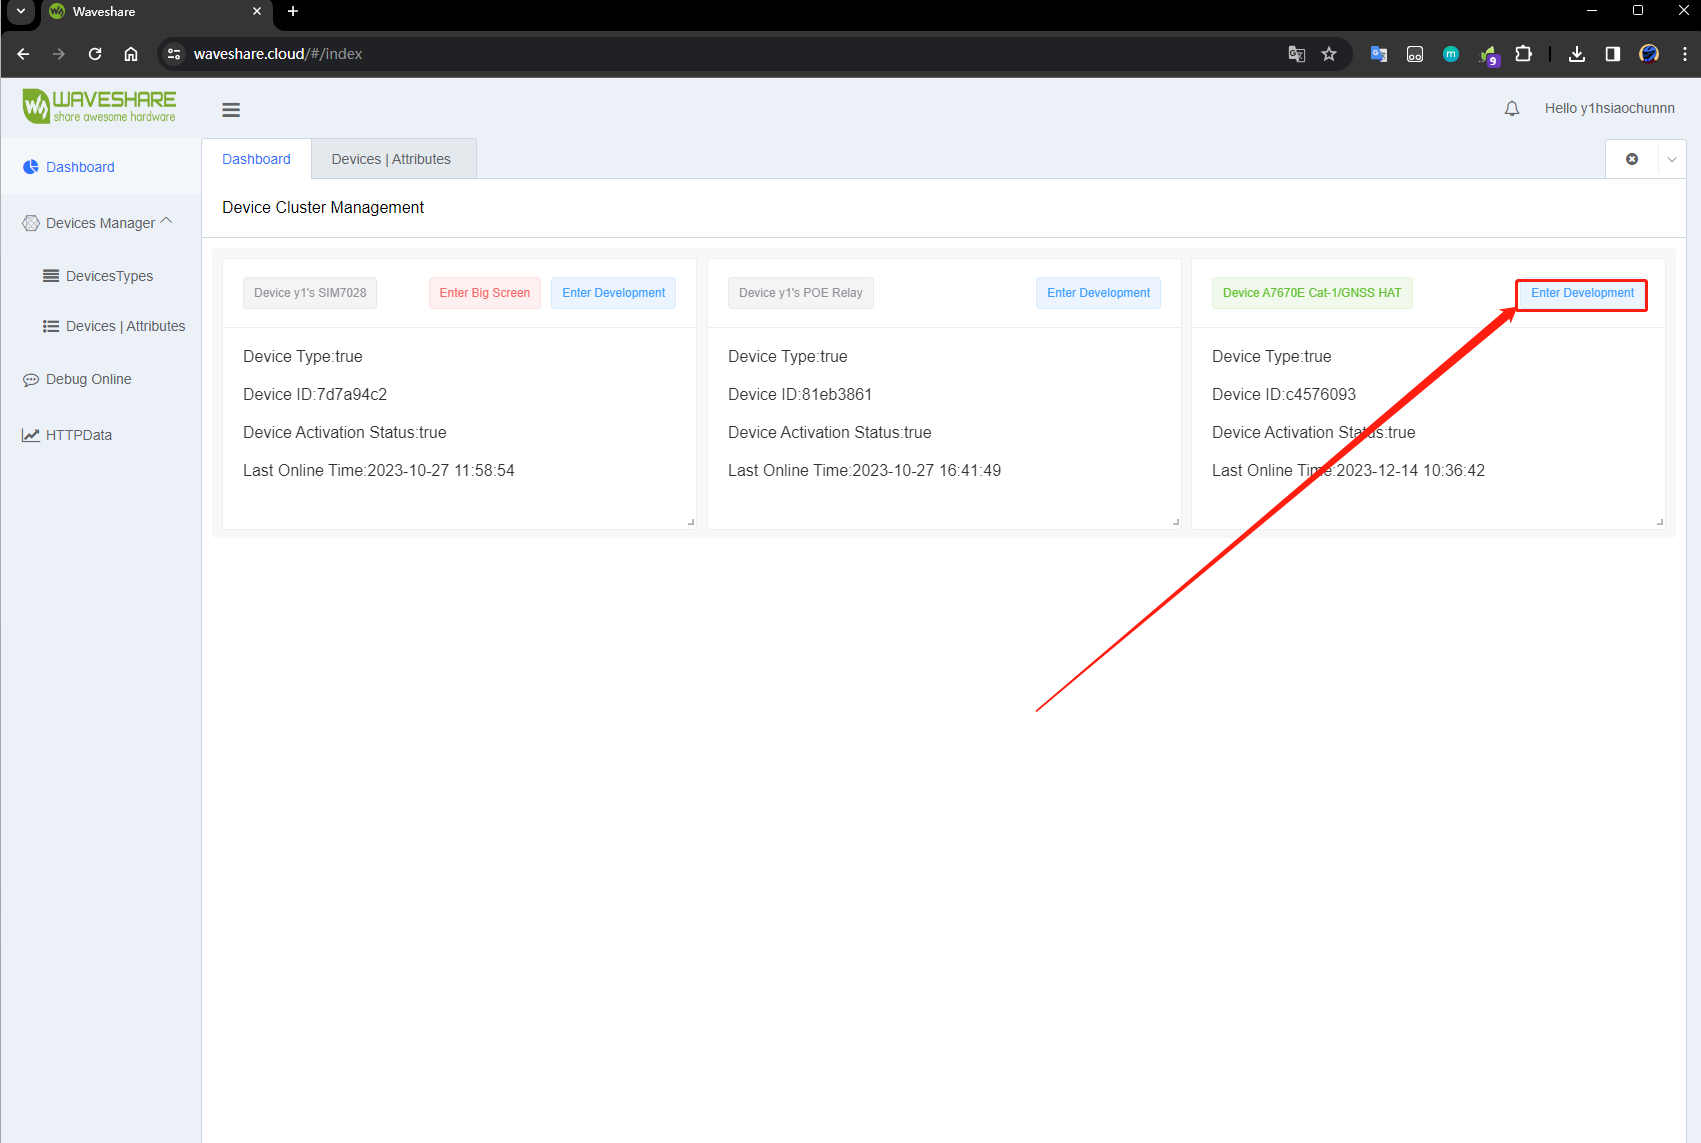
Resource
Schematic
Demo
Tools & Drivers
Datasheet
- SIM7672X_SIM7652X_Series_FTP(S)_Application_Note_V1.00
- SIM7672X_SIM7652X_Series_HTTP(S)_Application_Note_V1.00
- SIM7672X_SIM7652X_Series_MQTT(S)_Application_Note_V1.00
- SIM7672X_SIM7652X_Series_NETWORK_Application_Note_V1.00
- SIM7672X_SIM7652X_Series_SSL_Application_Note_V1.00
- SIM7672X_SIM7652X_Series_Sleep_Mode_Application_Note_V1.00
- SIM7672X_SIM7652X_Series_TCPIP_Application_Note_V1.00
- SIM7672X_SIM7652X_Series_UART_Application_Note_V1.00
- SIM7672X_SIM7652X_Series_UIM_HOT_SWAP_Application_Note_V1.00
- SIM7672X_Series_Hardware_Design_V1.01
- SIM7672_Series_SPEC_Preliminary_230518
- SIM7672_Series_Spec_231205
- SIM767XX_Series_AT_Command_Manual_V1.01
- SIM767XX_V1.01_KDL(230309)
Related Example
FAQ
Taking the connection of SIM7670G LTE Cat-1/GNSS HAT to Raspberry Pi as an example, after parsing the latitude and longitude information of satellite signals through the GNSS_example.py code, you can simply input the latitude and longitude data into a map that supports the NMEA 0183 coordinate system.
Here, we will demonstrate using the map service provided by Waveshare Cloud:
1. Create any type of device on the device attribute page and obtain the MQTT connection data.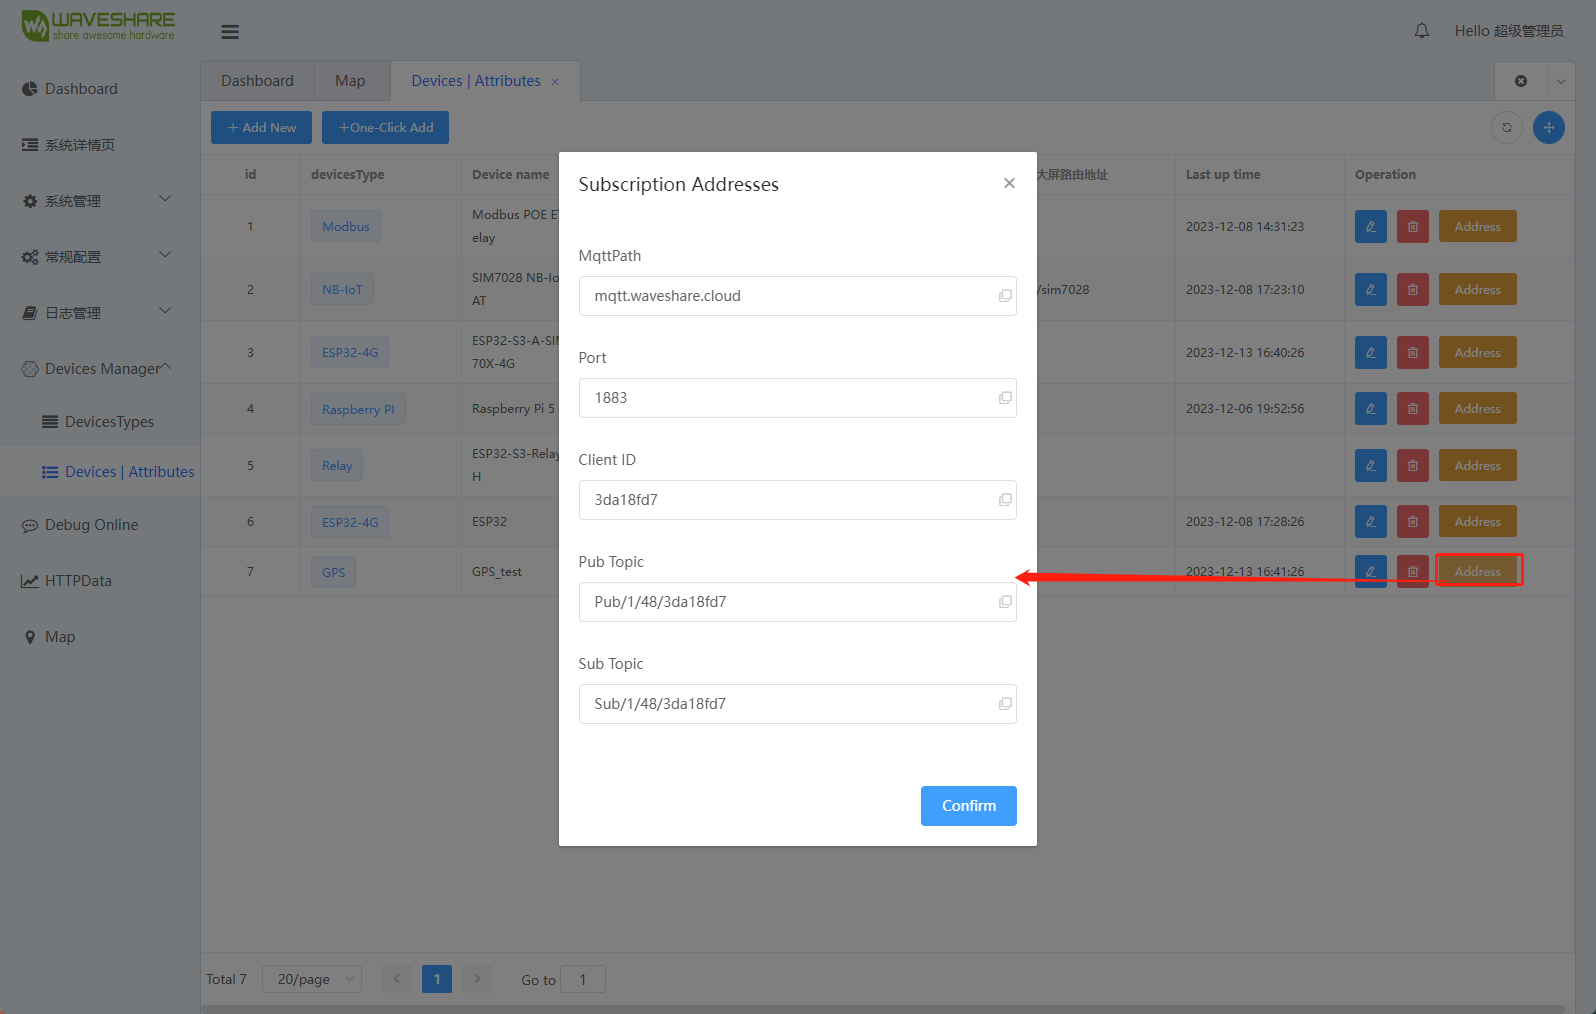
2. Input the parameters to the "Raspberry/GPSMaps/SIM7670G_GNSS_Python.py" demo: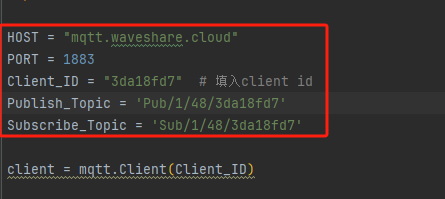
3. Connect the SIM7670G LTE Cat-1/GNSS HAT to the Raspberry Pi and run the example demo located at Raspberry/GPSMaps/SIM7670G_GNSS_Python.py. Wait for the satellite signal to be parsed successfully, and you can then view the location information on the map.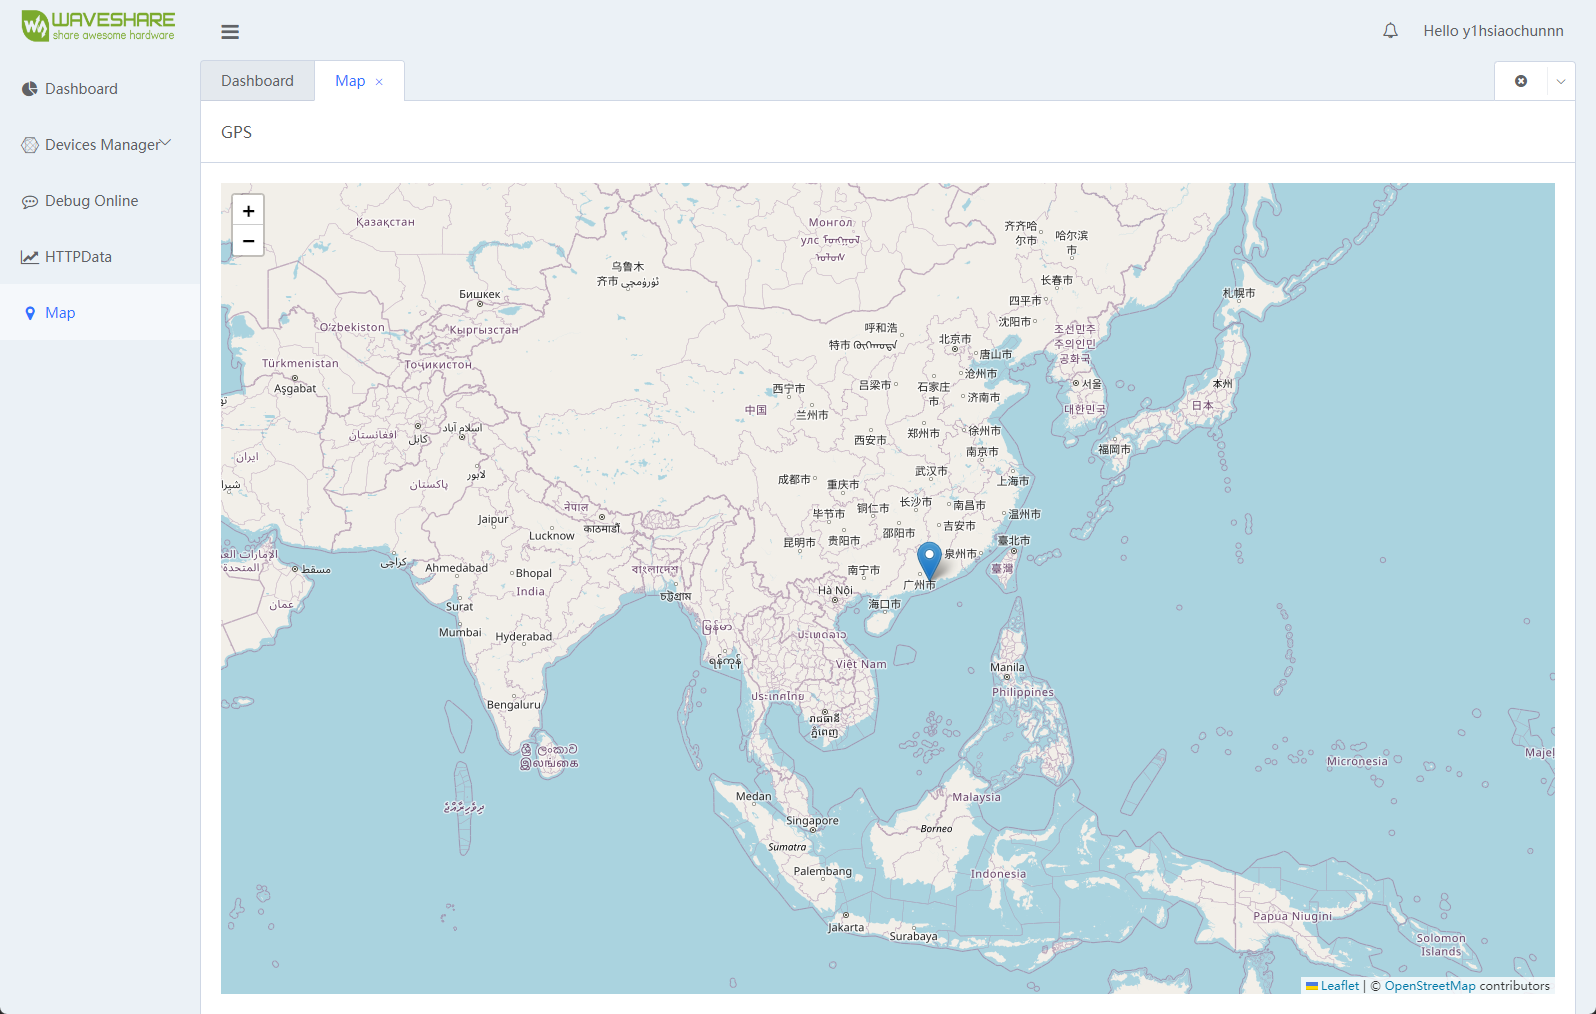
Support
Monday-Friday (9:30-6:30) Saturday (9:30-5:30)
Email: services01@spotpear.com