


- sales/support
Google Chat:---
- sales
+86-0755-88291180
- sales01
sales@spotpear.com
- sales02
dragon_manager@163.com
- support
tech-support@spotpear.com
- CEO-Complaints
zhoujie@spotpear.com
- Only Tech-Support
WhatsApp:13246739196
- Purchase/Shipping/Refund
WhatsApp:13424403025
Raspberry Pi GPM280Z21 User Guide
Features
- 2.8inch IPS screen, 640 × 480 pixels, 70% NTSC color gamut.
- Enjoys a smooth gaming experience with 60fps.
- Optical bonding toughened glass panel with anti-fingerprint technique.
- Compatible with Raspberry Pi Zero 2 W.
- Battery indicator light for checking the power of the game console easily.
- Update ROMs via WiFi.
Introduction
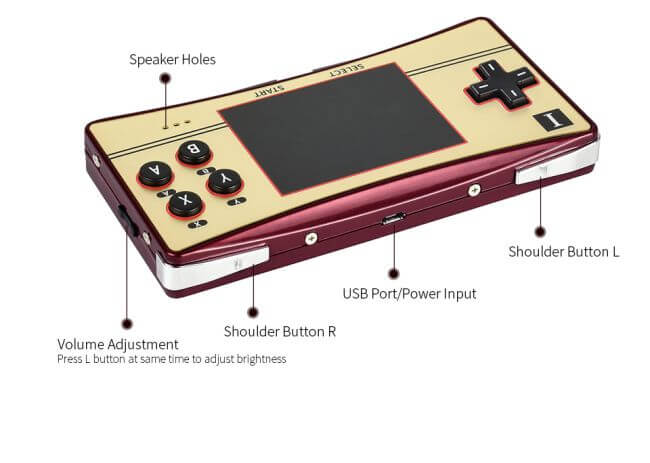
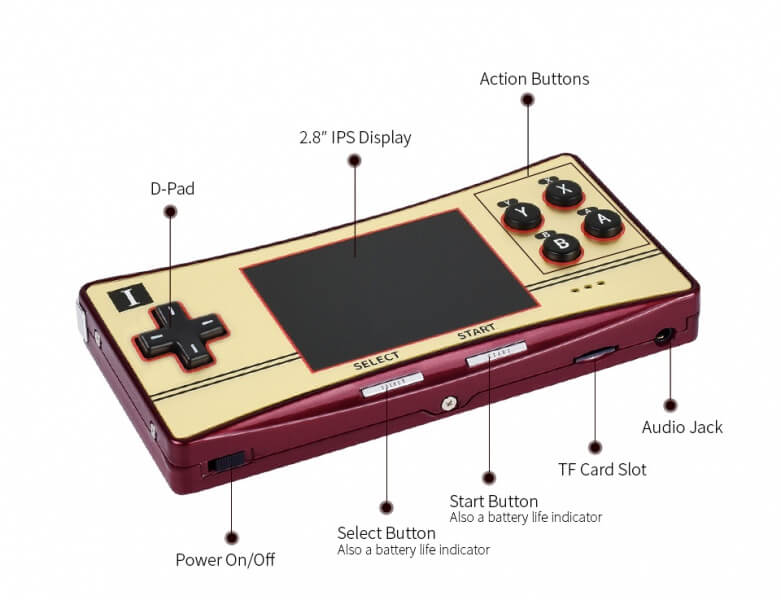
【Note】The battery indicator shows the battery level from high to low through green, blue, and red.
Pre-configured Image
1. Download the zip file to the PC, and unzip it to get the .img file.
| OS | Revision | Raspberry Pi | User name/Password | Link |
|---|---|---|---|---|
| Retropie | v4.8 | Raspberry Pi Zero 2W | pi/raspberry | Google Drive |
2. Connect the TF card to the PC, and use SDFormatter.exe to format the TF card.
3. Open the Win32DiskImager, select the system image downloaded in step 1, and click "Write" to write the system image.
4. After the image has finished writing, insert the TF card into GPM280, turn on the switch, and then the system will start normally.
【Note】If the battery power is too low (flashing red light or the indicator is off), the system will not be able to start. In this case, you need to charge the GPM280 by connecting a 5V/3A power adapter to the Micro USB interface. The indicator light will flash when charging, and the GPM280 supports charging while playing games.
Advanced User Manual
Note: The following content is only for players who have a certain understanding of Raspberry Pi and Linux. Ordinary players do not need to understand.
Official Retropie for GPM280
1. Download Retropie system from the official website, and unzip it to get the ".img" file.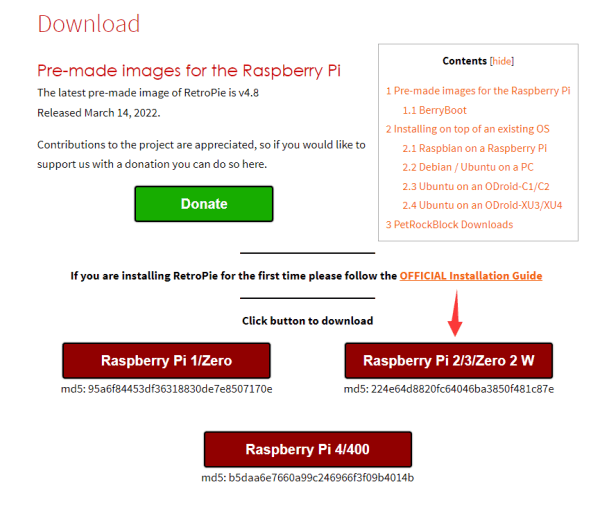
2. Connect the TF card to the PC, use SDFormatter.exe to format the TF card.
3. Open the Win32DiskImager, select the system image downloaded in step 1, and click "Write" to program the system image.
4. Download the GPM280 configuration file, extract 4 files, and copy the "ssh" and "wpa_supplicant.conf" files to the root directory (/boot/) of the TF card.
5. Open "wpa_supplicant.conf", change "USERSSID" and "USERPSK" to the "SSID" and password of WiFi that needs to be connected.
6. Copy "waveshare-dpi-3b-4b.dtbo" to "/boot/overlays/".
7. Open the "config.txt file" in the root directory of the TF card, and add the following code at the end of "config.txt", you can refer to "config.txt" in the GPM280 configuration file.
dtparam=spi=off
dtparam=i2c_arm=off
gpio=0-9=a2
gpio=12-17=a2
gpio=20-25=a2
enable_dpi_lcd=1
display_default_lcd=1
dpi_group=2
dpi_mode=87
dpi_output_format=0x7F216
hdmi_timings=480 0 26 16 10 640 0 25 10 15 0 0 0 60 0 32000000 1
dtoverlay=waveshare-dpi-3b-4b
disable_audio_dither=1
dtoverlay=audremap,pins_18_19
audio_pwm_mode=2
extra_transpose_buffer=2
display_rotate=3
boot_delay=0
hdmi_ignore_edid=0xa5000080
8. Please save it and then eject the TF card.
9. Insert the TF card into the GPM280, turn on the power switch, and then you can enter the system normally after waiting for seconds.
10. After the system is started, the first step is to enter the "WELCOME" interface, and you need to remap the keys. Operation method: long press the A key to enter the key remapping interface, then press the D-pad up, down, left, and right in turn, press START, SELECT, A, B, X, Y, L, R, and long press the A key to skip the other useless keys. At the last HOTKEY ENABLE, SELECT is selected by default. Then press A to select OK to confirm the key mapping.
11. Check the IP address. Operation method: Enter CONFIGURATION and select SHOW IP.
12. Sound settings.
- Press "START" to enter the main menu and enter the "SOUND SETTINGS". Set "AUDIO DEVICE" to "HEADPHONE", and set the "OMX PAYER AUDIO DEVICE" to "LOCAL".
- Return, go to "RETROPIE CONFIGURATION", select "AUDIO", and choose "Headphones". Return to the "RETROPIE CONFIGURATION" interface, select "RASPI-CONFIG", use the D-pad key to select "1 System Options", and choose <Select>, press B to confirm, and then select "S2 Audio"=>"0 Headphones".
- After restarting, press "START" to enter the main menu, enter the "SOUND SETTINGS" and increase the "SYSTEM VOLUME", (for example, to 100%). There is sound after restarting again.
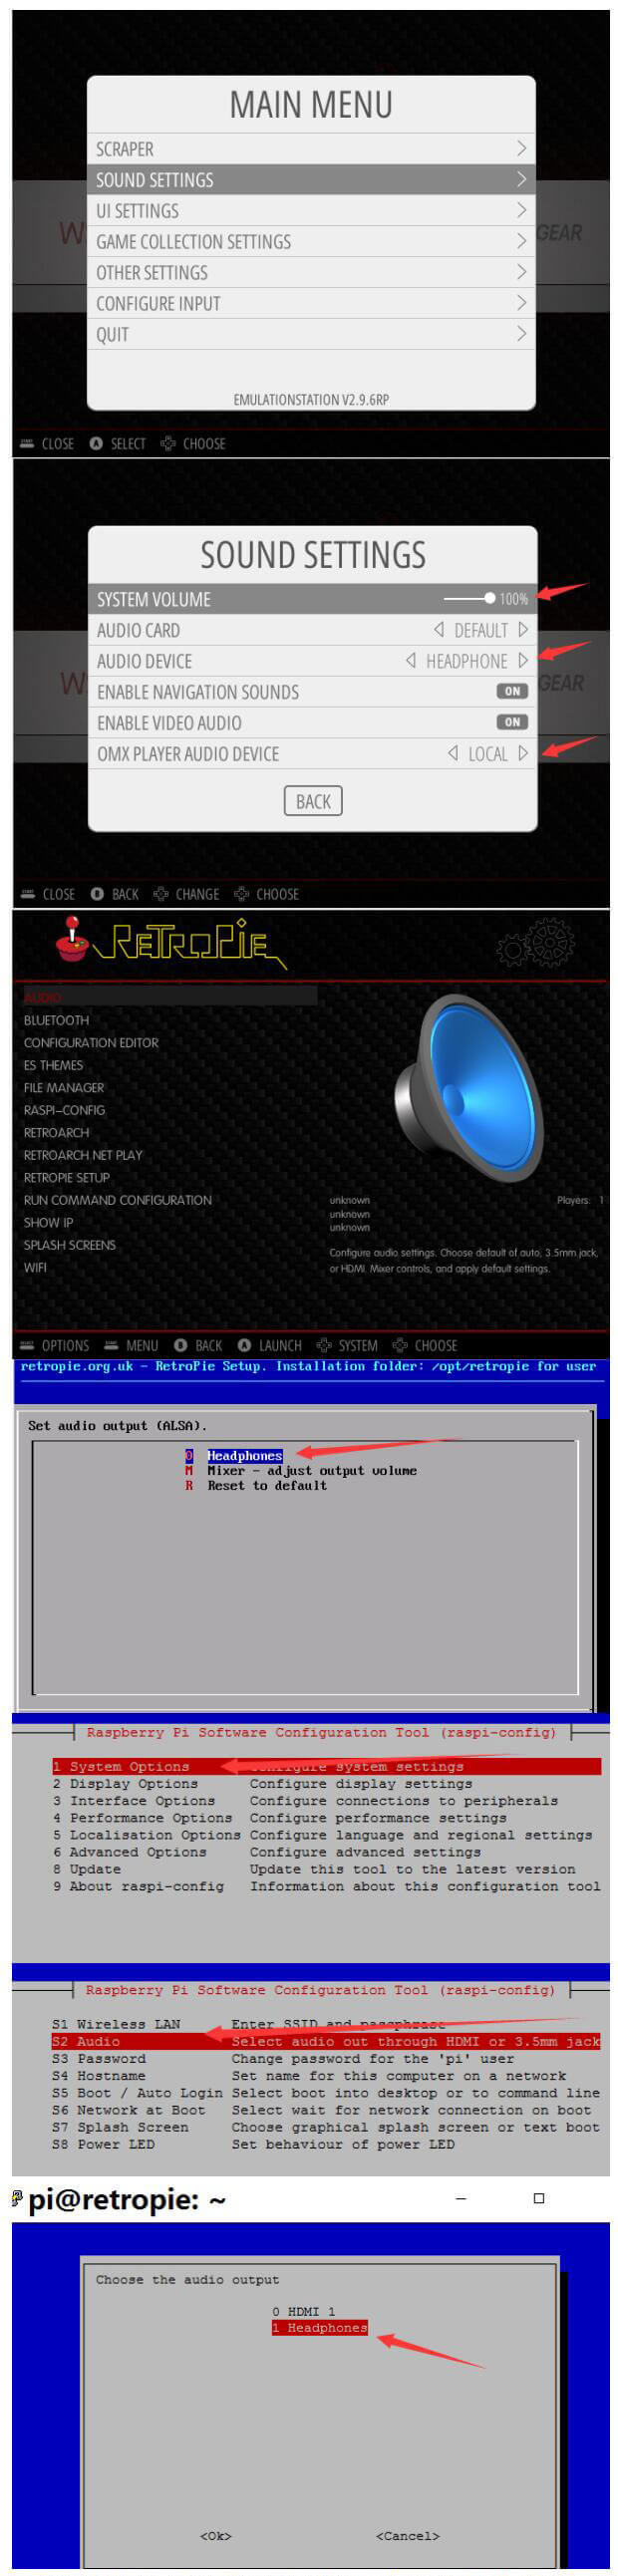
13. Expand storage. Operation method: Enter "CONFIGURATION", select "RASPI-CONFIG", select "6 Advanced Options" with the D-pad key up and down, select <Select> with the D-pad key left and right, press B to confirm, select "A1 Expand Filesystem", press "B" to confirm, and finally restart the system.
14. Update ROMs. Operation method: On the PC of the same local area network, open the corresponding IP, as shown below:
- Copy the ROMs to the relevant directory, as shown below:
- Then in the simulator selection interface, press "Start"->QUIT->RESTART EMULATIONSTATION, and press "A" to confirm. After restarting the emulator, you can see the newly added game.
15. Connect to GPM280 via sftp. Operation method: Open FileZilla or other similar software, enter the IP address obtained in the previous step, (user name: pi, password: raspberry, port: 22), and you can connect to GPM280 normally, as shown in the figure below.
16. Game full-screen setting, this step is normally not necessary, because V4.8 is turned on by default. Operation method: log in to the game console system remotely through SSH, user name: pi, password: raspberry, execute the following command:
sudo nano /opt/retropie/configs/all/retroarch.cfg
Make sure the following commands are enabled, V4.8 is enabled by default.
video_aspect_ratio_auto = "true"17. Power off safely. Operation method: Press the START button on the menu interface, and select QUIT->SHUTDOWN SYSTEM.
18. Other more detailed operation methods can refer to: Retropie official documentation.