


- sales/support
Google Chat:---
- sales
+86-0755-88291180
- sales01
sales@spotpear.com
- sales02
dragon_manager@163.com
- support
tech-support@spotpear.com
- CEO-Complaints
zhoujie@spotpear.com
- Only Tech-Support
WhatsApp:13246739196
- Purchase/Shipping/Refund
WhatsApp:13424403025
- HOME
- >
- ARTICLES
- >
- Common Moudle
- >
- Power
RS485 Control Tutorial
RS485 Control
Connect the ESP32-S3-ETH-8DI-8RO device using RS485, and send data to ESP32-S3-ETH-8DI-8RO to control the opening and closing of each relay. Communication is performed at a default baud rate of 9600.
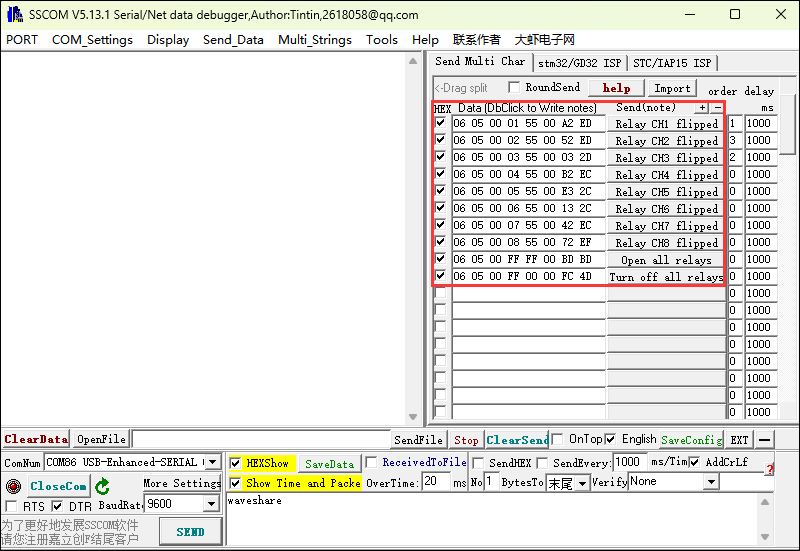
Operation Command Command Function 06 05 00 01 55 00 A2 ED Switch the state of CH1 relay 06 05 00 02 55 00 52 ED Switch the state of CH2 relay 06 05 00 03 55 00 03 2D Switch the state of CH3 relay 06 05 00 04 55 00 B2 EC Switch the state of CH4 relay 06 05 00 05 55 00 E3 2C Switch the state of CH5 relay 06 05 00 06 55 00 13 2C Switch the state of CH6 relay 06 05 00 07 55 00 42 EC Switch the state of CH7 relay 06 05 00 08 55 00 72 EF Switch the state of CH8 relay 06 05 00 FF FF 00 BD BD Turn on all relays 06 05 00 FF 00 00 FC 4D Turn off all relays
Hardware Connection
Here we use the example of USB TO RS232/485 Converter for demonstration
ESP32-S3-Relay-6CH USB-TO-RS232-485 RS485 - A+ Tx B - A+ RS485 - B- Rx B - B-
Software Operation
- Use SSCOM to send data
- Open the SSCOM software and select the COM port corresponding to the Port B connected above
- Open the serial port and use the Send Multi Char function to quickly send commands
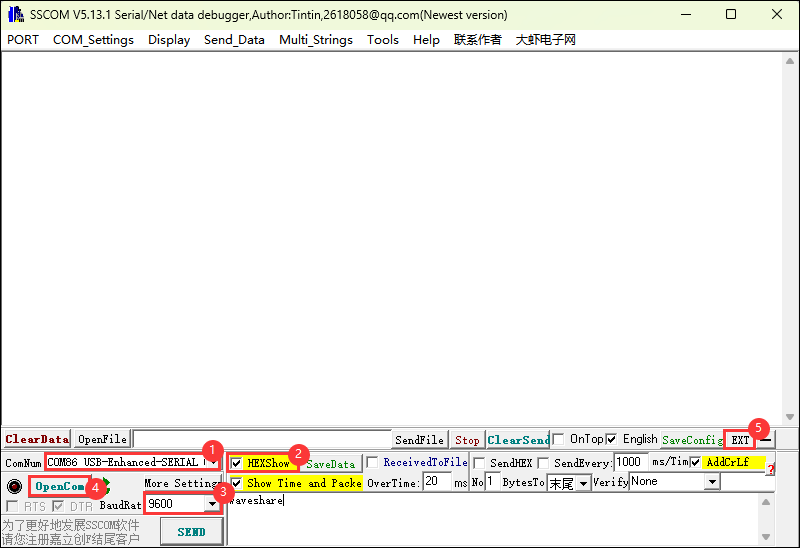
- You can control the relays with the following commands
TAG:
Bevelopment Board
Raspberry Pi Camera 8MP IMX415 also For Luckfox-Omni3576 RK3576
Raspberry Pi MLX90641
Raspberry Pi Pico 2 RP2350B 2.1 inch Round LCD Touch Display 480x480 HMI LVGL QMI8658 6-axis 65K Colors
MP2.5G Raspberry Pi 5 PCIe to 2.5G Ethernet HAT Pi5 RTL8125
Raspberry Pi 5 IMX219
Arduino MLX90641
Raspberry Pi 5 Official Red-White Case
UART To Ethernet
USB to JTAG
Raspberry Pi 2inch LCD
Programmable Keyboard
Raspberry Pi UART
RP2040
ESP32-S3 IR Infrared Thermal Imaging Camera B 45/90 80×62 ESP32-S3-WROOM
Serial UART Bus Servo ST3020 TTL 25KG.CM Magnetic-Encoder High precision and Large torque
Jetson Nano
Sipeed NanoKVM-USB Finger-sized 4K USB KVM for Server/SBCs
Raspberry Pi RP2040 LoRa-HF
ESP32 LVGL
TAG:
Pi5
Chip RP2350A RP2350B RP2354A RP2354B Raspberry Pi Pico 2
Raspberry Pi 5 PCIe M.2 NVMe SSD Pi5 2230-Board mini
ESP32 Google Dinosaur game
Raspberry Pi 0.96inch OLED
Industrial-grade isolated 2-way RS485 hub repeater One RS485 TO Two RS485
Raspberry Pi MLX90641
1.6inch Rotary screen
Raspberry Pi 13.3 inch FHD AMOLED Capacitive TouchScreen Display Type-C HDMI Computer PC
MINI linux board
14 inch Dual Double LCD Computer PC Monitor Display Secondary Screen TypeC Mini HDMI Windows MacOS
Raspberry Pi UPS HAT E 21700 Li battery (NOT included) 5V 6A Uninterruptible Power Supply
ESP32 P4 7inch Display TouchScreen
Raspberry Pi 7inch DSI LCD B Display MIPI IPS 800x480 Capacitive TouchScreen
Raspberry Pi 2.8 inch DSI Display MIPI LCD Capacitive TouchScreen 480x640
Raspberry Pi Thermal imaging camera
ESP32-S3
Raspberry Pi 5
PC Monitor Screen
DeepSeek ESP32-S3 Voice Chat Robot