- sales/support
Google Chat:---
- sales
+86-0755-88291180
- sales01
sales@spotpear.com
- sales02
dragon_manager@163.com
- support
tech-support@spotpear.com
- CEO-Complaints
zhoujie@spotpear.com
- Only Tech-Support
WhatsApp:13246739196
- Purchase/Shipping/Refund
WhatsApp:13424403025
RPi Tutorial Series: 1-Wire DS18B20 Sensor User Guide
DS18B20 is a common temperature sensor which communicates over a 1-Wire bus that by definition requires only one data line. Usually, a certain MCU reads data from DS18B20 in strict accordance with Timing, but now we are going to control DS18B20 using a Raspberry and with the Raspbian OS. You will find that everything is file in the Linux.
Enable 1-Wire
Enable 1-Wire interface with the raspi-config tool.
sudo raspi-config
Select Advanced Option -> 1-Wire -> <Yes>
In fact this tool edits the /boot/config.txt and appends this line: dtoverlay=w1-gpio. With this line, a GPIO to drive an external pullup is disabled by default. It's inconvenience in certain condition so we often change "dtoverlay=w1-gpio" to "dtoverlay=w1-gpio-pullup". We also specify GPIO 4 for I/O, so we change the line to "dtoverlay=w1-gpio-pullup,gpiopin=4". Just for instance, because GPIO 4 (BCM numbering, can be checked by this command: gpio readall) is used for I/O by default so "gpiopin=4" is not usually required.
More details about "dtoverlay", please read the manual: /boot/overlays/README.
- Quote from /boot/overlays/README:
Name:   w1-gpio
Info:   Configures the w1-gpio Onewire interface module.
        Use this overlay if you *don't* need a GPIO to drive an external pullup.
Load:   dtoverlay=w1-gpio,<param>=<val>
Params: gpiopin                 GPIO for I/O (default "4")

        pullup                  Non-zero, "on", or "y" to enable the parasitic
                                power (2-wire, power-on-data) feature


Name:   w1-gpio-pullup
Info:   Configures the w1-gpio Onewire interface module.
        Use this overlay if you *do* need a GPIO to drive an external pullup.
Load:   dtoverlay=w1-gpio-pullup,<param>=<val>
Params: gpiopin                 GPIO for I/O (default "4")

        pullup                  Non-zero, "on", or "y" to enable the parasitic
                                power (2-wire, power-on-data) feature

        extpullup               GPIO for external pullup (default "5")
Finally, we append this line to the config.txt file: "dtoverlay=w1-gpio-pullup,gpiopin=4" (no space in this line).
Check whether the module is started
Connect the Data Pin of DS18B20 to the GPIO 4 of RPi (BCM numbering, corresponds to the physical 7 pin. The same below). The Pins GND/VCC are connected to 3.3V power supply. Reboot the Raspberry Pi to enable the settings. Then list the 1-Wire module with this command:
lsmod | grep w1
You get: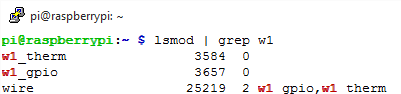
It indicates the module is started. If you didn't find the w1 device, mount it with:
sudo modprobe w1_gpio
sudo modprobe w1_therm
Read temperature
Change the current directory to /sys/bus/w1/devices
cd /sys/bus/w1/devices
List the file and a 28-xxxxxxxxxxxx device directory (e.g. here is 28-00000674869d) will be found. This is the ROM of DS18B20. If more than one DS18B20 are connected, you will find a certain directories more than one.
cd 28-00000674869d
You can read the temperature from the w1_slave file in the directory. This is too good to be true!
cat w1_slave
Read the temperature from the file w1_slave
The YES in the first line indicates CRC check success (Data Valid ). The number following t= is the temperature, 28750 stands for 28.7 (C).
Programming
- These examples require a certain library, see: Libraries Installation for RPi
sysfs
#include <stdio.h>
#include <stdlib.h>
#include <unistd.h>
#include <fcntl.h>
#include <dirent.h>
#include <string.h>
#include <time.h>

int main(int argc, char *argv[])
{
    char path[50] = "/sys/bus/w1/devices/";
    char rom[20];
    char buf[100];
    DIR *dirp;
    struct dirent *direntp;
    int fd =-1;
    char *temp;
    float value;
    // These tow lines
mount the device:
    system("sudo modprobe w1-gpio");
    system("sudo modprobe w1-therm");
    // Check if /sys/bus/w1/devices/ exists.
    if((dirp = opendir(path)) == NULL)
    {
        printf("opendir error\n");
        return 1;
    }
    // Reads the directories or files in the current directory.
    while((direntp = readdir(dirp)) != NULL)
    {
        // If 28-00000 is the substring of d_name,
        // then copy d_name to rom and print rom.
        if(strstr(direntp->d_name,"28-00000"))
        {
            strcpy(rom,direntp->d_name);
            printf(" rom: %s\n",rom);
        }
    }
    closedir(dirp);
    // Append the String rom and "/w1_slave" to path
    // path becomes to "/sys/bus/w1/devices/28-00000xxxx/w1_slave"
    strcat(path,rom);
    strcat(path,"/w1_slave");
    while(1)
    {
        // Open the file in the path.
        if((fd = open(path,O_RDONLY)) < 0)
        {
            printf("open error\n");
            return 1;
        }
        // Read the file
        if(read(fd,buf,sizeof(buf)) < 0)
        {
            printf("read error\n");
            return 1;
        }
        // Returns the first index of 't'.
        temp = strchr(buf,'t');
        // Read the string following "t=".
        sscanf(temp,"t=%s",temp);
        // atof: changes string to float.
        value = atof(temp)/1000;
        printf(" temp : %3.3f °C\n",value);

        sleep(1);
    }
    return 0;
}
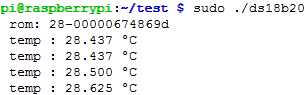
Save the file as "ds18b20.c" then compile and run with:
gcc -Wall ds18b20.c -o ds18b20
sudo ./ds18b20
Python
import os
import glob
import time

# These tow lines mount the device:
os.system('modprobe w1-gpio')
os.system('modprobe w1-therm')

base_dir = '/sys/bus/w1/devices/'
# Get all the filenames begin with 28 in the path base_dir.
device_folder = glob.glob(base_dir + '28*')[0]
device_file = device_folder + '/w1_slave'
def read_rom():
    name_file=device_folder+'/name'
    f = open(name_file,'r')
    return f.readline()

def read_temp_raw():
    f = open(device_file, 'r')
    lines = f.readlines()
    f.close()
    return lines

def read_temp():
    lines = read_temp_raw()
    # Analyze if the last 3 characters are 'YES'.
    while lines[0].strip()[-3:] != 'YES':
        time.sleep(0.2)
        lines = read_temp_raw()
    # Find the index of 't=' in a string.
    equals_pos = lines[1].find('t=')
    if equals_pos != -1:
        # Read the temperature .
        temp_string = lines[1][equals_pos+2:]
        temp_c = float(temp_string) / 1000.0
        temp_f = temp_c * 9.0 / 5.0 + 32.0
        return temp_c, temp_f

print(' rom: '+ read_rom())
while True:
    print(' C=%3.3f  F=%3.3f'% read_temp())
time.sleep(1)
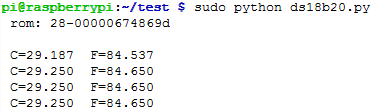
Save the file as "ds18b20.py" then execute with:
sudo python ds18b20.py
expected result