- sales/support
Google Chat:---
- sales
+86-0755-88291180
- sales01
sales@spotpear.com
- sales02
dragon_manager@163.com
- support
tech-support@spotpear.com
- CEO-Complaints
zhoujie@spotpear.com
- Only Tech-Support
WhatsApp:13246739196
- Purchase/Shipping/Refund
WhatsApp:13424403025
RP2350-POE-ETH User Guide
Features
- Uses the RP2350A microcontroller chip developed by Raspberry Pi
- Unique dual-core, dual-architecture, featuring dual-core ARM Cortex-M33 processors and dual-core Hazard3 RISC-V processors, running at clock frequencies up to 150MHz, allowing users to flexibly switch between the two architectures
- Built-in 520KB of SRAM and 16MB of on-chip Flash
- Features a Type-C interface for easy plug-and-play (no orientation concerns)
- Onboard W6300 with integrated TCP/IP protocol stack
- Supports USB1.1 host and device
- Castellated module design allows direct soldering and integration onto custom base boards
- Drag-and-drop programming using mass storage over USB
- Brings out 20 GPIO pins, compatible with some Pico expansion boards
- Accurate on-chip clock and timer
- Built-in temperature sensor for real-time chip temperature monitoring
- 12 × programmable I/O (PIO) state machines for custom peripheral support
Onboard Resources
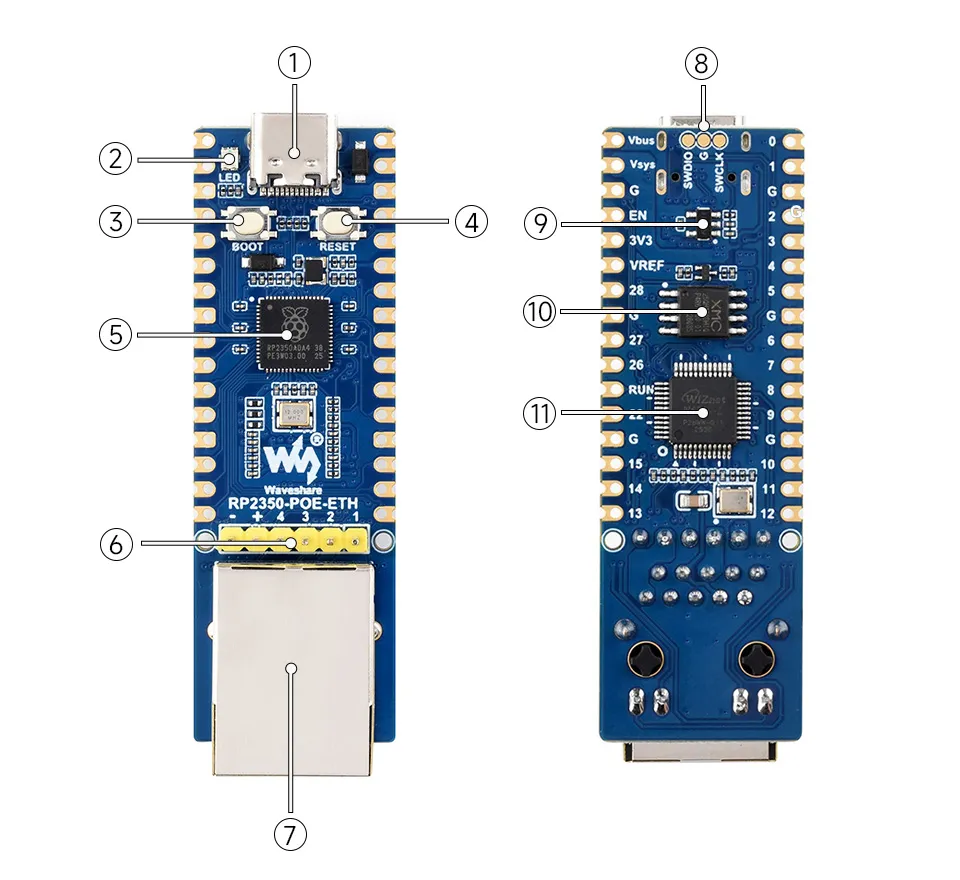
- USB Type-C connector For programming, supports USB1.1 host and device
- WS2812 Cool RGB LED
- BOOT button Press while resetting to enter download mode
- RESET button Reset button
- RP2350A Dual-core, dual-architecture processor, up to 150MHz operating frequency
- PoE module & power supply header Supports external PoE power module, allowing the entire board to be powered via Ethernet cable
- 100M RJ45 Ethernet port Ethernet port
- Debug Interface Supports online simulation and debugging
- Low Dropout Linear Regulator Vout = 3.3V, max current 800mA
- 16MB NOR Flash For storing programs and data
- W6300 Ethernet driver chip
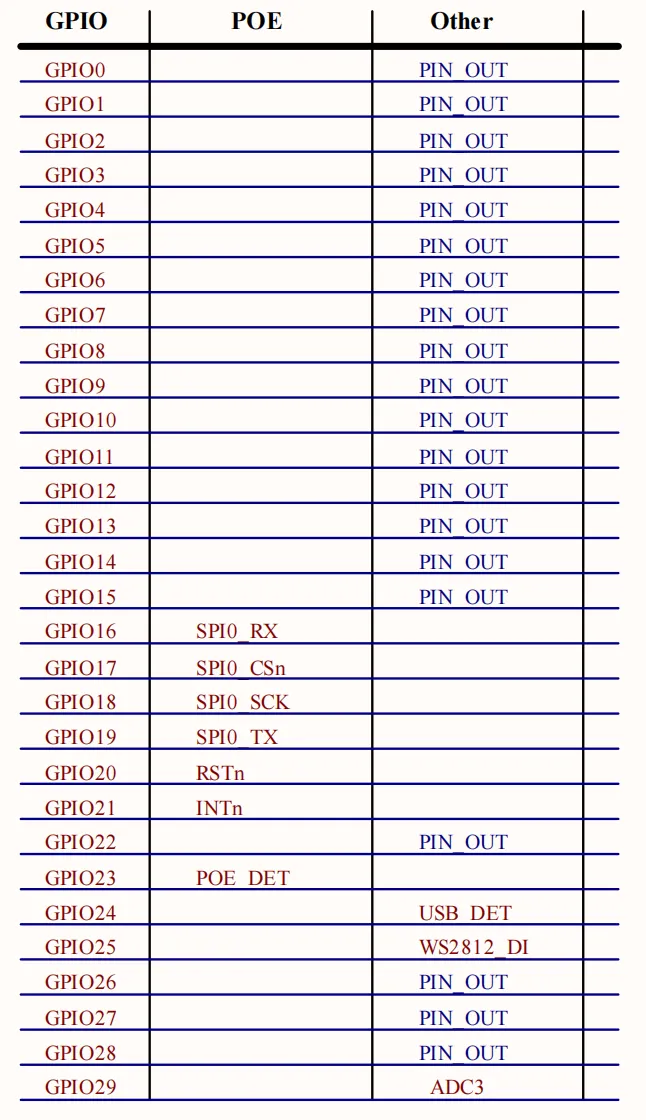
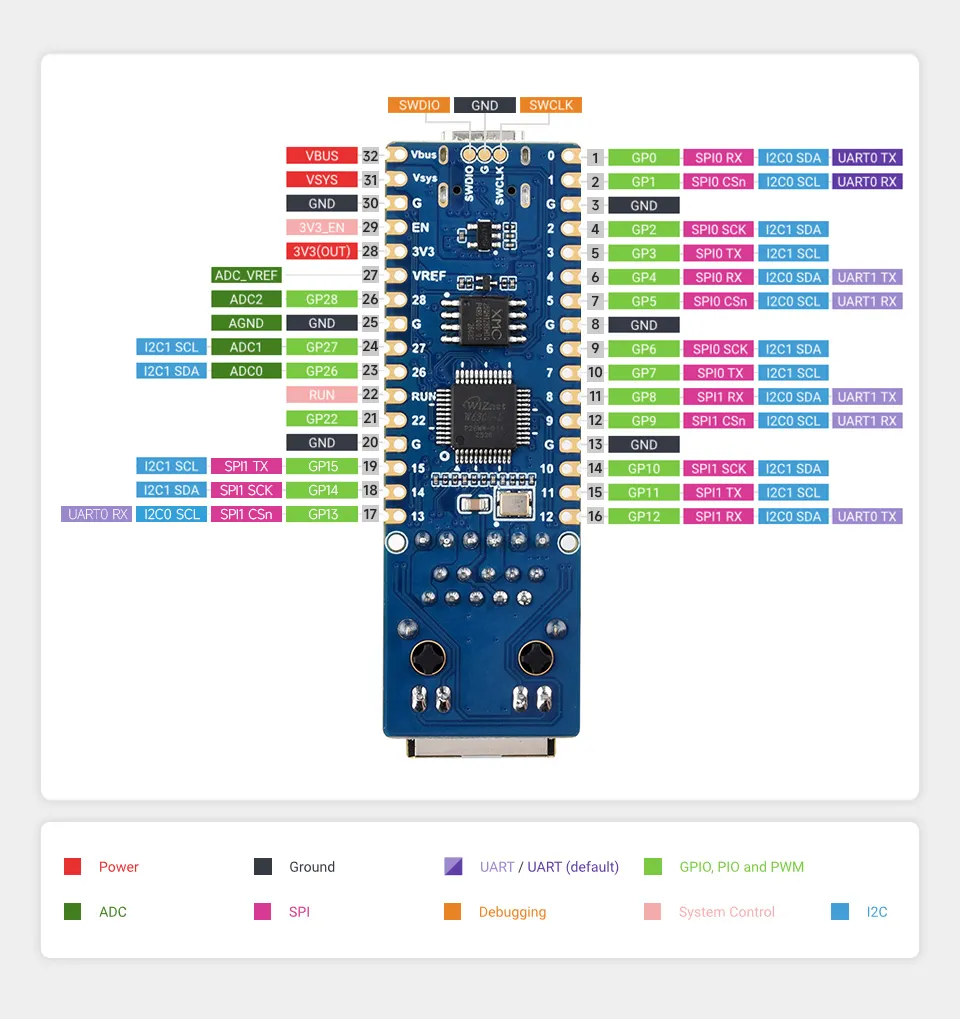
Interface Introduction
Dimensions
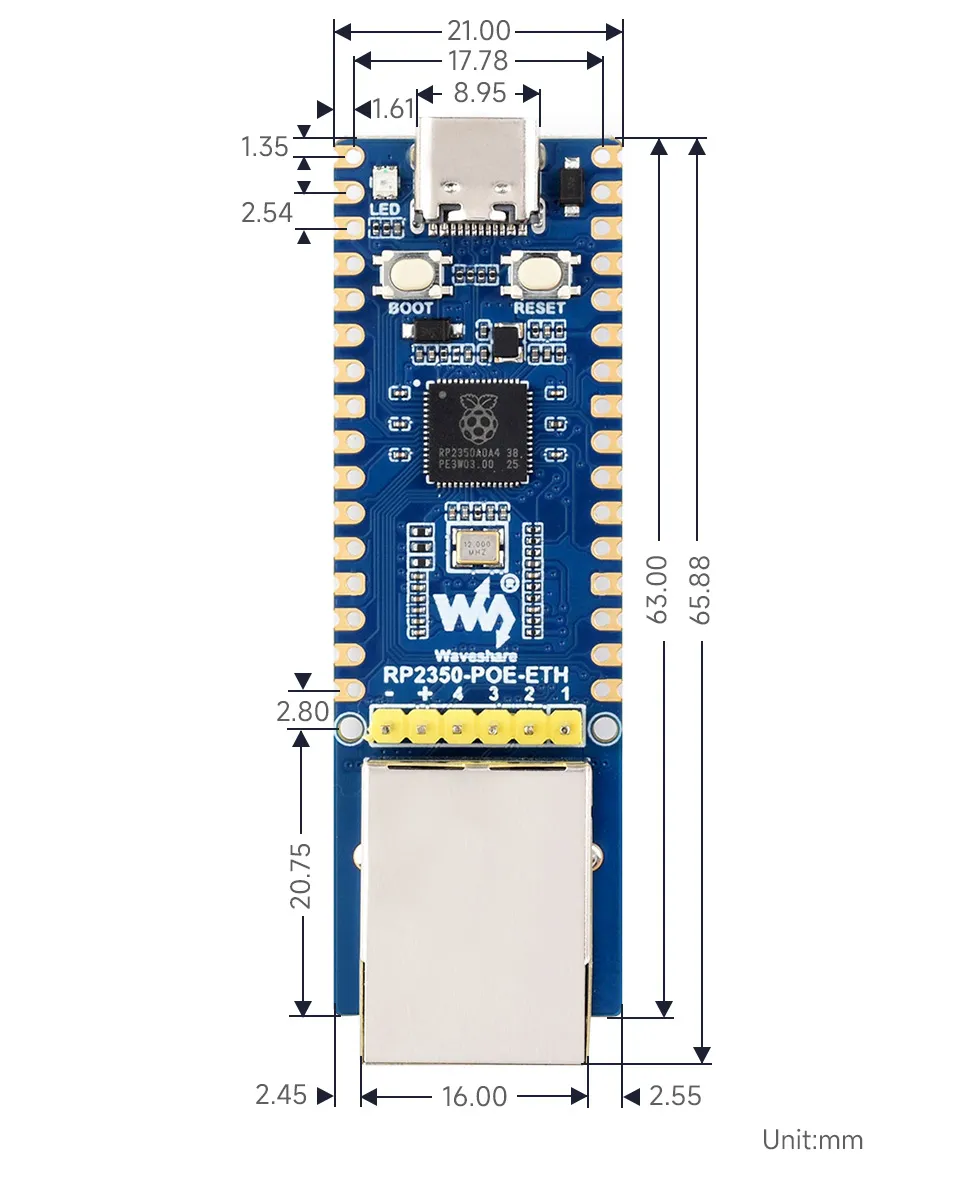
Working with MicroPython
This chapter contains the following sections. Please read as needed:
MicroPython Getting Started Tutorial
New to Pico MicroPython development and want to get started quickly? We have prepared a general introductory tutorial for you. This tutorial is designed to help developers quickly become familiar with Thonny IDE and start developing. It covers environment setup, project creation, component usage, and peripheral programming, helping you take the first step in MicroPython programming.
- Section 1 Basic Introduction
- Section 2 GPIO
- Section 3 PWM
- Section 4 ADC
- Section 5 UART
- Section 6 I2C
- Section 7 SPI
- Section 8 PIO
Setting Up the Development Environment
Please refer to the Install and Configure Thonny IDE Tutorial to download and install the Thonny IDE.
Example
The MicroPython examples are located in the examples/MicroPython directory of the example package.
| Example | Basic Program Description | Dependency Library |
|---|---|---|
| 01_MQTT | MQTT example | - |
01_MQTT
Example Description
- This example demonstrates how the RP2350-POE-ETH uses the W6300 Ethernet to connect to a public MQTT broker (
broker.emqx.io:1883by default) under MicroPython, and implements:- Subscribe topic:
Sub/ed229f15 - Publish topic:
Pub/ed229f15 - Publish a device status JSON once on power‑up, and then every 10 seconds thereafter (including CPU frequency, temperature, VSYS voltage, USB/POE insertion status, uptime, etc.)
- Subscribe topic:
- Open-source usage notes (strongly recommended to modify on first use to avoid conflicts among multiple people/devices):
- MQTT Brokers typically require that the
Client IDbe globally unique at any given time: if two devices use the sameMQTT_CLIENT_IDto log in, the later one will kick off the earlier one, resulting in frequent disconnections. - If topics use fixed values, data from multiple devices will be mixed together and can easily be accidentally subscribed to or controlled by others.
- It is recommended to modify at least:
MQTT_CLIENT_ID,MQTT_SUB_TOPIC, andMQTT_PUB_TOPIC. If you set up your own broker or enable authentication, also modifyMQTT_USERNAMEandMQTT_PASSWORD.
- MQTT Brokers typically require that the
In the source code for this example, the relevant configuration is located in:
main.py: Topic definitions + reading MQTT parameters fromconfig.py
# Constants for MQTT Topics
MQTT_SUB_TOPIC = 'Sub/ed229f15'
MQTT_PUB_TOPIC = 'Pub/ed229f15'

# MQTT Parameters
MQTT_SERVER = config.mqtt_server
MQTT_PORT = config.mqtt_port
MQTT_USERNAME = config.mqtt_username
MQTT_PASSWORD = config.mqtt_password
MQTT_CLIENT_ID = config.mqtt_client_id
MQTT_KEEPALIVE = config.mqtt_keepalive
config.py: MQTT broker and account information
mqtt_server = b'broker.emqx.io'
mqtt_port = 1883
mqtt_client_id = b'ed229f15'
mqtt_keepalive = 60
mqtt_username = b'w6300_test'
mqtt_password = b'0123456789'
Hardware Connection
- Connect the development board to your computer via USB (for power, flashing, and serial log viewing).
- Plug an Ethernet cable into the RJ45 port and ensure the network can reach the public internet (able to access
broker.emqx.io:1883). - Optional: Use a PoE Ethernet cable to power the board (the program will reflect the
poe_insertedstatus in the reported JSON).
Code Analysis
- Entry file:
main.py- Ethernet initialization
ethernet_init()network.WIZNET6K()initializes the Ethernet interfacenic.ifconfig('dhcp')enables DHCP to obtain an IP address and waits fornic.isconnected()
- MQTT connection
mqtt_connect()- Uses
from umqtt.simple import MQTTClient - After successful connection, sets the callback
client.set_callback(mqtt_recv_callback)and subscribes toMQTT_SUB_TOPIC
- Uses
- Publish and subscribe topics (defined by default as constants at the top of
main.py):
- Ethernet initialization
MQTT_SUB_TOPIC = 'Sub/ed229f15'
MQTT_PUB_TOPIC = 'Pub/ed229f15'
- Reporting (once at startup + every 10 seconds)
PUBLISH_INTERVAL = 10- The published JSON consists of three parts:
device/system/message(note:get_network_info()is implemented in the current code but not yet included in the payload; you can extend it as needed):
{
  "device": { "chip": "RP2350A", "client_id": "ed229f15" },
  "system": {
    "cpu_mhz": 150,
    "ram_kb": 520,
    "temp_c": 36.2,
    "vsys_voltage_v": 5.021,
    "vsys_adc_raw": 2048,
    "usb_inserted": true,
    "poe_inserted": false,
    "uptime": "0:00:01:23"
  },
  "message": "Hello, waveshare!"
}
- Subscription message callback
mqtt_recv_callback(topic, message)- Upon receiving a message on the subscribed topic, it attempts to parse the payload as JSON and executes commands according to the fields (supports multiple fields in a single payload):
{"adc": 1}: reads VSYS voltage (GPIO29 ADC) and replies toPub/...{"led": 2}: sets WS2812 color (GPIO25, values0-8){"io_dect": 1}: reads USB/POE insertion status (GPIO24/23) and replies toPub/...
- Reply examples:
- Upon receiving a message on the subscribed topic, it attempts to parse the payload as JSON and executes commands according to the fields (supports multiple fields in a single payload):
{"vsys_voltage":5.021,"vsys_adc_raw":2048}
{"led_color":2,"led_name":"RED"}
{"usb_inserted":true,"poe_inserted":false}
- MQTT library
lib/umqtt/simple.py: basic MQTT protocol implementation (connect/publish/subscribe/wait_msg/check_msg)robust.py: adds automatic reconnection logic on top ofsimple.py(this example currently usesumqtt.simple; you can switch torobustfor more resilience if needed)
Operation Result
Before running, please complete the Hardware Connections and follow the steps below for programming and deployment:
- Flash the MicroPython Firmware (UF2)
- After entering BOOT mode, drag-and-drop/copy the
RP2350-POE-ETH.uf2file from thefirmware/MicroPythondirectory onto the development board's USB drive to complete programming.
- After entering BOOT mode, drag-and-drop/copy the
- Upload the example code to the board's file system and run main.py in Thonny
- Files in the
examples/MicroPython/01_MQTTdirectory:main.py(MicroPython auto‑start entry on power‑up)config.pylib/umqtt/simple.pylib/umqtt/robust.py
- Note: The
lib/directory structure must be preserved; the final layout on the board should resemble:
- Files in the
/
  main.py
  config.py
  lib/
    umqtt/
      simple.py
      robust.py
- After programming and uploading the files, reset the board. The serial port will print logs similar to the following (may vary slightly depending on the network environment):
Initialize Ethernet (W6300)
Waiting for Ethernet connection...
Ethernet connection successful!
IP address: 192.168.1.100
Subscribe to topic: Sub/ed229f15
Published: {...} -> Pub/ed229f15
...
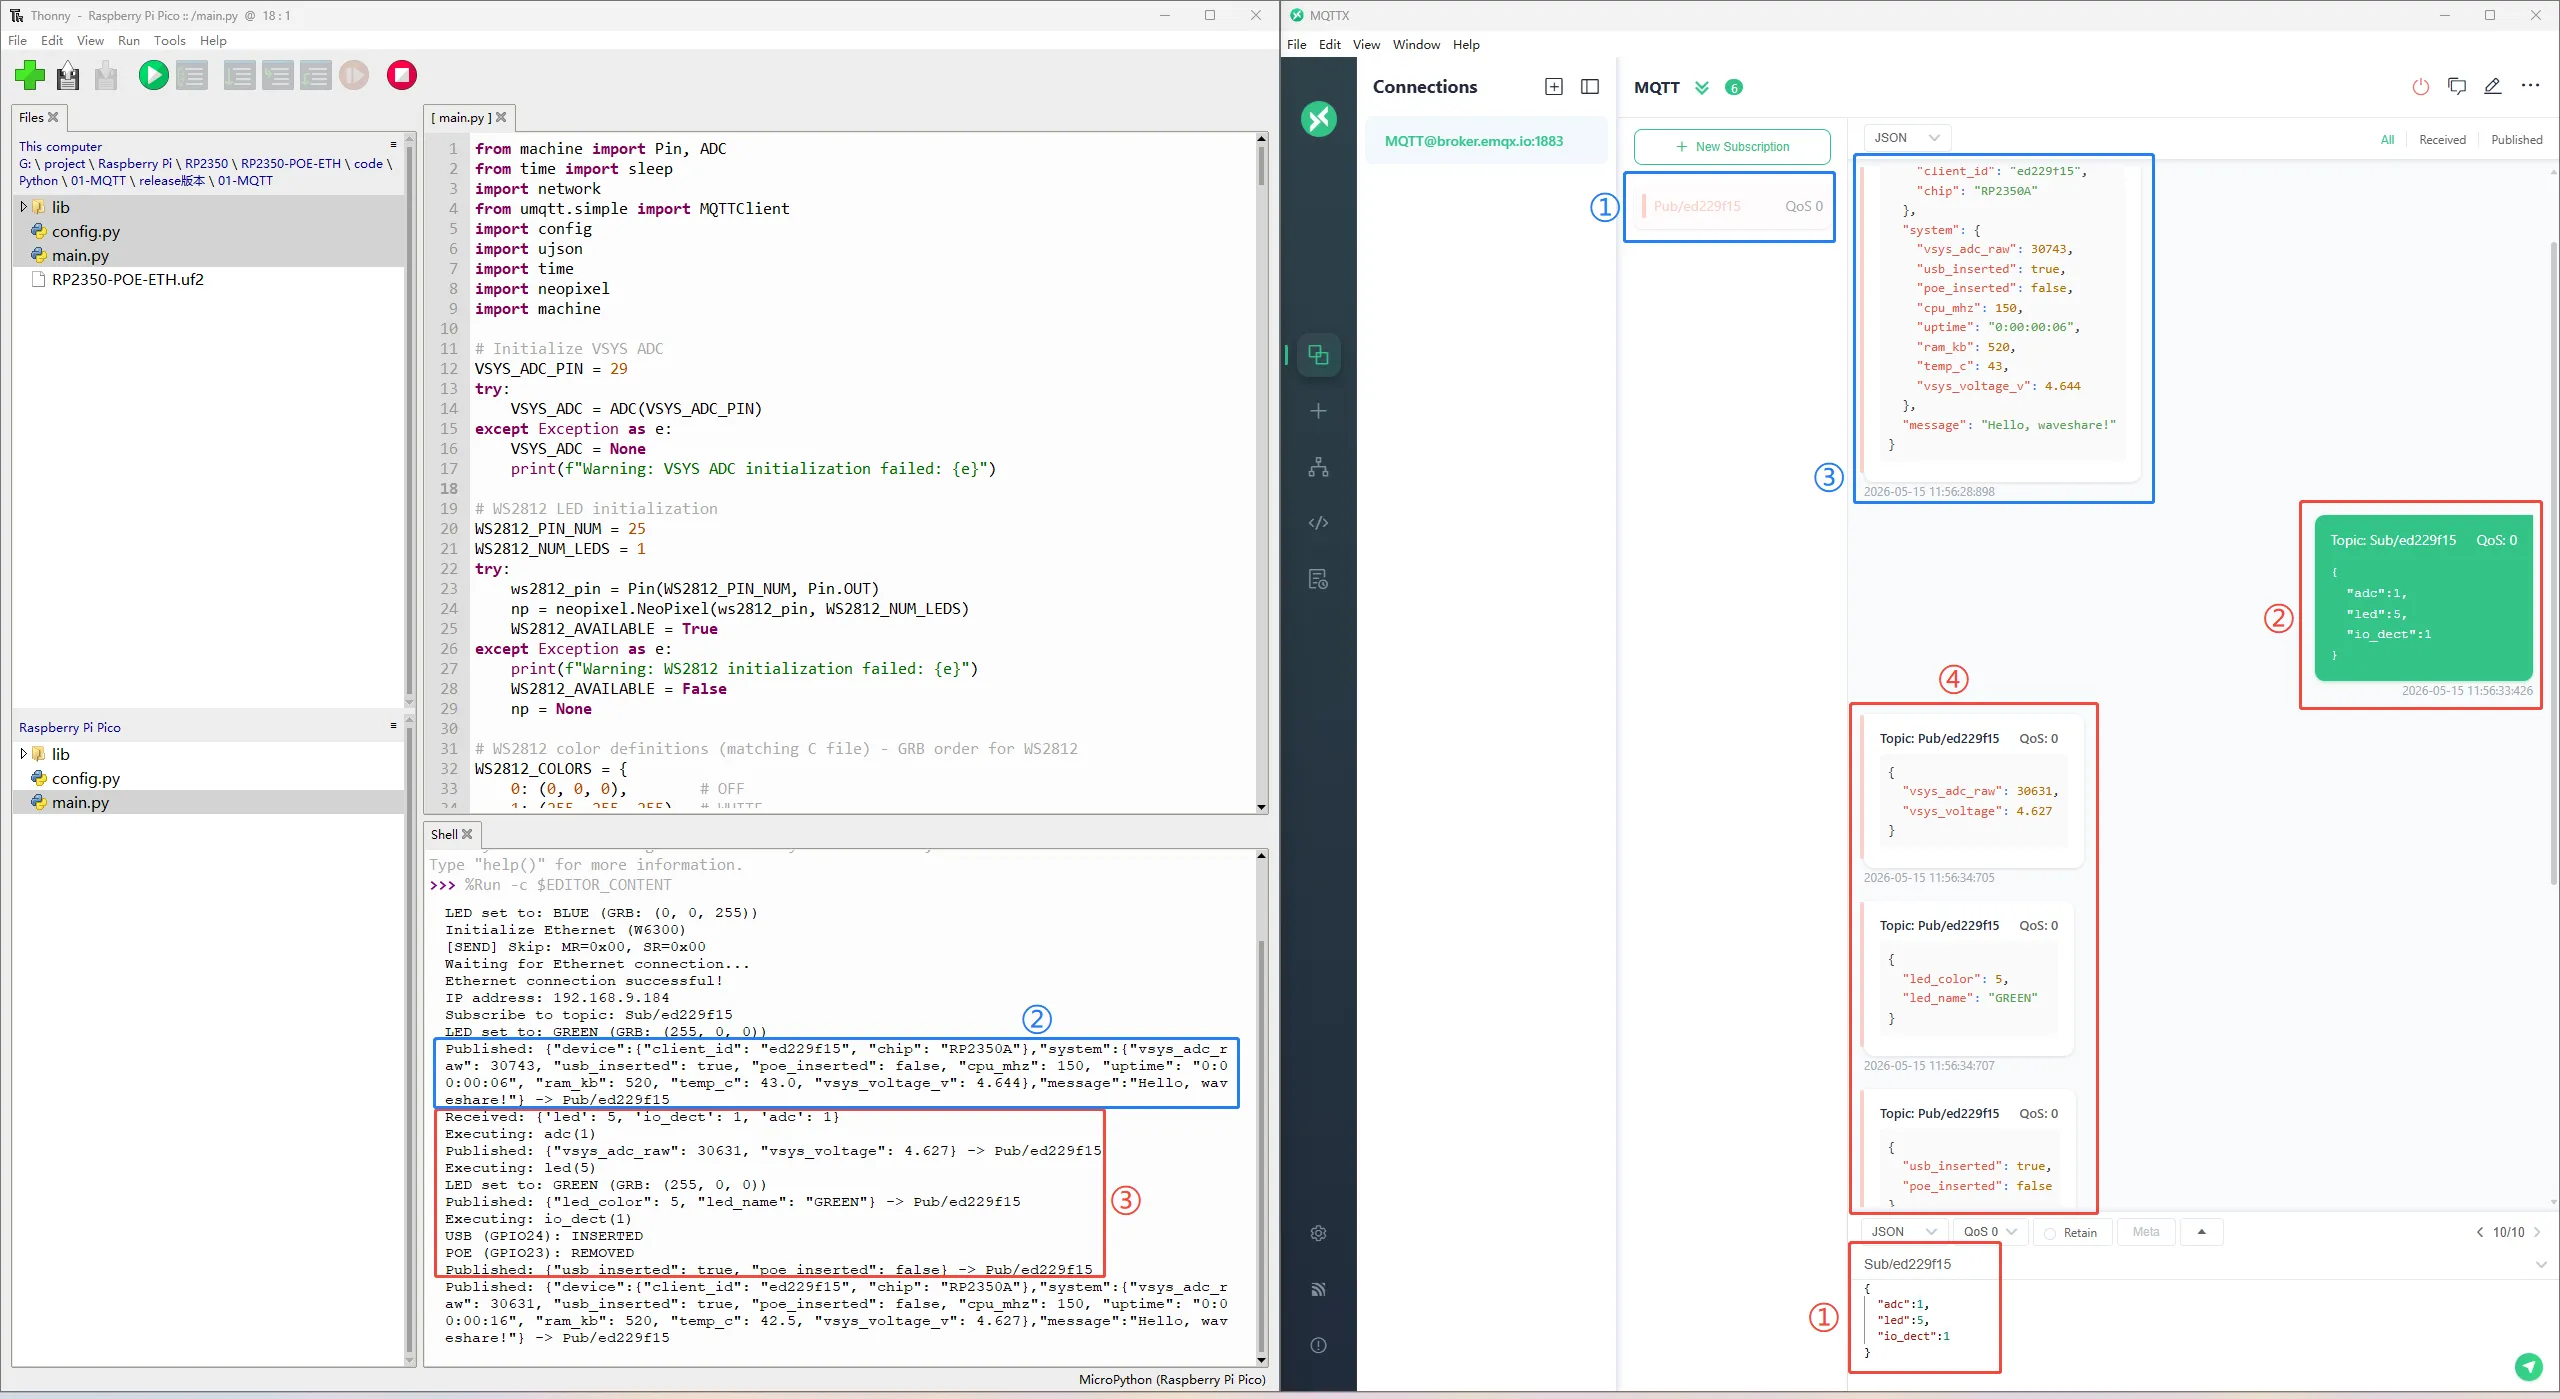
Verify with any MQTT client (MQTTX recommended)
- MQTTX client settings:
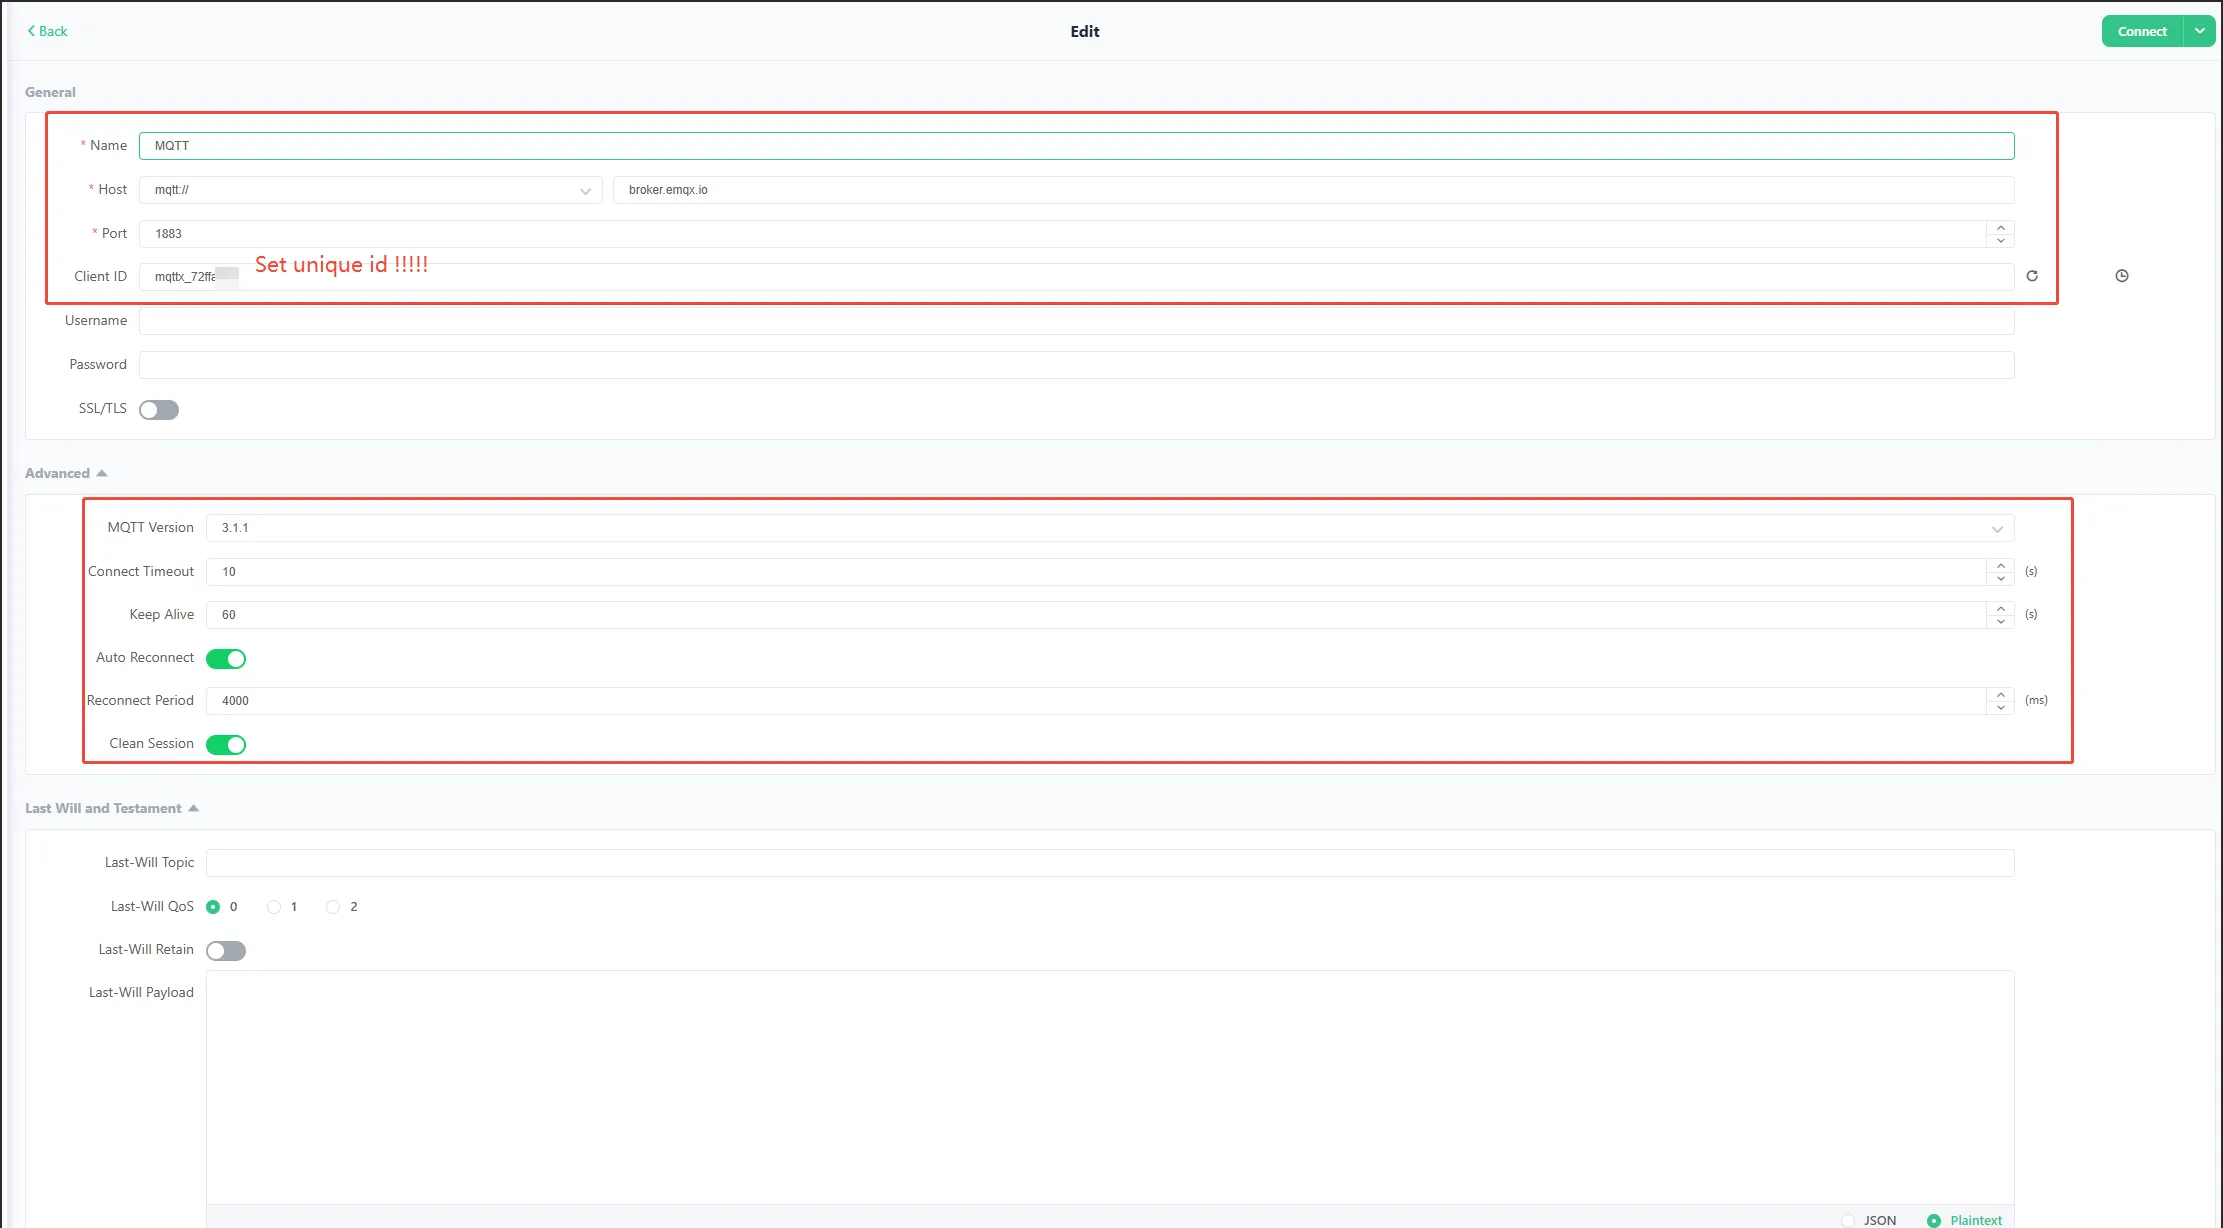
RP2350-POE-ETHconnection parameters:- Host:
broker.emqx.io - Port:
1883 - Username:
w6300_test - Password:
0123456789 - Client ID:
ed229f15
- Host:
- Subscribe to topic:
Pub/ed229f15to receive the JSON reported by the board every 10 seconds. - Publish control commands (payload as a JSON string) to the topic
Sub/ed229f15, for example:
{"led":2}
{"adc":1,"io_dect":1}
Working with C/C++
This chapter contains the following sections. Please read as needed:
Setting Up the Development Environment
Please refer to the Raspberry Pi Pico C/C++ Getting Started to download and install the Pico VS Code.
Example
The C/C++ examples are located in the examples/C directory of the example package.
| Example | Basic Program Description | Dependency Library |
|---|---|---|
| 01_MQTT | MQTT example | - |
01_MQTT
Example Description
- This example demonstrates how the RP2350-POE-ETH uses the Pico SDK (C project) to connect to a public MQTT broker (
broker.emqx.io:1883by default) over Ethernet and implements:- Subscribe topic:
Sub/ed229f15 - Publish topic:
Pub/ed229f15 - Publish a device status JSON every 10 seconds (including MAC, Client ID, temperature, VSYS voltage, USB/POE insertion status, uptime, network parameters, etc.)
- Subscribe topic:
- The program uses DHCP to obtain an IP address automatically and resolves the domain
broker.emqx.iovia DNS to obtain the broker IP before connecting. It also supports switching to static IPv4 and a static broker IP. - Serial logs are output via USB CDC (the project configures
pico_enable_stdio_usb(main 1)), which can be used for debugging and viewing MQTT interactions. - Open-source usage notes (strongly recommended to modify on first use to avoid conflicts among multiple people/devices):
- MQTT Brokers typically require that the
Client IDbe globally unique at any given time: if two devices use the sameMQTT_CLIENT_IDto log in, the later one will kick off the earlier one, resulting in frequent disconnections. - If a fixed Topic is used, data from multiple devices will be mixed together and can easily be mis-subscribed or mis-controlled by others.
- It is recommended to modify at least:
MQTT_CLIENT_ID,MQTT_PUBLISH_TOPIC, andMQTT_SUBSCRIBE_TOPIC. If you are using your own Broker or have enabled authentication, also modifyMQTT_USERNAMEandMQTT_PASSWORD.
- MQTT Brokers typically require that the
The default configuration is located in mqtt_app/mqtt_app.c (macro definition area):
#define MQTT_USERNAME "w6300_test"
#define MQTT_CLIENT_ID "ed229f15"
#define MQTT_PASSWORD "0123456789"

#define MQTT_PUBLISH_TOPIC "Pub/ed229f15"
#define MQTT_SUBSCRIBE_TOPIC "Sub/ed229f15"
Hardware Connection
- Connect the development board to your computer via a USB cable (for power, programming, and USB CDC serial log viewing).
- Plug an Ethernet cable into the RJ45 port and ensure the network can reach the public internet (able to access
broker.emqx.io:1883). - Optional: Use a PoE Ethernet cable to power the board (the program will report
poe_insertedstatus in the JSON payload).
Code Analysis
Entry file:
main.c- This project uses
main()as the entry point; after board/peripheral/network initialization, it enters the infinite loop ofmqtt_service_run()(internalwhile(1)), which handles MQTT keep‑alive, packet reception, and periodic publishing. - Core flow of
main()(text description)- System initialization:
DEV_Module_Init()(clock/stdio, etc.) +WS2812_init()(status LED) - Power/temperature related initialization:
bsp_adc_voltage_detection_init(...)(VSYS sampling configuration) +adc_set_temp_sensor_enabled(true)(temperature channel) - IO initialization:
usb_detect_io_init()/poe_detect_io_init() - Business start:
mqtt_app_init()(Ethernet + DHCP/DNS + MQTT) →mqtt_service_run()(MQTT main loop: keep‑alive, packet reception, periodic publishing) - Error handling: if any step returns a non‑zero value, it enters
while(1)and lights the error indicator (LED_INDICATOR_ERROR())
- System initialization:
- This project uses
MQTT logic file:
mqtt_app/mqtt_app.c- Key configurations (macro definitions)
- Broker
g_dns_target_domain = "broker.emqx.io": Broker domain name (default uses DNS resolution).PORT_MQTT (1883): MQTT TCP port.- If DNS is disabled on your network or you want to use a fixed Broker IP: change
#if 0to#if 1inmqtt_connect()to useMQTT_BROKER_IP_0~3.
MQTT_CLIENT_ID / MQTT_USERNAME / MQTT_PASSWORD: Account information for connecting to the broker (the example uses fixed values by default; also supports auto‑generation based on the Unique ID)MQTT_PUBLISH_TOPIC / MQTT_SUBSCRIBE_TOPIC: Publish/subscribe topicsMQTT_PUBLISH_PERIOD (10s): Periodic publish interval
- Broker
- Static/Dynamic switching (it is recommended to change only this part of the source code to switch)
- Network addressing: Static IP ↔ DHCP (dynamic)
- Default (DHCP)
- Network addressing: Static IP ↔ DHCP (dynamic)
- Key configurations (macro definitions)
static eth_NetInfo g_net_info = {
    .ip = {192, 168, 1, 100},
    .sn = {255, 255, 255, 0},
    .gw = {192, 168, 1, 1},
    .dns = {8, 8, 8, 8},
    .dhcp = NETINFO_DHCP,
    .ipmode = NETINFO_DHCP_V4
};
- Note: In DHCP mode, the above
.ip/.sn/.gw/.dnsare placeholder values; they will be overwritten by parameters assigned by the router afterethchip_dhcp_run()succeeds. The gateway and DNS are also provided by the router. - DHCP entry (after a lease is successfully obtained, reconnection is triggered in the DHCP callback)
int mqtt_app_init(void)
{
    if (g_net_info.dhcp == NETINFO_DHCP) {
        ethchip_dhcp_init(ethchip_dhcp_assign, ethchip_dhcp_assign, ethchip_dhcp_conflict);
        return ethchip_dhcp_run();
    }
    return mqtt_connect();
}
- Broker address: Static IP ↔ DNS (dynamic domain name resolution)
- Default (DNS resolution)
static uint8_t g_dns_target_domain[] = "broker.emqx.io";
#if 0
    g_mqtt_broker_ip[0] = MQTT_BROKER_IP_0;
    g_mqtt_broker_ip[1] = MQTT_BROKER_IP_1;
    g_mqtt_broker_ip[2] = MQTT_BROKER_IP_2;
    g_mqtt_broker_ip[3] = MQTT_BROKER_IP_3;
#else
    ethchip_dns_init();
    ethchip_dns_get_domain_ip(g_net_info.dns, g_dns_target_domain, g_mqtt_broker_ip);
#endif
- Switch to static Broker IP: Change
#if 0to#if 1in the code above; it will then useMQTT_BROKER_IP_0~3 - MQTT identity: Static client_id/username ↔ Dynamically generated (based on Unique ID)
- Default (static client_id / username)
#if 1
    snprintf(g_mqtt_client_id, sizeof(g_mqtt_client_id), "%s", MQTT_CLIENT_ID);
#else
    snprintf(g_mqtt_client_id, sizeof(g_mqtt_client_id), "%s%02X%02X%02X%02X",
             MQTT_CLIENT_ID_PREFIX, board_id.id[4], board_id.id[5], board_id.id[6], board_id.id[7]);
#endif

#if 1
    snprintf(g_mqtt_username, sizeof(g_mqtt_username), "%s", MQTT_USERNAME);
#else
    snprintf(g_mqtt_username, sizeof(g_mqtt_username), "%s%02X%02X%02X%02X",
             MQTT_USERNAME_PREFIX, board_id.id[4], board_id.id[5], board_id.id[6], board_id.id[7]);
#endif
Switch to dynamic generation: Change the two
#if 1above to#if 0; and it will compose a unique identity for each device using the prefix + Unique ID.Note: The current publish/subscribe topics are fixed (multiple devices will have mixed data).
message_arrived(MessageData *msg_data)printf("%.*s\n", ...): Prints the received message content.mqtt_parse_and_execute_commands(...): Passes the subscribed message to the command parsing module (located inmqtt_execute_commands.c), which executes instructions according to the JSON fields and replies.
static const mqtt_cmd_map_t g_cmd_map[] = {
    {"adc",      adc_op_handle},
    {"led",      led_op_handle},
    {"io_dect",  io_dect_op_handle},
};
- Supported control commands (payload is JSON; executes only if the field exists and value >= 0)
{"adc":1}: Reads VSYS voltage and ADC raw value, and publishes a JSON toMQTT_PUBLISH_TOPIC
{"vsys_voltage":5.021,"vsys_adc_raw":2048}
{"led":N}: Sets the onboard WS2812 color (Nranges from0-8), and publishes the result toMQTT_PUBLISH_TOPIC- Success example:
{"led_color":2,"led_name":"RED"}
- Failure example (out of range):
{"error":"invalid_led_color","value":99,"valid_range":"0-8"}
{"io_dect":1}: Reads USB/POE insertion detection IOs and publishes the status toMQTT_PUBLISH_TOPIC
{"usb_inserted":true,"poe_inserted":false}
build_mqtt_payload(...)- Reads temperature, Flash capacity, system uptime, VSYS voltage, USB/POE insertion status, network parameters, etc., and composes a JSON string as the publish payload.
- Key error handling: if voltage reading fails, it falls back to
0to avoid reporting abnormal values.
Operation Result
Import and compile the 01_MQTT project using VS Code. After compilation, flash the .uf2 file from the
builddirectory, or directly flash 01_MQTT.uf2 file from thefirmware/Cdirectory for quick verification.After programming the example, open the USB serial port (common serial tools default to 115200 baud) and you should see logs similar to:
DEV_Module_Init OK

========== Device Identity ==========
MAC:       02:08:DC:xx:xx:xx
ClientID:  ed229f15
UserName:  w6300_test
======================================

DHCP initialization succeed
 DHCP success
 DHCP assign succeed
 mqtt disconnect
 mqtt connect
DNS initialized successfully
 DNS success
 Target domain : broker.emqx.io
 IP of target domain : 34.243.217.54
 MQTT connected
 Published
 Subscribed
 Published
 Published
...
Verify using any MQTT client (MQTTX recommended)
- MQTTX client settings:
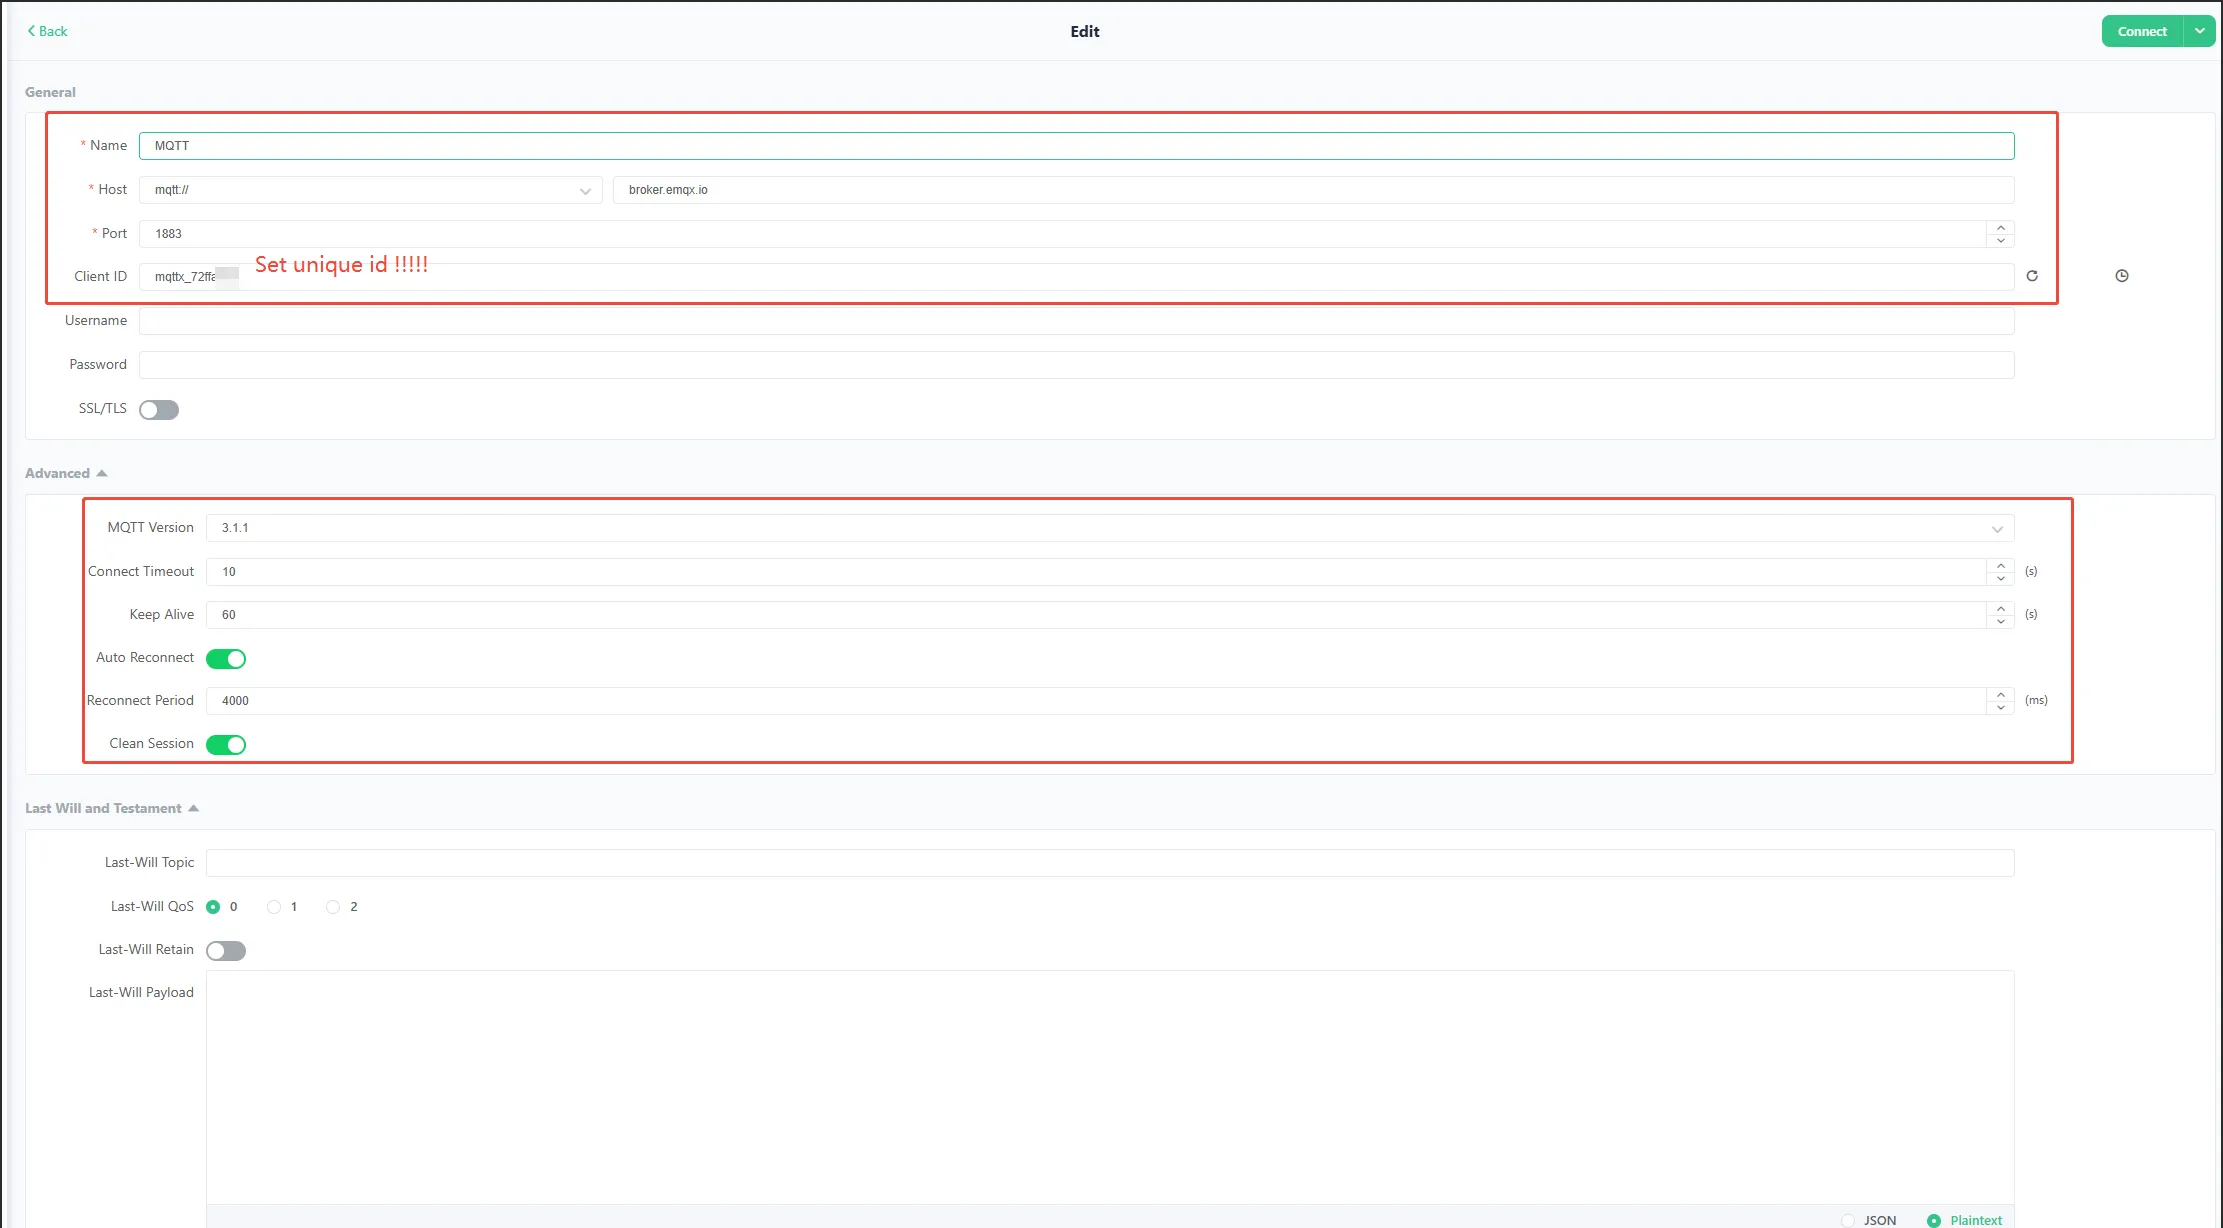
RP2350-POE-ETHconnection parameters (consistent with macro configuration):- Host:
broker.emqx.io - Port:
1883 - Username:
w6300_test - Password:
0123456789 - Client ID:
ed229f15
- Host:
- Subscribe to topic:
Pub/ed229f15. You will receive the JSON reported by the board every 10 seconds, for example:
{
  "device": { "chip": "RP2350A", "mac": "02:08:DC:xx:xx:xx", "client_id": "ed229f15" },
  "system": {
    "cpu_mhz": 150,
    "ram_kb": 520,
    "flash_mb": 16,
    "temp_c": 36.2,
    "vsys_voltage_v": 5.021,
    "vsys_adc_raw": 2048,
    "usb_inserted": true,
    "poe_inserted": false,
    "uptime": "0:00:01:23"
  },
  "network": { "mode": "DHCP", "ip": "192.168.1.100", "subnet": "255.255.255.0", "gateway": "192.168.1.1", "dns": "8.8.8.8" },
  "message": "Hello, waveshare!"
}
- Publish any string or JSON to the topic
Sub/ed229f15:Publish any string: the board will print it verbatim to the serial port (see the
message_arrived(...)code snippet earlier).Publish a JSON command (e.g.,
{"led":2}): it will execute the corresponding action and republish the result toPub/ed229f15(it is recommended to subscribe toPub/ed229f15to see the execution reply).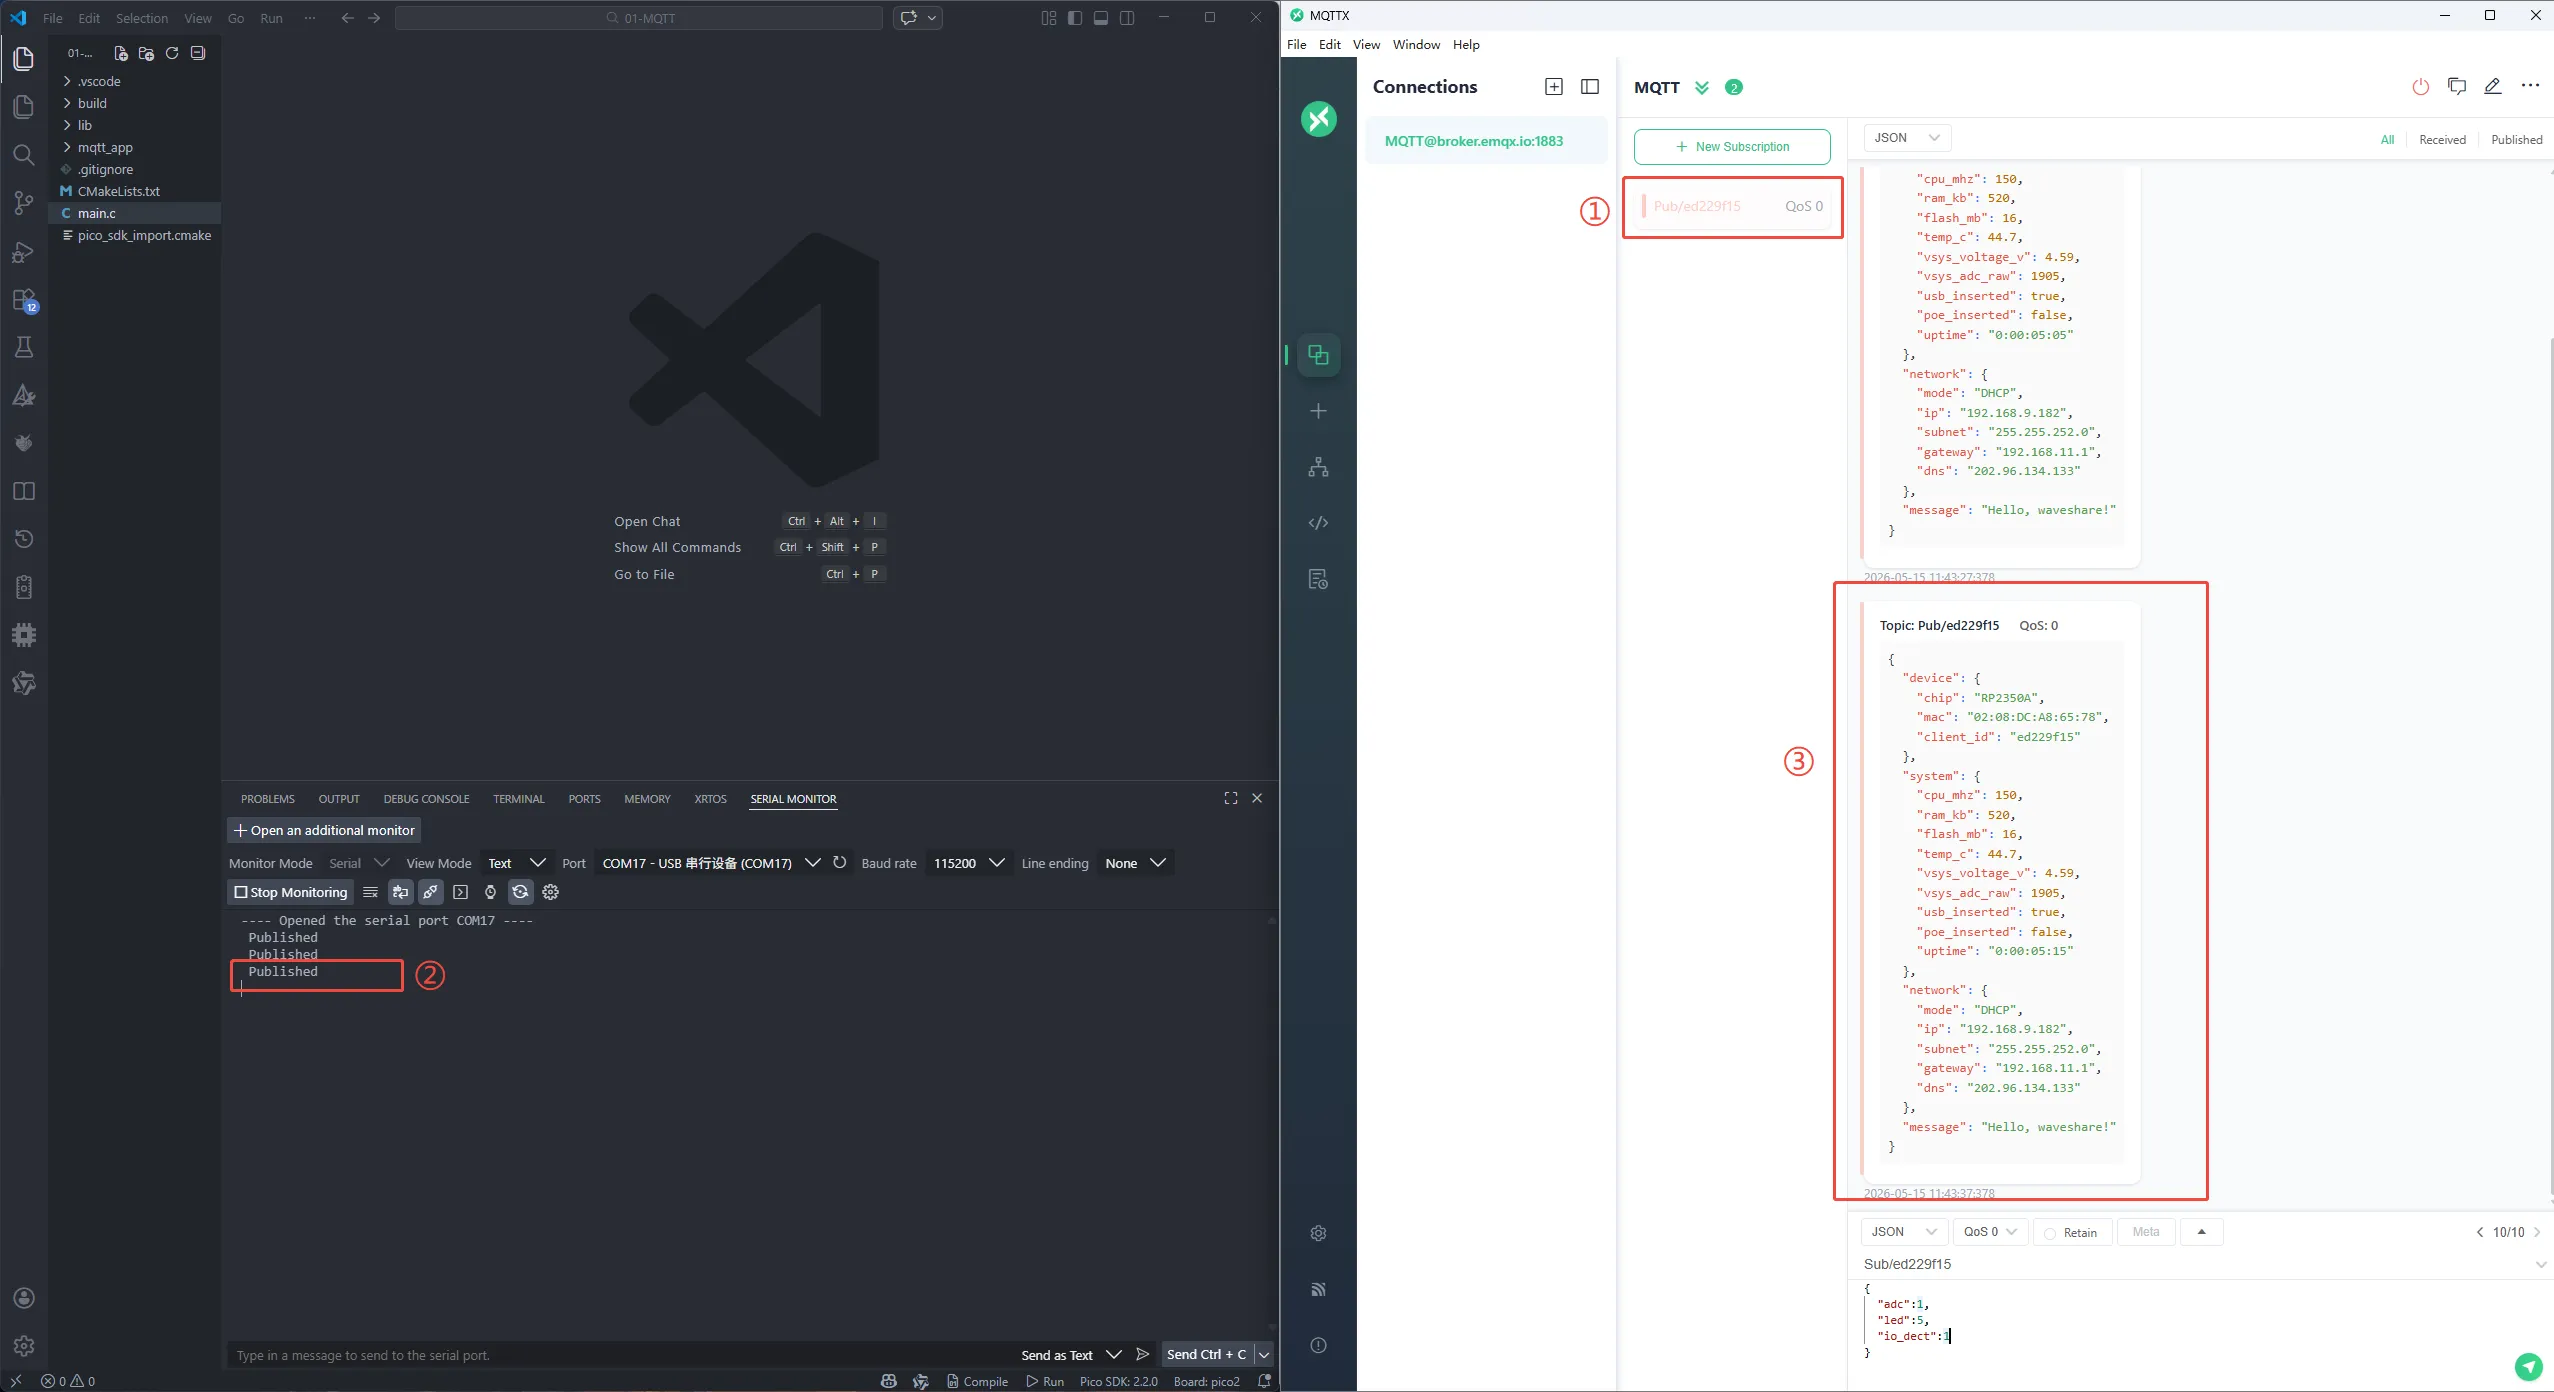
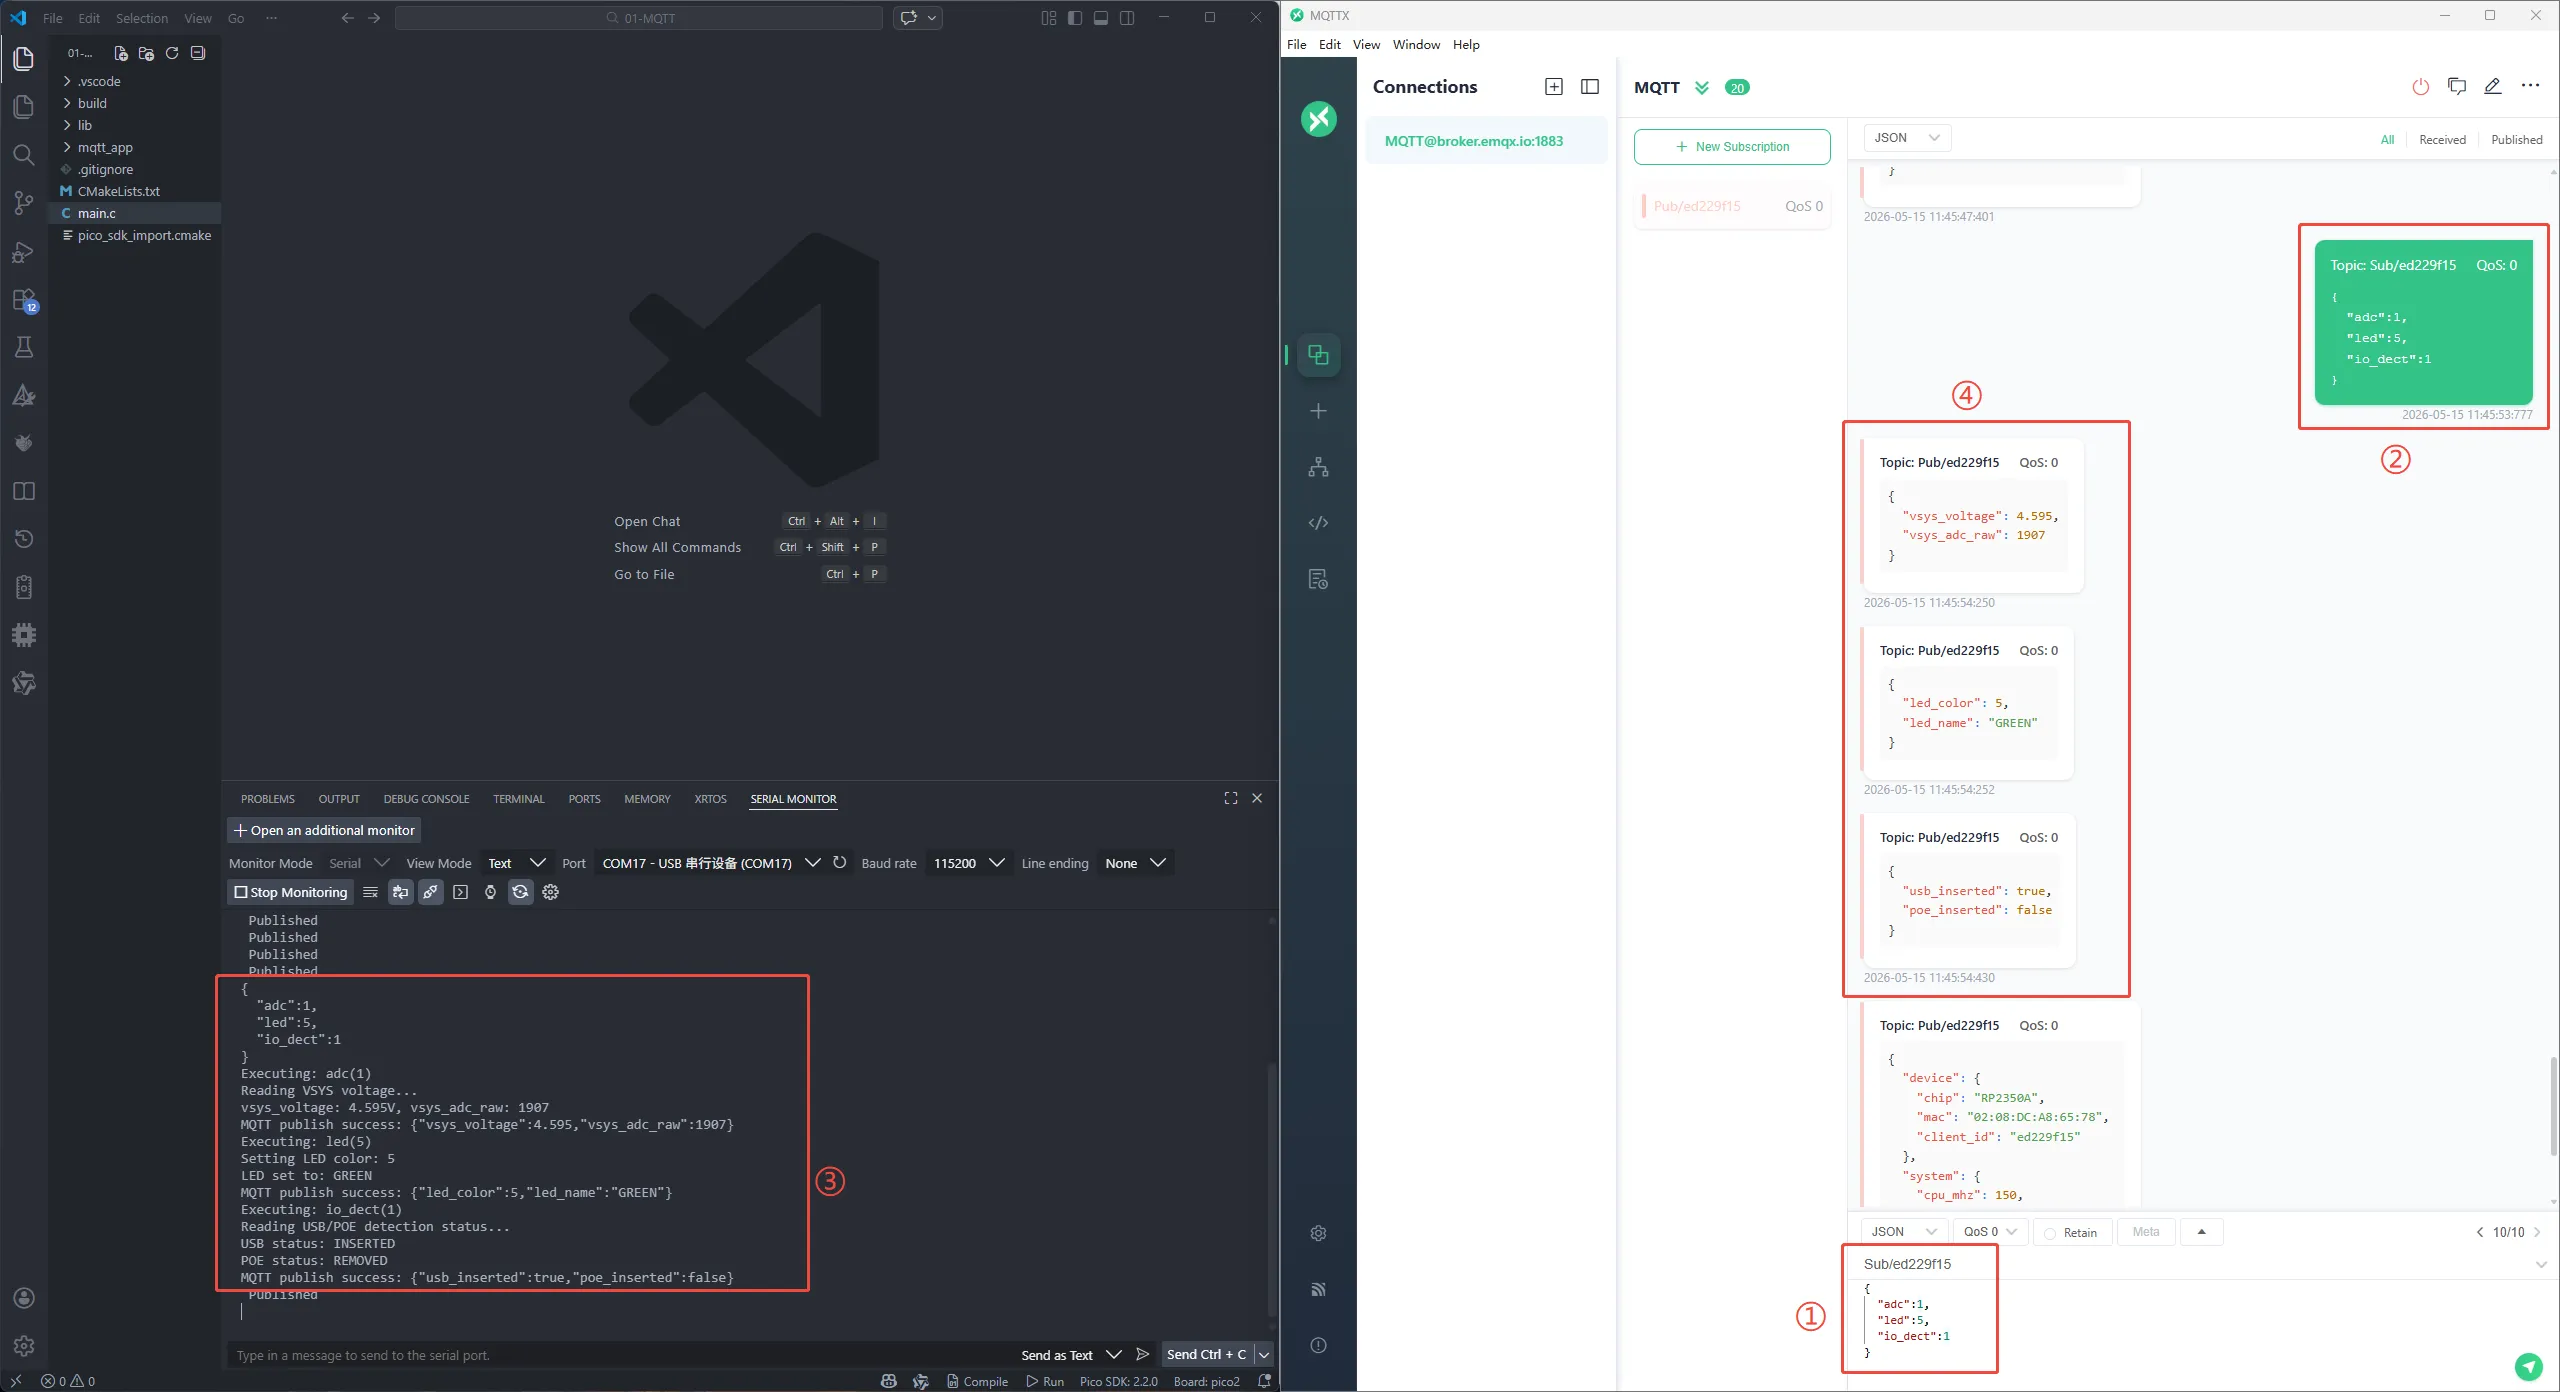
Working with Arduino
This chapter contains the following sections. Please read as needed:
Setting Up the Development Environment
Please refer to the Install and Configure Arduino IDE Tutorial to download and install the Arduino IDE.
Example
The Arduino examples are located in the examples/Arduino directory of the example package.
| Example | Basic Program Description | Dependency Library |
|---|---|---|
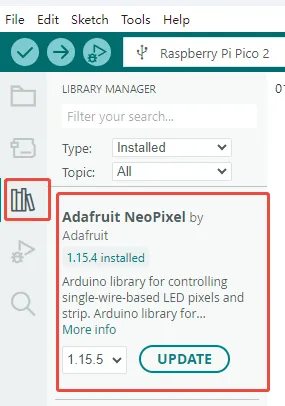
| 01_MQTT | MQTT example | Adafruit_NeoPixel |
01_MQTT
Example Description
- This example uses the WS2812 LED library
Adafruit_NeoPixel; it must be installed in advance. - This example demonstrates the RP2350-POE-ETH connecting to a public MQTT Broker (default
broker.emqx.io:1883) via Ethernet, and implements:- Subscribe topic:
Sub/ed229f15 - Publish topic:
Pub/ed229f15 - Publish a device status JSON every 10 seconds (including MAC, IP, temperature, VSYS voltage, USB/POE insertion status, uptime, etc.)
- Subscribe topic:
- The program uses DHCP to obtain an IP address automatically and resolves the domain name
broker.emqx.iovia DNS to get the Broker IP before connecting. - Open-source usage notes (strongly recommended to modify on first use to avoid conflicts among multiple people/devices):
- MQTT Brokers typically require that the
Client IDbe globally unique at any given time: if two devices use the sameMQTT_CLIENT_IDto log in, the later one will kick off the earlier one, resulting in frequent disconnections. - If a fixed Topic is used, data from multiple devices will be mixed together and can easily be mis-subscribed or mis-controlled by others.
- It is recommended to modify at least:
MQTT_CLIENT_ID,MQTT_PUBLISH_TOPIC, andMQTT_SUBSCRIBE_TOPIC. If you are using your own Broker or have enabled authentication, also modifyMQTT_USERNAMEandMQTT_PASSWORD.
- MQTT Brokers typically require that the
#define MQTT_USERNAME "w6300_test"
#define MQTT_CLIENT_ID "ed229f15"
#define MQTT_PASSWORD "0123456789"

#define MQTT_PUBLISH_TOPIC "Pub/ed229f15"
#define MQTT_SUBSCRIBE_TOPIC "Sub/ed229f15"
Hardware Connection
- Connect the development board to your computer via USB (for power, flashing, and serial log viewing).
- Plug an Ethernet cable into the RJ45 port and ensure the network can reach the public internet (able to access
broker.emqx.io:1883). - Optional: Use a PoE Ethernet cable to power the board (the program will report
poe_insertedstatus in the JSON payload).
Code Analysis
Entry file
01-MQTT.inoextern "C" int _write(...): Redirectsprintf()output toSerial, so thatprintfprintouts from C files can also be seen in the serial monitor.setup()Serial.begin(115200): Initializes the serial port at 115200 baud rate.DEV_Module_Init(): Initializes board-level hardware (GPIO/SPI/Ethernet chip, etc., implemented internally in the BSP).bsp_adc_voltage_detection_init(...): Initializes VSYS voltage detection (later reportsvsys_voltage_vandvsys_adc_raw).usb_detect_io_init()/poe_detect_io_init(): Initializes USB/POE insertion detection IOs (later reportsusb_inserted/poe_inserted).mqtt_app_init(): Initializes Ethernet + DHCP/DNS + MQTT connection.
loop()mqtt_service_run(): The MQTT main loop (internally awhile(1)), responsible for maintaining the connection, processing subscribed messages, and publishing periodically.
MQTT logic file
mqtt_app.c- Key configurations (macro definitions)
- Broker
g_dns_target_domain = "broker.emqx.io": Broker domain name (default uses DNS resolution).- If DNS is disabled on your network or you want to use a fixed Broker IP: change
#if 0to#if 1inmqtt_connect()to useMQTT_BROKER_IP_0~3.
PORT_MQTT (1883): MQTT TCP port.MQTT_CLIENT_ID/MQTT_USERNAME/MQTT_PASSWORD: Credentials for connecting to the Broker (hardcoded in the example).MQTT_PUBLISH_TOPIC/MQTT_SUBSCRIBE_TOPIC: Publish/subscribe topics.MQTT_PUBLISH_PERIOD (10s): Periodic publish interval.g_dns_target_domain = "broker.emqx.io": Default Broker domain.
- Broker
- Static/Dynamic switching (it is recommended to change only this part of the source code to switch)
- Network addressing: Static IP ↔ DHCP (dynamic)
- Default (DHCP)
- Network addressing: Static IP ↔ DHCP (dynamic)
- Key configurations (macro definitions)
static eth_NetInfo g_net_info = {
    .ip = {192, 168, 1, 100},
    .sn = {255, 255, 255, 0},
    .gw = {192, 168, 1, 1},
    .dns = {8, 8, 8, 8},
    .dhcp = NETINFO_DHCP,
    .ipmode = NETINFO_DHCP_V4
};
- Note: In DHCP mode, the above
.ip/.sn/.gw/.dnsare only placeholders; they will be overwritten by the parameters assigned by the router afterethchip_dhcp_run()succeeds. The gateway (gw) and DNS are also provided by the router, so there is no need to manually change them to match "your own router".
int mqtt_app_init(void)
{
    if (g_net_info.dhcp == NETINFO_DHCP) {
        ethchip_dhcp_init(ethchip_dhcp_assign, ethchip_dhcp_assign, ethchip_dhcp_conflict);
        return ethchip_dhcp_run();
    }
    return mqtt_connect();
}
- Switch to static IPv4 (disable DHCP and fill in fixed IP parameters)
static eth_NetInfo g_net_info = {
    .ip = {192, 168, 1, 100},
    .sn = {255, 255, 255, 0},
    .gw = {192, 168, 1, 1},
    .dns = {8, 8, 8, 8},
    .dhcp = NETINFO_STATIC,
    .ipmode = NETINFO_STATIC_V4
};
How to fill in static IP parameters (incorrect values will cause "network not working / MQTT connection failure")
.ip: The fixed IP of the development board. It must be in the same subnet as the router and must not conflict with other devices on the LAN.- Example: If your router is
192.168.1.1with subnet mask255.255.255.0, you could choose192.168.1.123.
- Example: If your router is
.sn(Subnet Mask): Must match the subnet configuration of the router.- The most common value for home routers is
255.255.255.0.
- The most common value for home routers is
.gw(Gateway): The default gateway, usually the router's LAN IP.- Example:
192.168.1.1.
- Example:
.dns: DNS server IP.- Can be the router IP (e.g.,
192.168.1.1) or a public DNS (e.g.,8.8.8.8,114.114.114.114).
- Can be the router IP (e.g.,
- Tip: If the router has DHCP enabled, try to set the static IP outside the DHCP address pool, or configure "IP/MAC binding (address reservation)" on the router to avoid conflicts.
Broker address: Static IP ↔ DNS (dynamic domain name resolution)
- Default (DNS resolution)
static uint8_t g_dns_target_domain[] = "broker.emqx.io";
#if 0
    g_mqtt_broker_ip[0] = MQTT_BROKER_IP_0;
    g_mqtt_broker_ip[1] = MQTT_BROKER_IP_1;
    g_mqtt_broker_ip[2] = MQTT_BROKER_IP_2;
    g_mqtt_broker_ip[3] = MQTT_BROKER_IP_3;
#else
    ethchip_dns_init();
    ethchip_dns_get_domain_ip(g_net_info.dns, g_dns_target_domain, g_mqtt_broker_ip);
#endif
- Switch to static Broker IP: Change
#if 0to#if 1in the code above; it will then useMQTT_BROKER_IP_0~3(currently fixed to34.243.217.54). - MQTT identity: Static client_id/username ↔ Dynamically generated (based on Unique ID)
- Default (static client_id / username)
#define MQTT_USERNAME "w6300_test"
#define MQTT_CLIENT_ID "ed229f15"
#if 1
    snprintf(g_mqtt_client_id, sizeof(g_mqtt_client_id), "%s", MQTT_CLIENT_ID);
#else
    snprintf(g_mqtt_client_id, sizeof(g_mqtt_client_id), "%s%02X%02X%02X%02X",
             MQTT_CLIENT_ID_PREFIX, board_id.id[4], board_id.id[5], board_id.id[6], board_id.id[7]);
#endif

#if 1
    snprintf(g_mqtt_username, sizeof(g_mqtt_username), "%s", MQTT_USERNAME);
#else
    snprintf(g_mqtt_username, sizeof(g_mqtt_username), "%s%02X%02X%02X%02X",
             MQTT_USERNAME_PREFIX, board_id.id[4], board_id.id[5], board_id.id[6], board_id.id[7]);
#endif
- Switch to dynamic generation: Change the two
#if 1above to#if 0; it will then compose a unique identity for each device usingMQTT_CLIENT_ID_PREFIX/MQTT_USERNAME_PREFIX+ Unique ID. - Note: The current publish/subscribe topics are fixed (multiple devices will have mixed data).
#define MQTT_PUBLISH_TOPIC "Pub/ed229f15"
#define MQTT_SUBSCRIBE_TOPIC "Sub/ed229f15"
generate_device_identity()- Reads the Unique ID of the RP2350 (
pico_get_unique_board_id) to generate a MAC address (first 3 bytes fixed OUI:02:08:DC, last 3 bytes taken from the chip's Unique ID). - Generates/sets MQTT
client_idandusername(the example currently uses static macros; it also supports automatic generation based on Unique ID).
- Reads the Unique ID of the RP2350 (
mqtt_app_init()- Initializes the Ethernet chip driver (SPI, reset, check, 1ms timer, etc.).
- If
g_net_info.dhcp == NETINFO_DHCP:ethchip_dhcp_init(...)+ethchip_dhcp_run(): Starts DHCP to obtain an IP address (upon success, the DHCP callback is invoked and automatically triggers MQTT connection).
- If using static IP: directly calls
mqtt_connect()to establish MQTT.
mqtt_connect()network_initialize(g_net_info): Writes the current network parameters to the Ethernet chip (IP/gateway/DNS, etc.).- DNS path (enabled by default)
ethchip_dns_get_domain_ip(...): Resolvesbroker.emqx.ioto obtaing_mqtt_broker_ip.- You can also switch to a static IP (change
#if 0to#if 1to useMQTT_BROKER_IP_0~3).
ConnectNetwork(...): Establishes a TCP connection to the Broker.MQTTClientInit(...)+MQTTConnect(...): Initializes the MQTT client and completes the CONNECT.MQTTSubscribe(..., message_arrived): Subscribes toMQTT_SUBSCRIBE_TOPIC; received messages are passed tomessage_arrived().
message_arrived(MessageData *msg_data)printf("%.*s\n", ...): Prints the received message content.mqtt_parse_and_execute_commands(...): Passes the subscribed message to the command parsing module. The current subscribe topic isSub/ed229f15. The behavior upon receiving a message is as follows:- Print the payload as-is to the serial port.
- Attempt to execute commands according to JSON fields (supports multiple fields in one payload, e.g., controlling LED and reading voltage simultaneously).
- The success/failure result is republished to
Pub/ed229f15(it is recommended to subscribe toPub/ed229f15to see the response).
- The success/failure result is republished to
// Supported control commands (payload is JSON; executes only if the field exists and value >= 0)
// {"adc":1}       Read VSYS voltage and report
// {"led":2}       Set WS2812 color (0-8)
// {"io_dect":1}   Read USB/POE insertion status and report
static const mqtt_cmd_map_t g_cmd_map[] = {
    {"adc",      adc_op_handle},
    {"led",      led_op_handle},
    {"io_dect",  io_dect_op_handle},
};
{"adc":1}: Reads VSYS voltage and ADC raw value, and publishes a JSON toPub/ed229f15:
{"vsys_voltage":5.021,"vsys_adc_raw":2048}
{"led":N}: Sets the onboard WS2812 color (Nranges from0-8: OFF/WHITE/RED/ORANGE/YELLOW/GREEN/CYAN/BLUE/PURPLE), and publishes the execution result toPub/ed229f15.- Success example:
{"led_color":2,"led_name":"RED"}
- Failure example (out of range):
{"error":"invalid_led_color","value":99,"valid_range":"0-8"}
{"io_dect":1}: Reads USB/POE insertion detection IOs and publishes the status toPub/ed229f15:
{"usb_inserted":true,"poe_inserted":false}
build_mqtt_payload(...)- Reads temperature (
read_chip_temp()), flash size, system uptime, VSYS voltage, USB/POE insertion status, network parameters, etc., and composes them into a JSON string. - This JSON is used as the publish payload (
g_mqtt_message.payload).
- Reads temperature (
mqtt_service_run()MQTTYield(...): Allows the MQTT client to handle packet reception, keep‑alive, callbacks, etc.- At each
MQTT_PUBLISH_PERIODinterval: callsMQTTPublish(...)to publish device status toMQTT_PUBLISH_TOPIC. - In DHCP mode,
ethchip_dhcp_run()is called periodically to maintain the lease; when DHCP reassigns an address,ethchip_dhcp_assign()disconnects and reconnects MQTT.
Operation Result
- After flashing the example, open the serial monitor (115200 baud) and you should see logs similar to:
=== System Start ===
DHCP initialization succeed
...(after obtaining IP)...
MQTT connected
Published
Subscribed
Published
Published
...
Verify using any MQTT client (MQTTX recommended)
- MQTTX client settings:
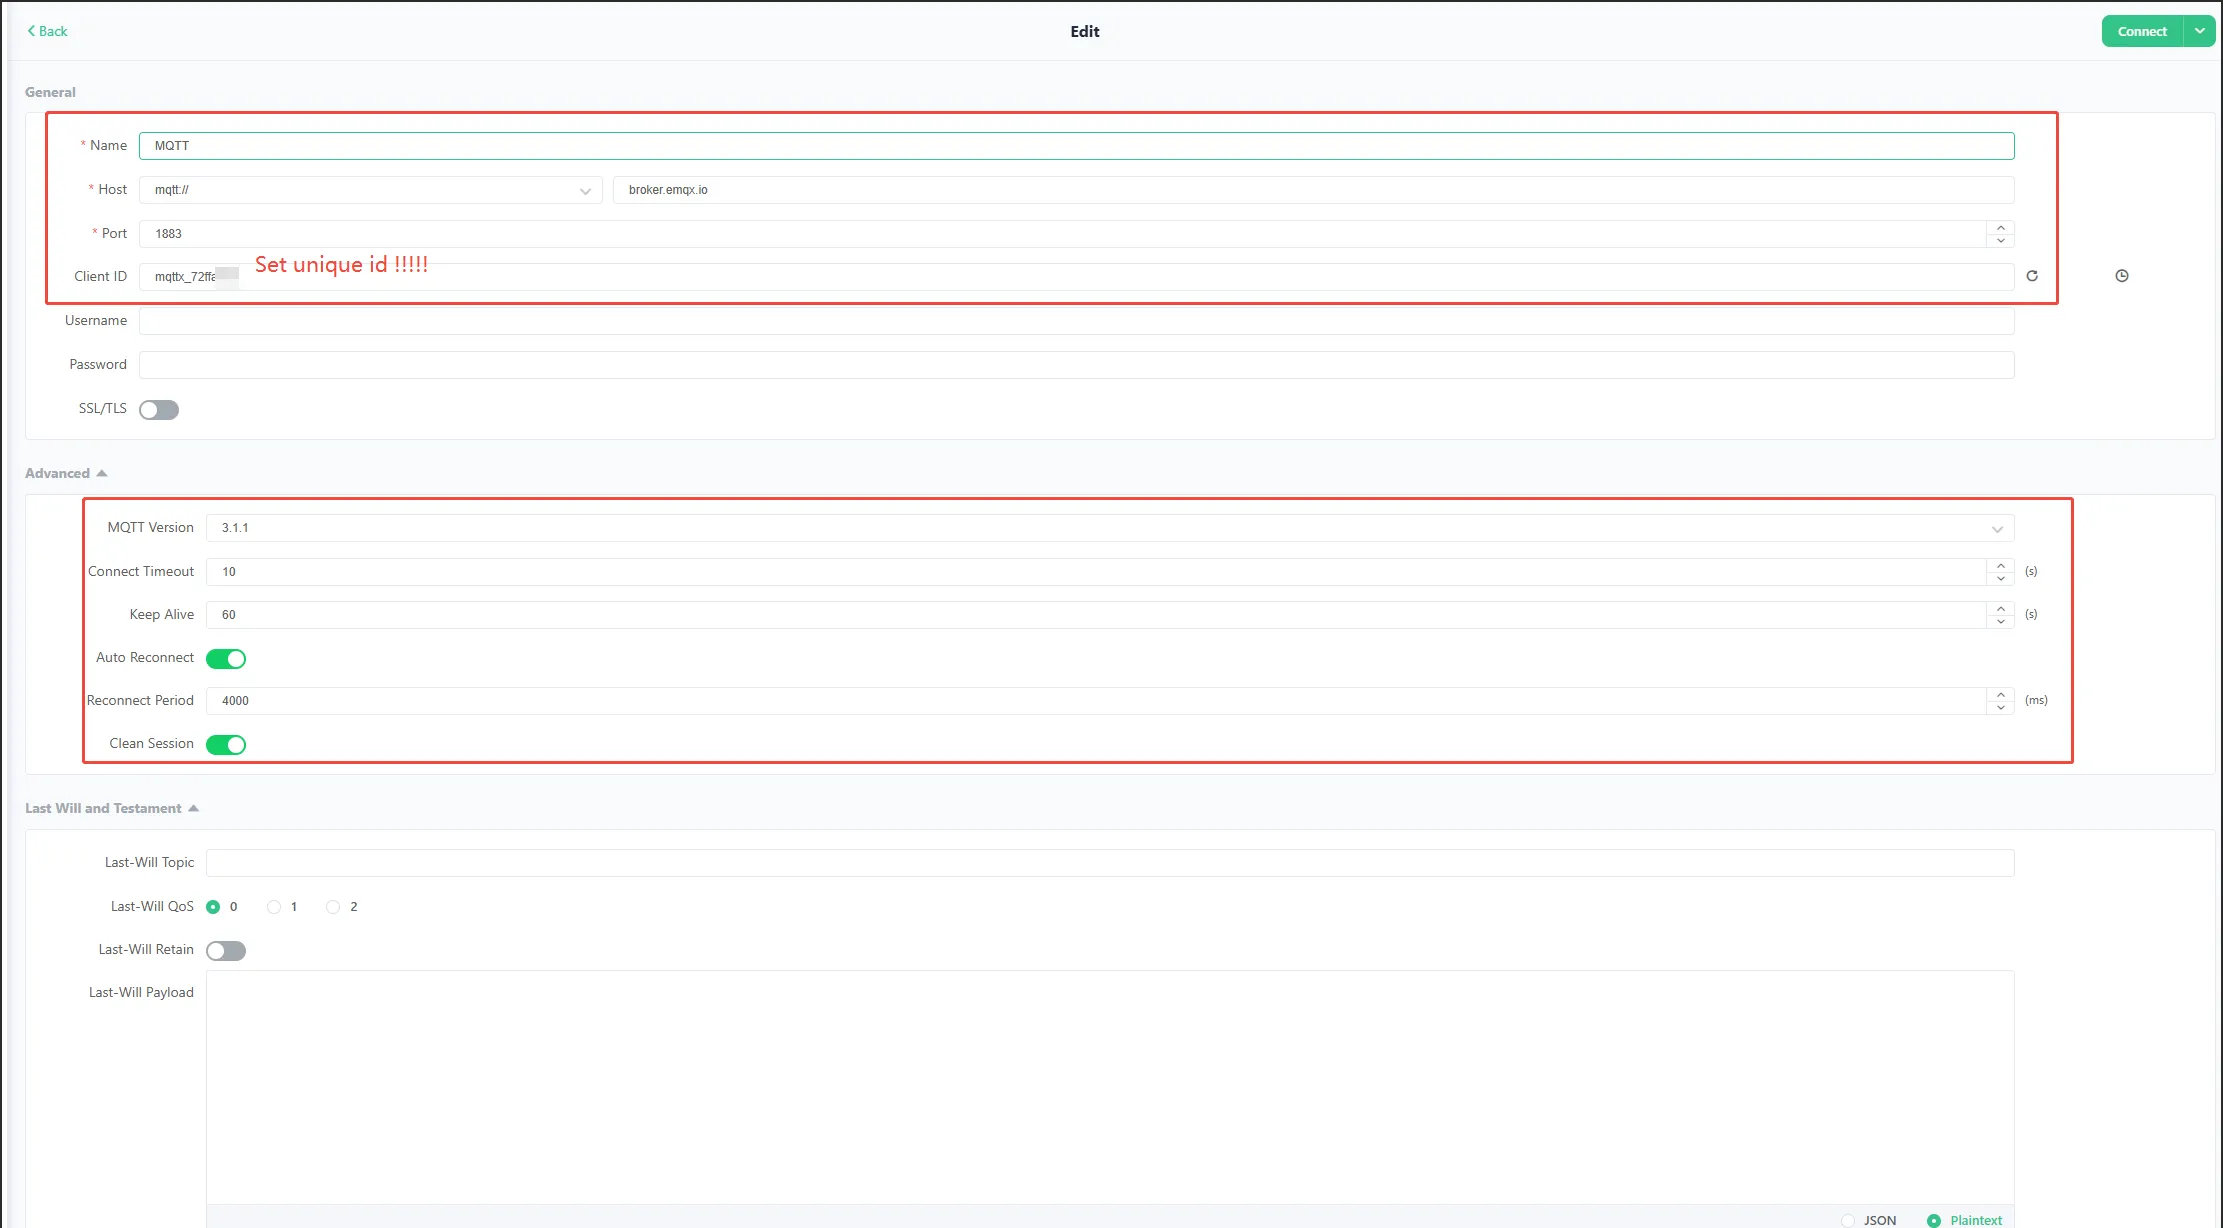
RP2350-POE-ETHconnection parameters:- Host:
broker.emqx.io - Port:
1883 - Username:
w6300_test - Password:
0123456789 - Client ID:
ed229f15
- Host:
- Subscribe to topic:
Pub/ed229f15. You will receive the JSON reported by the board every 10 seconds, for example:
{
  "device": { "chip": "RP2350A", "mac": "02:08:DC:xx:xx:xx", "client_id": "ed229f15" },
  "system": {
    "cpu_mhz": 150,
    "ram_kb": 520,
    "flash_mb": 16,
    "temp_c": 36.2,
    "vsys_voltage_v": 5.021,
    "vsys_adc_raw": 2048,
    "usb_inserted": true,
    "poe_inserted": false,
    "uptime": "0:00:01:23"
  },
  "network": { "mode": "DHCP", "ip": "192.168.1.100", "subnet": "255.255.255.0", "gateway": "192.168.1.1", "dns": "8.8.8.8" },
  "message": "Hello, waveshare!"
}
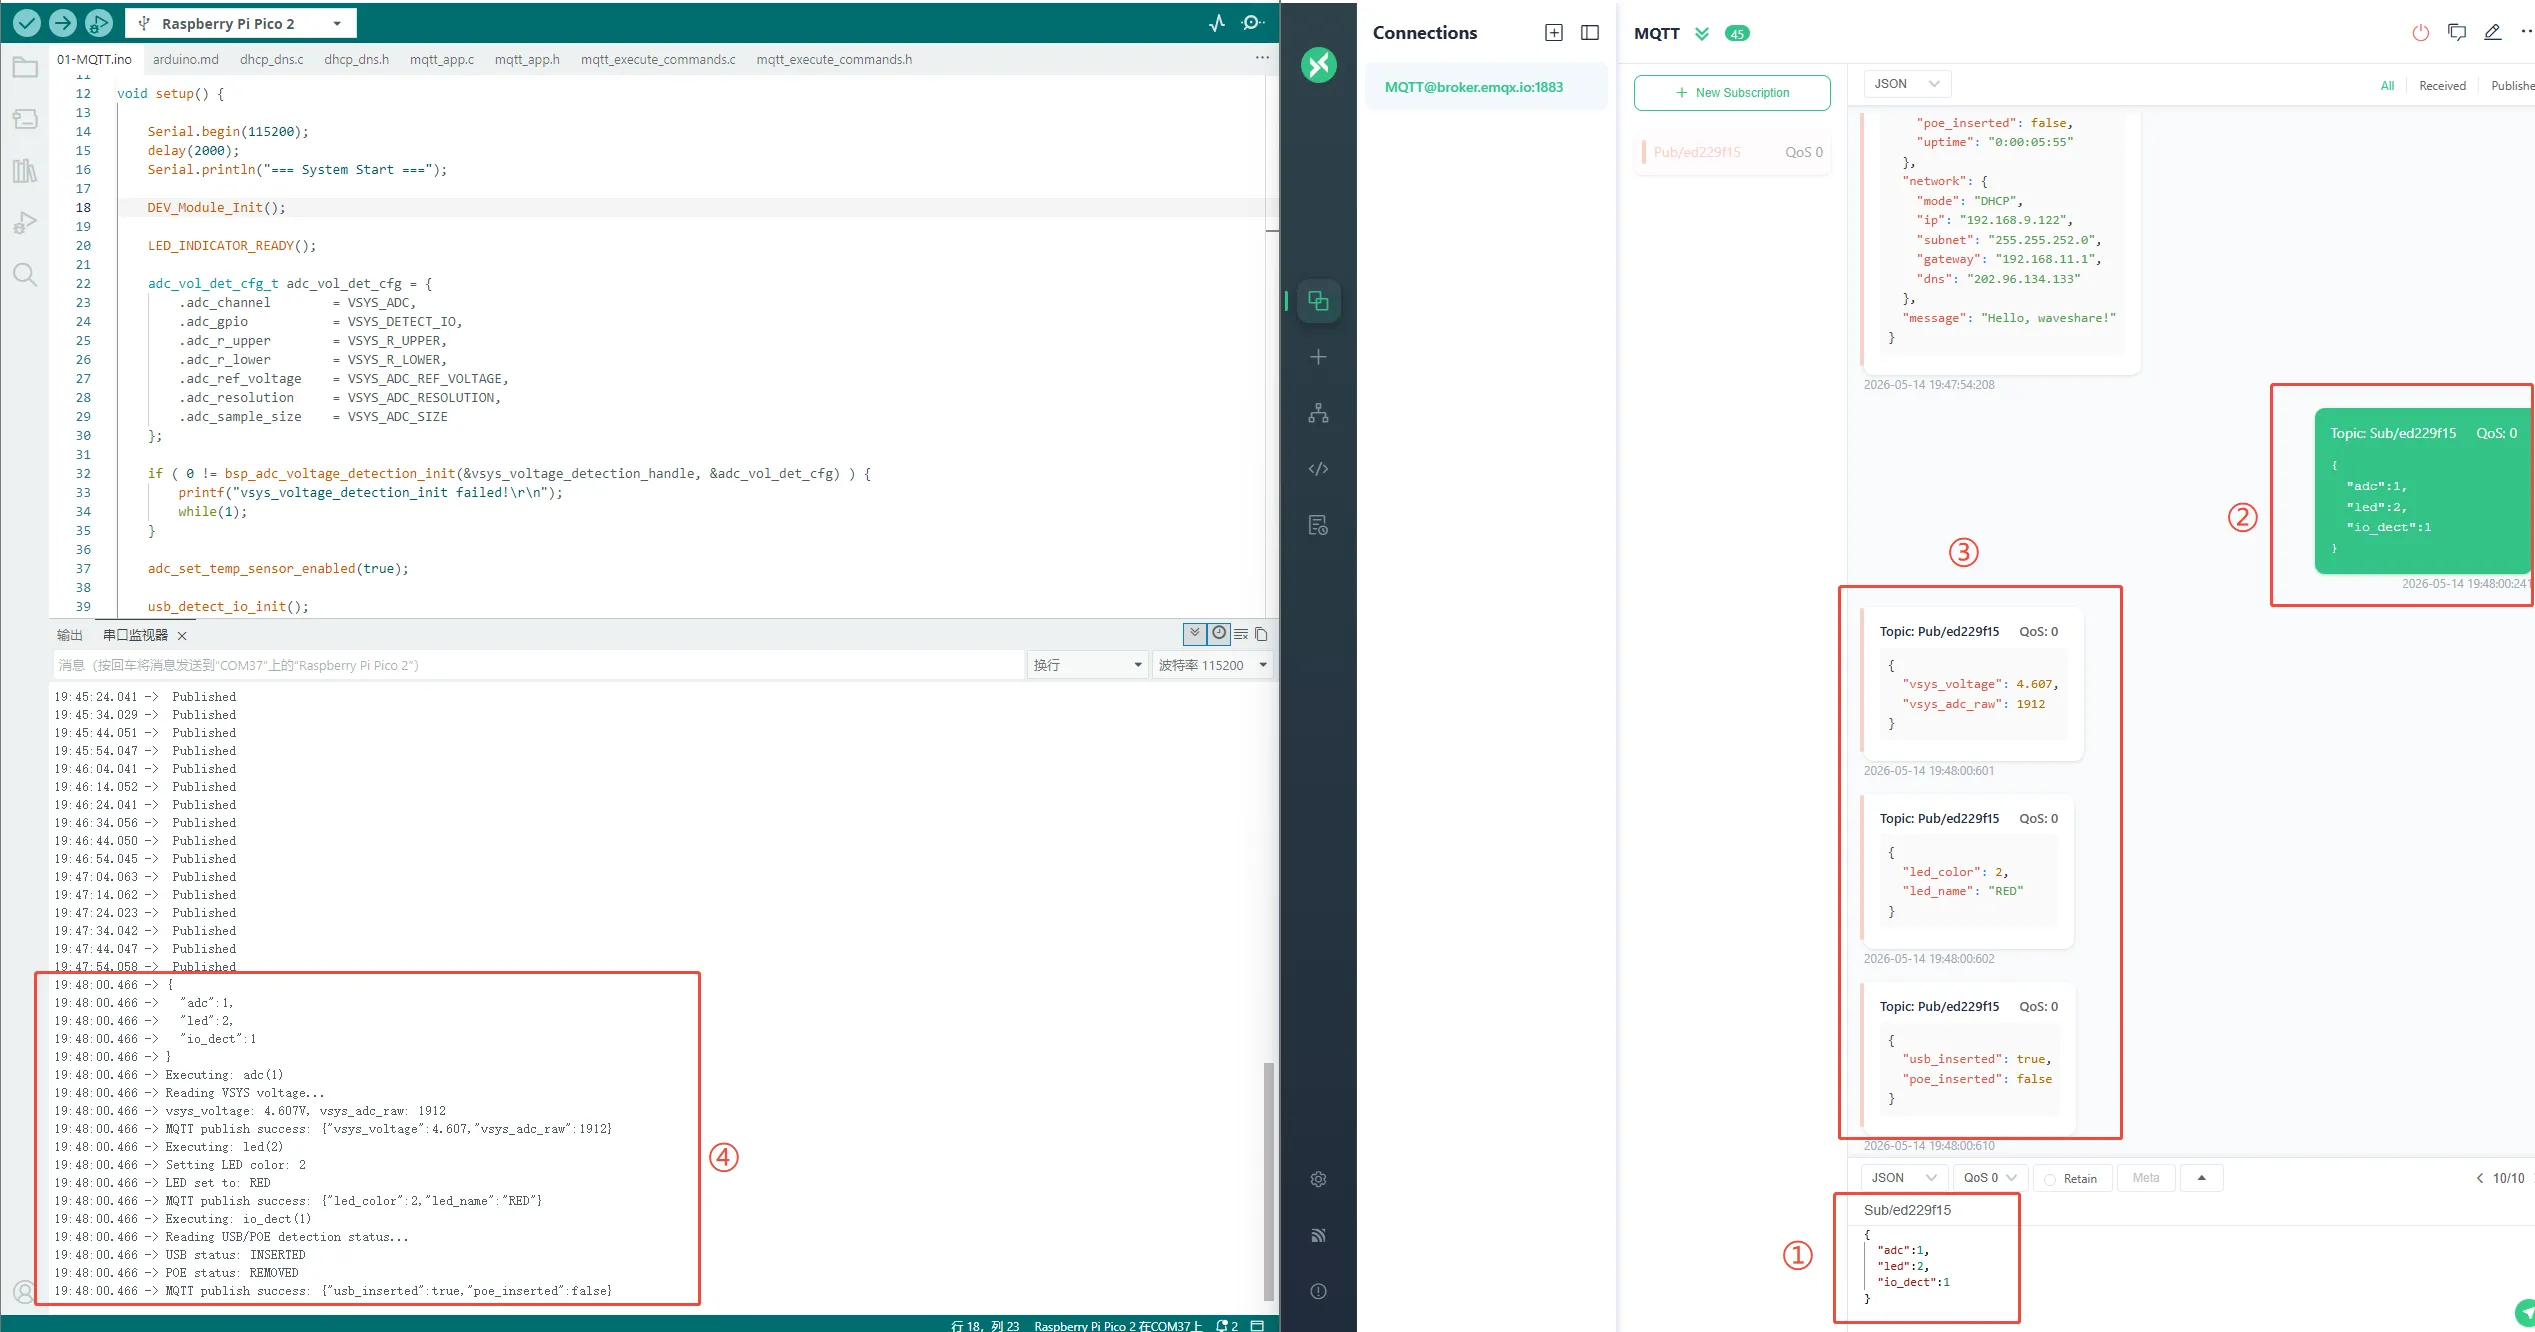
Publish any string to topic
Sub/ed229f15; the board's serial port will print the received message (and pass it to the command parsing function, which is convenient for customizing control logic in secondary development).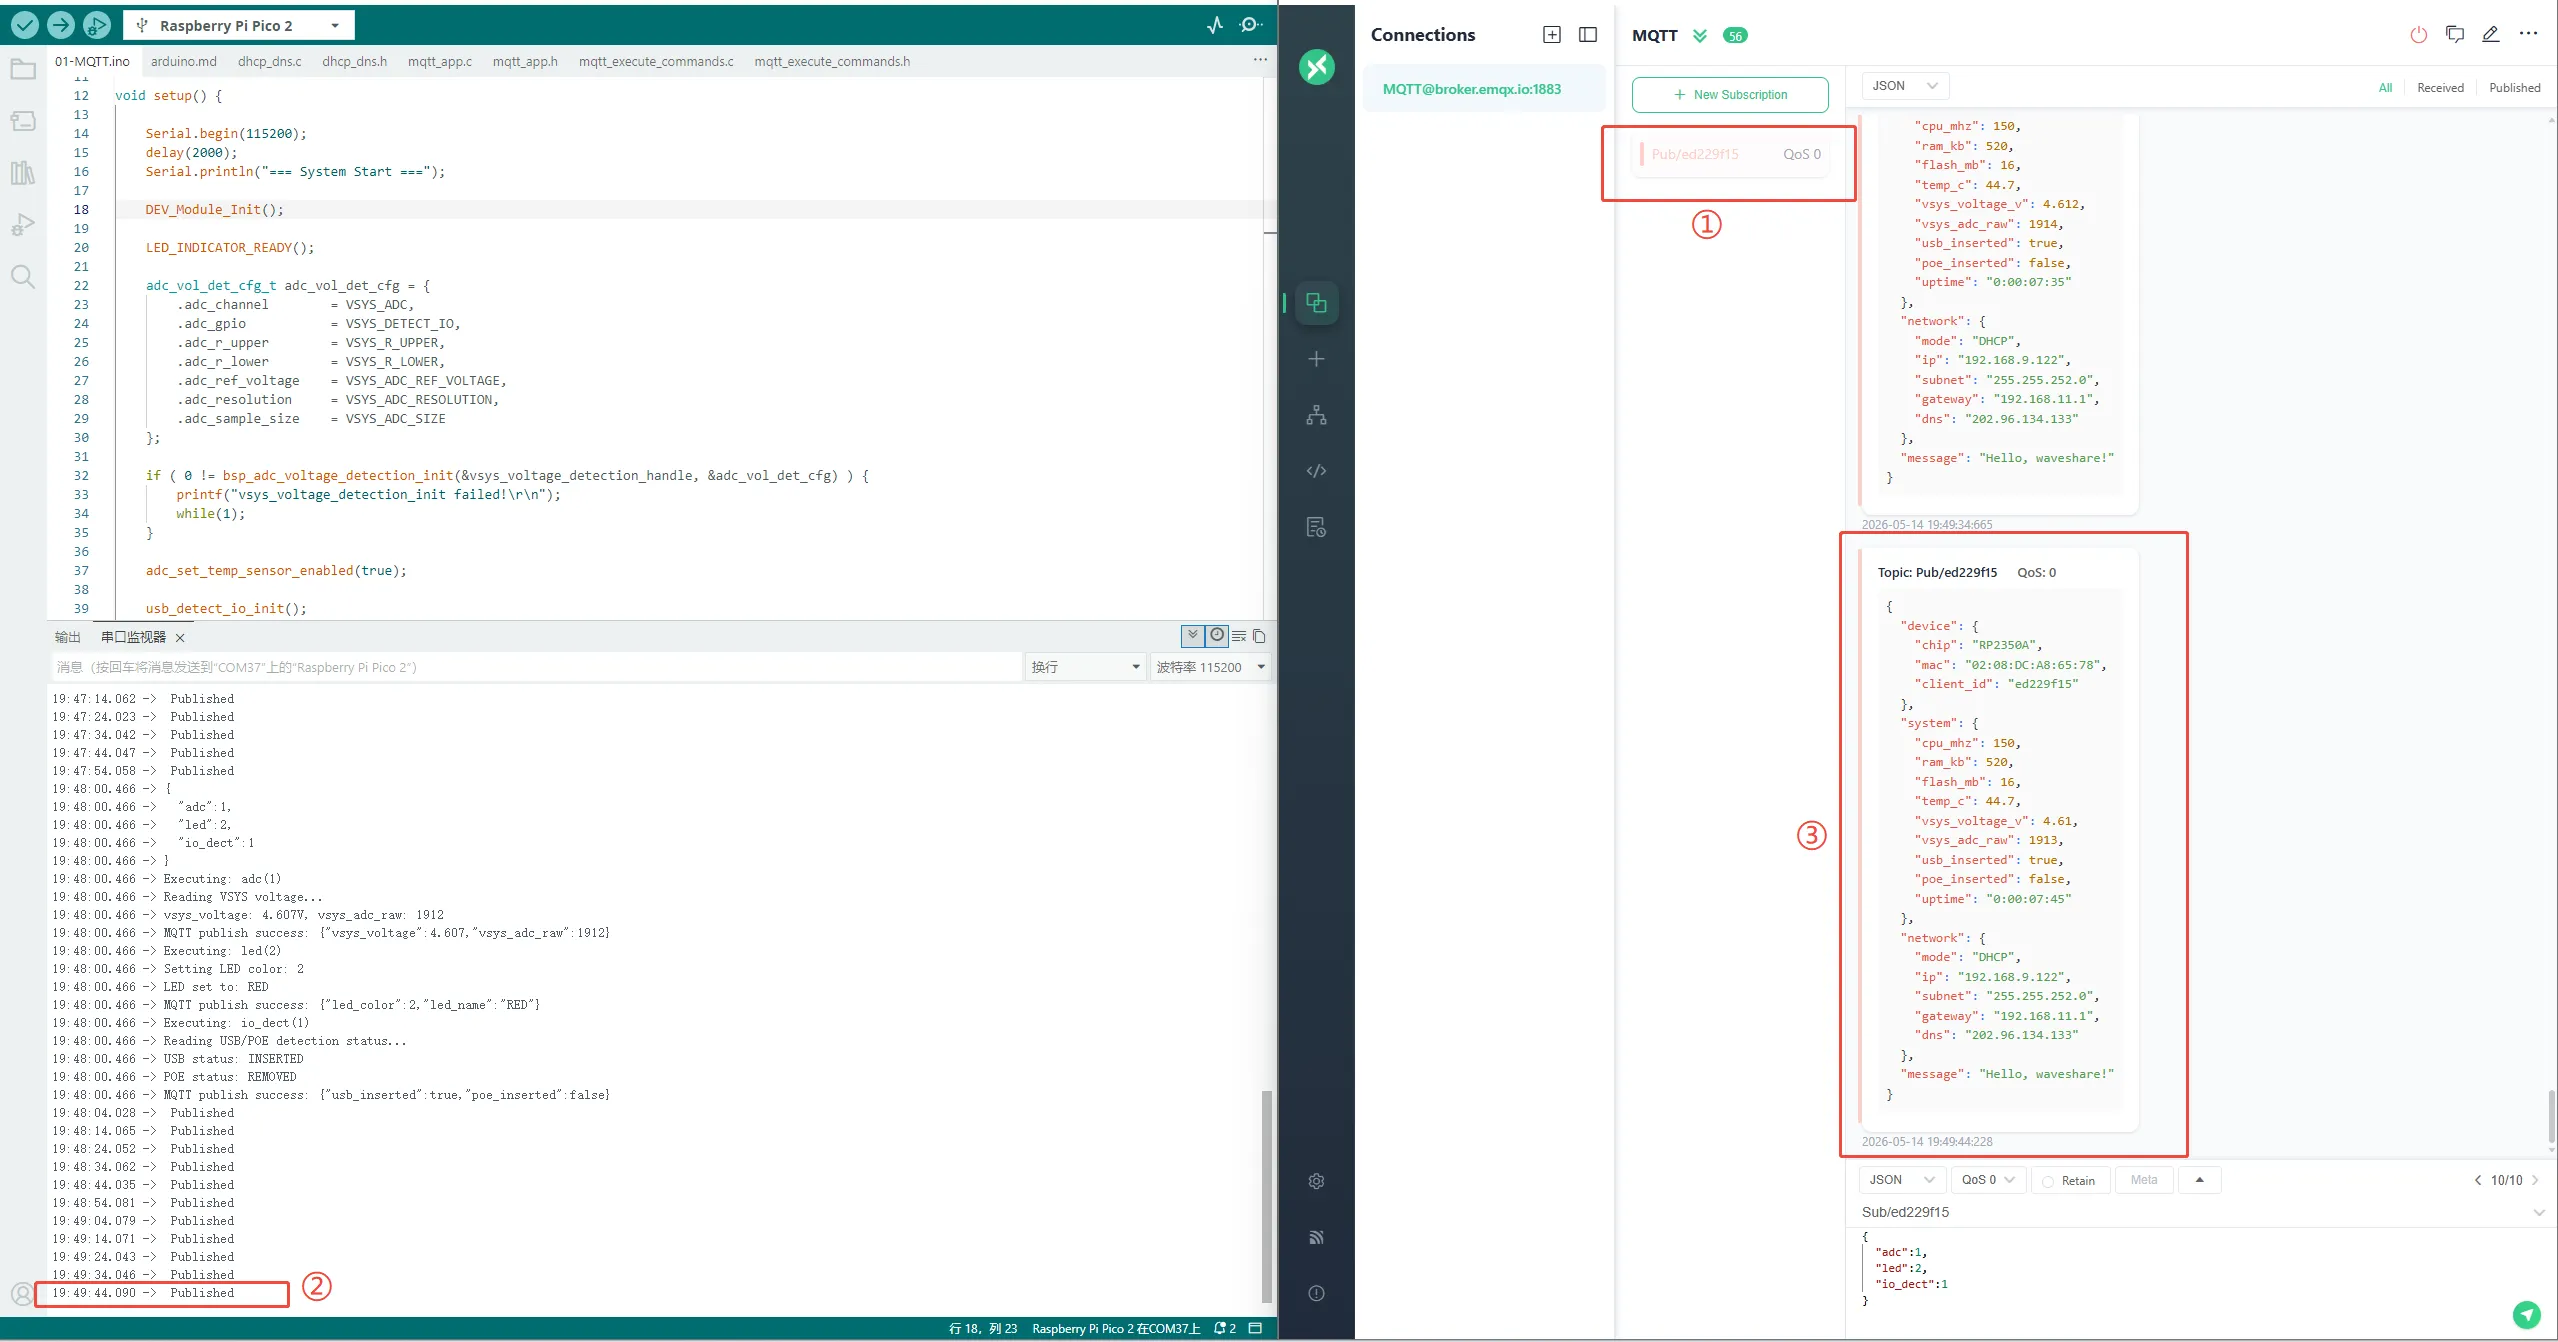
Resources
1. Hardware Resources
Development Board Design Files
2. Technical Manuals
- Datasheets
3. Official Resources
- Raspberry Pi Official Documentation
- Raspberry Pi Open Source Examples
4. Development Software
- pico-vscode package
- Font bitmap conversion software
- Font Library Conversion Tutorial
- Image Bitmap Conversion Software
- Image Bitmap Conversion Tutorial
5. Example
Support
Monday-Friday (9:30-6:30) Saturday (9:30-5:30)
Email: services01@spotpear.com