- sales/support
Google Chat:---
- sales
+86-0755-88291180
- sales01
sales@spotpear.com
- sales02
dragon_manager@163.com
- support
tech-support@spotpear.com
- CEO-Complaints
zhoujie@spotpear.com
- Only Tech-Support
WhatsApp:13246739196
- Purchase/Shipping/Refund
WhatsApp:13424403025
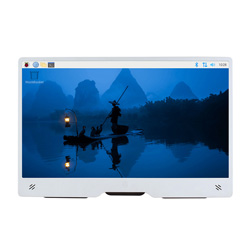
Raspberry-Pi-Monitor-Red-White User Guide
Features
- 15.6inch Full HD 1080p IPS display with anti-glare coating
- Standard HDMI port (compliant with version 1.4), supporting full-size HDMI input
- Integrated adjustable stand, compatible with VESA and screw mounting options
- Drives the LCD directly through the Raspberry Pi's HDMI interface, with a refresh rate up to 60Hz
- When used with Raspberry Pi, it is compatible with Raspberry Pi OS / Ubuntu / Kali and Retropie
- When used as a computer monitor, it supports Windows 11 / 10 / 8.1 / 8 / 7
- Supports OSD menu for adjusting backlight brightness and volume
- Equipped with 2 x 1.2W integrated speakers, supporting 44.1KHz and 96KHz sampling rates
Hardware Connection
Powered by Raspberry Pi's USB port
1.Use a USB Type-C cable to connect from the display's Type-C port to the Raspberry Pi's USB port
2.Use an HDMI cable to connect from the display's HDMI port to the Raspberry Pi's HDMI port
The installation effect is as follows: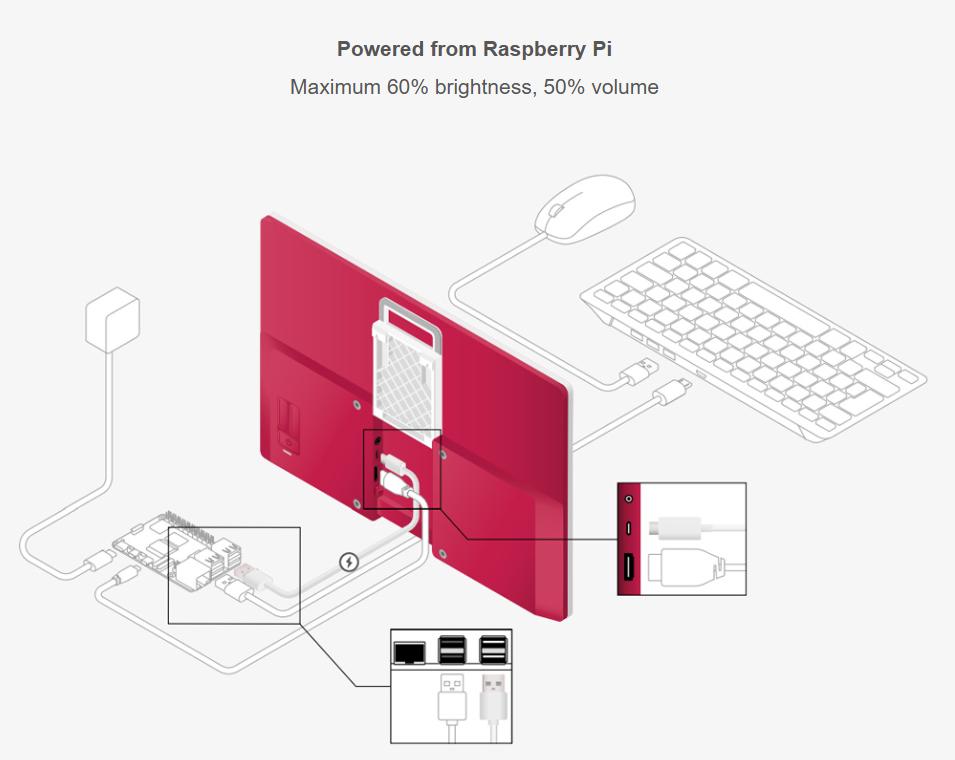
Power Supply via Official Adapter
1.Use a 5V 3A power supply to power the display's Type-C port
2.Use an HDMI cable to connect from the display's HDMI port to the Raspberry Pi's HDMI port
The installation effect is as follows: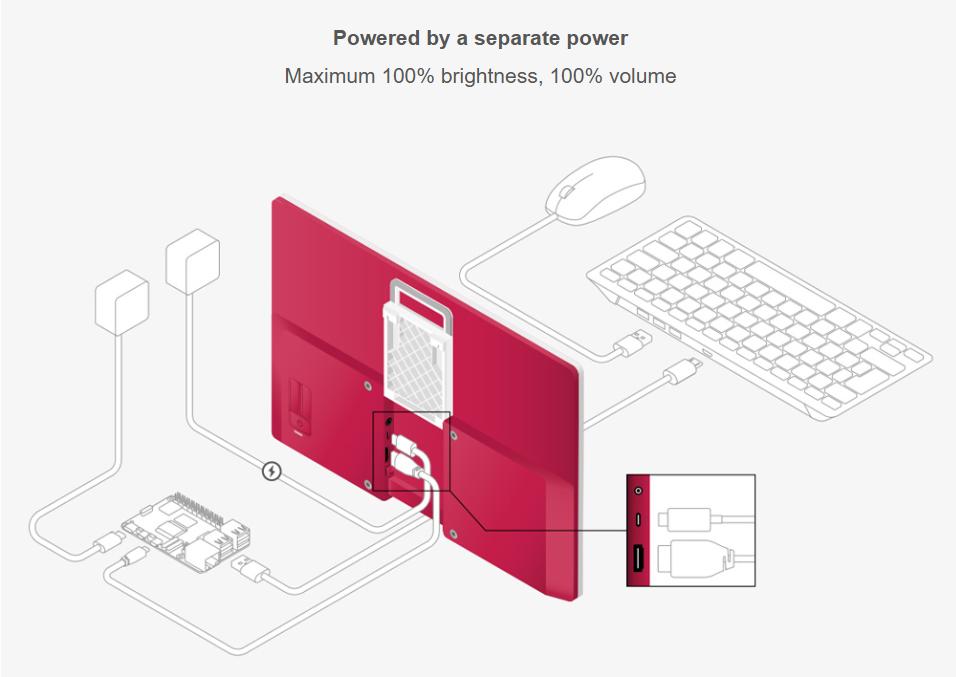
Power Supply Instructions
The Raspberry Pi Monitor draws power from a 5V USB Power Delivery (USB-PD) power source. Many USB-C power supplies, including the official power supplies for the Raspberry Pi 4 and Raspberry Pi 5, support this standard.
When using a power source that provides at least 1.5A of current over USB-PD, the Monitor operates in Full Power mode. In Full Power mode, you can use the full range (0%-100%) of display brightness and speaker volume.
When using a power source that does not supply at least 1.5A of current over USB-PD (including all USB-A power sources), the Monitor operates in Power Saving mode. Power Saving mode limits the maximum display brightness and the maximum speaker volume to ensure reliable operation. In Power Saving mode, you can use a limited range (0-50%) of display brightness and a limited range (0-60%) of speaker volume. When powered from a Raspberry Pi, the Monitor operates in Power Saving mode, since Raspberry Pi devices cannot provide 1.5A of current over a USB-A connection.
If the Monitor flashes on and off, your USB power supply is not capable of providing sufficient current to power the monitor. This can happen if you power the Monitor from a Raspberry Pi 5 or Pi 500 which is itself powered by a 5V/3A power supply. Try the following fixes to stop the Monitor from flashing on and off:

1.reduce the display brightness and volume (you may have to connect your monitor to another power supply to access the settings)
2.switch to a different power source or cable
Software Setup
Firmware Burning
Supports Raspberry Pi's Raspberry Pi OS / Ubuntu / Kali and Retropie systems.
When the LCD is used with these Raspberry Pi systems, you must manually set the resolution; otherwise, it may result in incorrect display resolution, affecting the experience.
If the system has a built-in KMS driver that automatically recognizes the resolution, this step can be skipped.
1.Connect the TF card to the PC ,download and use Raspberry Pi Imager to burn the corresponding system image. 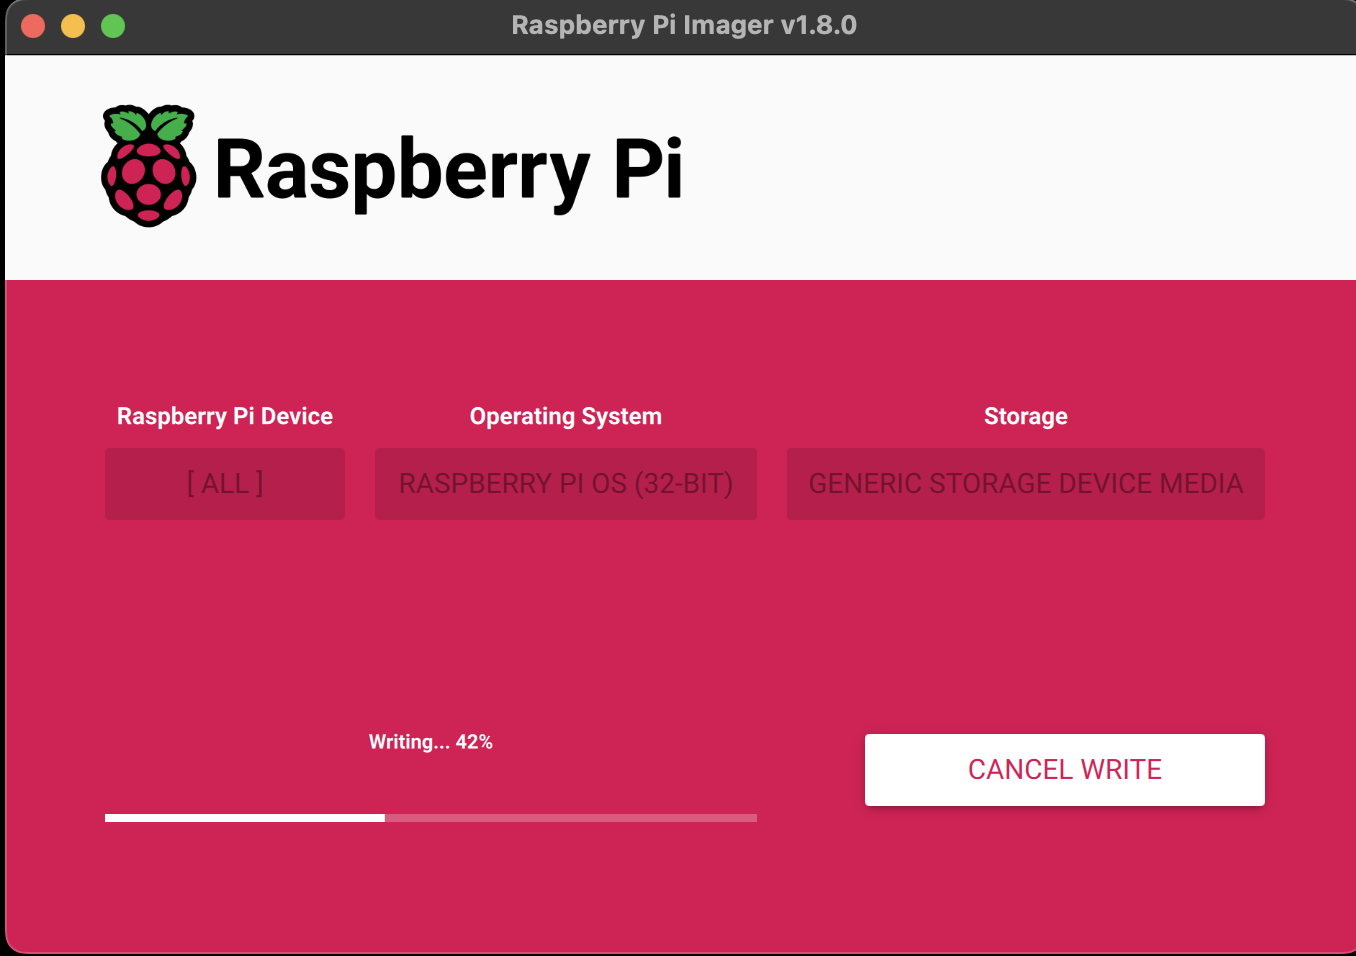
2.After the firmware burning is complete, insert the TF card into the Raspberry Pi, power up the Raspberry Pi, and after a few seconds of normal waiting, it should enter display. After the system starts, it can display normally.
Screen Sleep
To put the screen to sleep, run the following command in the Raspberry Pi terminal:
xset dpms force off
Note: This command is only applicable to Bullseye and Buster systems.
OSD Menu Introduction
Control
The back of the display has the following controls: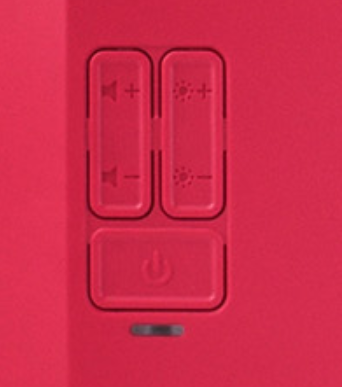
- Power button to enter and exit standby mode (indicated by the power symbol
 )
)
- Buttons to increase and decrease display brightness (indicated by the sun symbol ), to switch from power-saving mode to full power mode, please hold the brightness increase button for 3 seconds.
- Buttons to increase and decrease speaker volume (indicated by the speaker symbol )
On screen display messages
The on-screen display (OSD) may show the following messages:
Message Description 
No HDMI signal detected. 
The monitor will soon enter standby mode to conserve power. 
The output display resolution of the connected device is not supported. 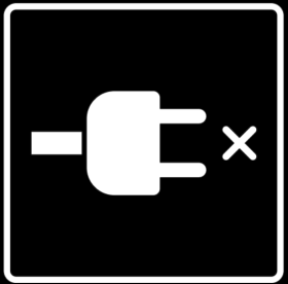
The monitor is operating in Power Saving mode, with reduced brightness and volume, because the monitor is not connected to a power supply capable of delivering 1.5A of current or greater. Additionally, the OSD shows information about display brightness changes using the (sun) symbol, and speaker volume level changes using the (speaker) symbol. Both brightness and volume use a scale that ranges from 0 to 100.
If you attempt to exit Standby mode when the display cannot detect an HDMI signal, the red LED beneath the Standby button will briefly light, but the display will remain in Standby mode.Position the Monitor
Use the following approaches to position the Monitor:
1.Angle the Monitor on the integrated stand.
2.Mount the Monitor on an arm or stand using the four VESA mount holes on the back of the red rear plastic housing.Use spacers to ensure adequate space for display and power cable egress.
3.Flip the integrated stand fully upwards, towards the top of the monitor. Use the drill hole template to create two mounting points spaced 55mm apart. Hang the Monitor using the slots on the back of the integrated stand.As illustrated below:
Precautions
Warnings
- This monitor is for indoor desktop use only.
- Do not expose the monitor to rain or damp environments; avoid spilling liquids on the monitor.
- Keep away from dust, moisture, and extreme temperature conditions.
- Do not place objects on the monitor.
- Avoid subjecting the monitor to severe vibrations or strong impacts.
- Do not place the monitor on an unstable surface.
- During use or transportation, do not hit or drop the monitor, as this may cause damage.
- When installing the monitor, secure it firmly to prevent falls.
- Do not apply excessive force to the screen or its surroundings; avoid pressing the screen with fingers or placing objects on it.
- Do not twist or deform the monitor's casing in any way.
- When transporting the monitor, avoid applying force without proper protection.
- Do not insert any objects into the slots of the monitor's casing.
- In different environments, you may notice slight unevenness in screen brightness.
- Do not disassemble the casing or attempt to repair the device yourself; any repairs should be done by authorized technical personnel.
- This product complies with the relevant regulations and directives of the country/region where it is sold. It has been tested and proven to meet the requirements through appropriate industry standards and quality management procedures.
- This product is classified as a Class B non-intentional radiator, in compliance with Part 15 of the FCC rules. Operation must comply with the following two conditions:
- This device must not cause harmful interference;
- This device must accept any interference received, including interference that may cause malfunction. In a domestic environment, this product may cause radio interference, and in such cases, users may need to take appropriate measures.
Safety Instructions
To prevent malfunction or damage to this product, please observe the following safety precautions:
- Avoid exposure to water or damp environments.
- Do not expose the product to any external heat sources; the Raspberry Pi monitor is designed to operate reliably at normal ambient temperatures.
- Handle with care during operation to prevent mechanical or electrical damage to the product.
- Turn off the monitor and unplug the cables before cleaning.
- Do not spray liquids directly onto any part of the product, and avoid using strong chemical cleaners.
- Wipe the screen and other parts of the monitor with a soft cloth.
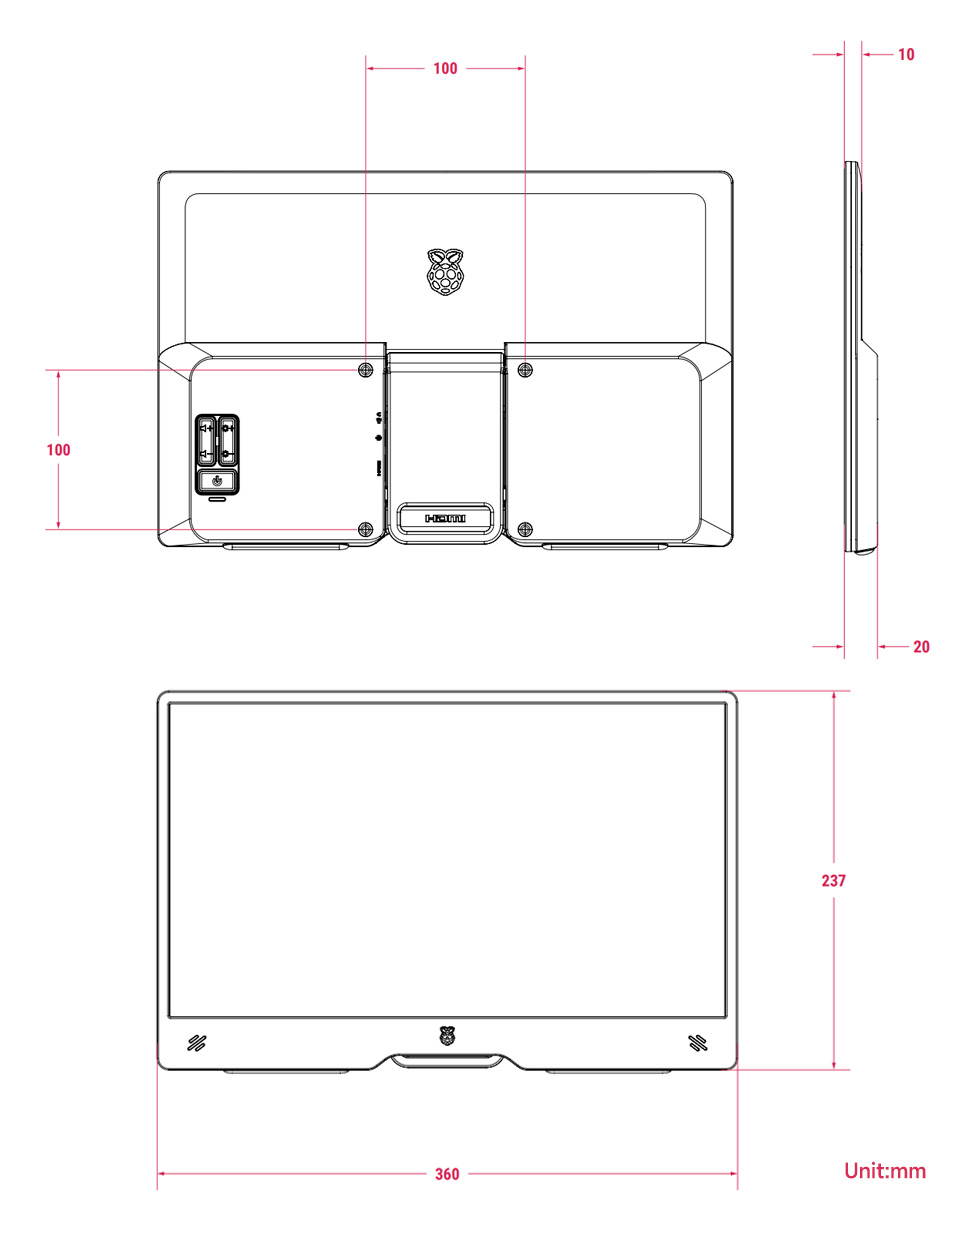
Dimension
Resourse
FAQ
Question: How to replace the Raspberry Pi boot logo image?
Answer:You can replace the custom image by swapping it with the image in this directory: /usr/share/plymouth/themes/pix/splash.png
Support
Monday-Friday (9:30-6:30) Saturday (9:30-5:30)
Mobile: +86 13434470212
Email: services01@spotpear.com