




- sales/support
Google Chat:---
- sales
+86-0755-88291180
- sales01
sales@spotpear.com
- sales02
dragon_manager@163.com
- support
tech-support@spotpear.com
- CEO-Complaints
zhoujie@spotpear.com
- Only Tech-Support
WhatsApp:13246739196
- Purchase/Shipping/Refund
WhatsApp:13424403025
4-DSI-TOUCH-A User Guide
Features
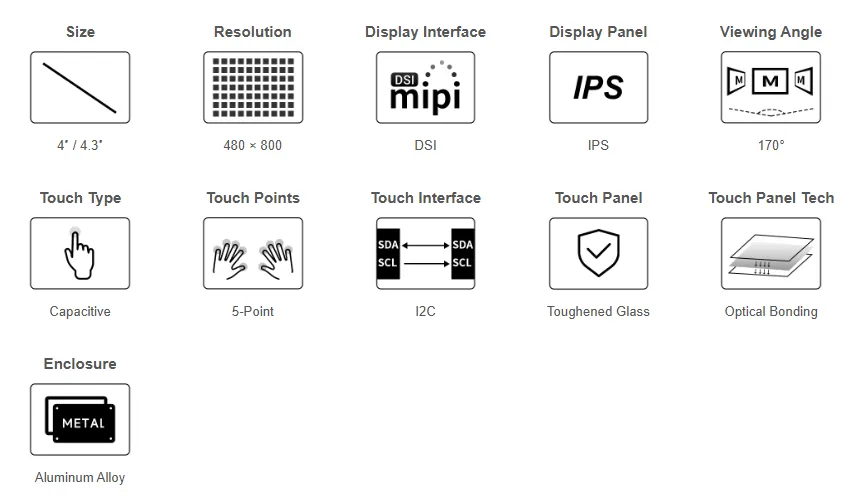
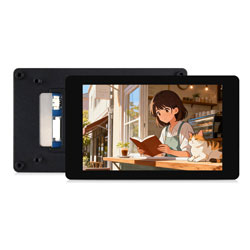
- 4inch DSI touch screen, capacitive 5-point touch control
- IPS display panel with a hardware resolution of 480×800
- Features the optical bonding process for clearer picture quality
- Toughened glass touch panel, hardness up to 6H
- Drives the LCD through the DSI interface, with a refresh rate of up to 60Hz
- Supports software control of backlight brightness
- Aluminum alloy back cover design, pure passive cooling design
Electrical Specifications
| Parameter | Min | Typical | Max | Unit | Note |
|---|---|---|---|---|---|
| Input Voltage | 4.75 | 5.00 | 5.25 | V | Note 1 |
| Input Current | TBD | 180 | TBD | mA | Note 2 |
| Operating Temperature | 0 | 25 | 60 | ℃ | Note 3 |
| Storage Temperature | -10 | 25 | 70 | ℃ | Note 3 |
- Note 1: Exceeding the maximum input voltage or improper operation may cause permanent damage to the device.
- Note 2: Input current must be ≥180mA, otherwise it will cause startup failure or display abnormalities. Prolonged abnormal operation may cause permanent damage to the device.
- Note 3: Do not store the display in high temperature or high humidity environments for extended periods. The display must operate within the specified limits to avoid damage.
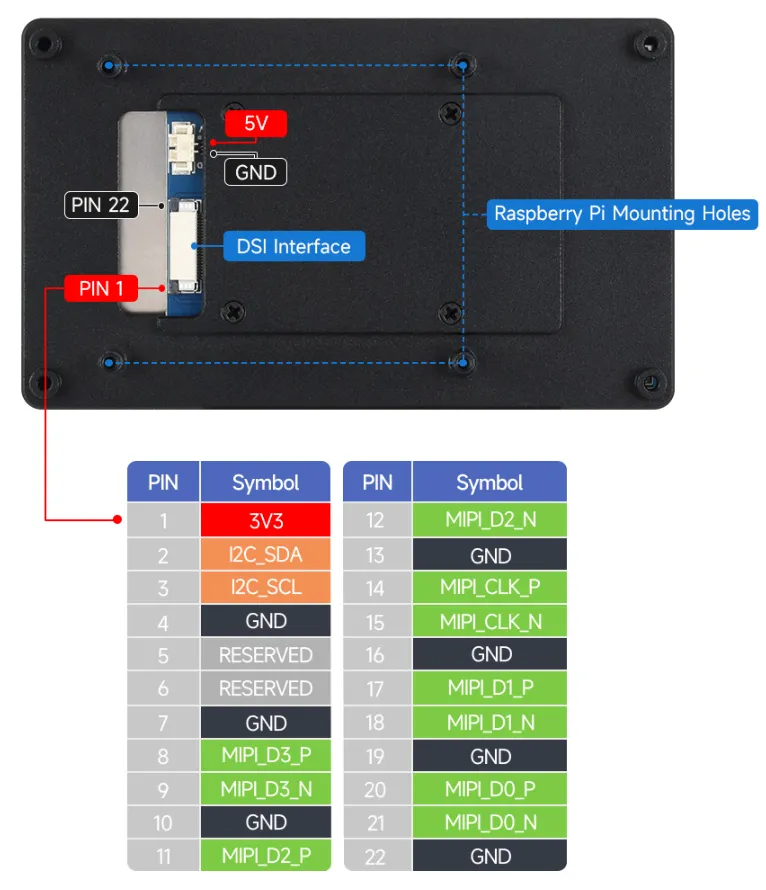
Interface Introduction
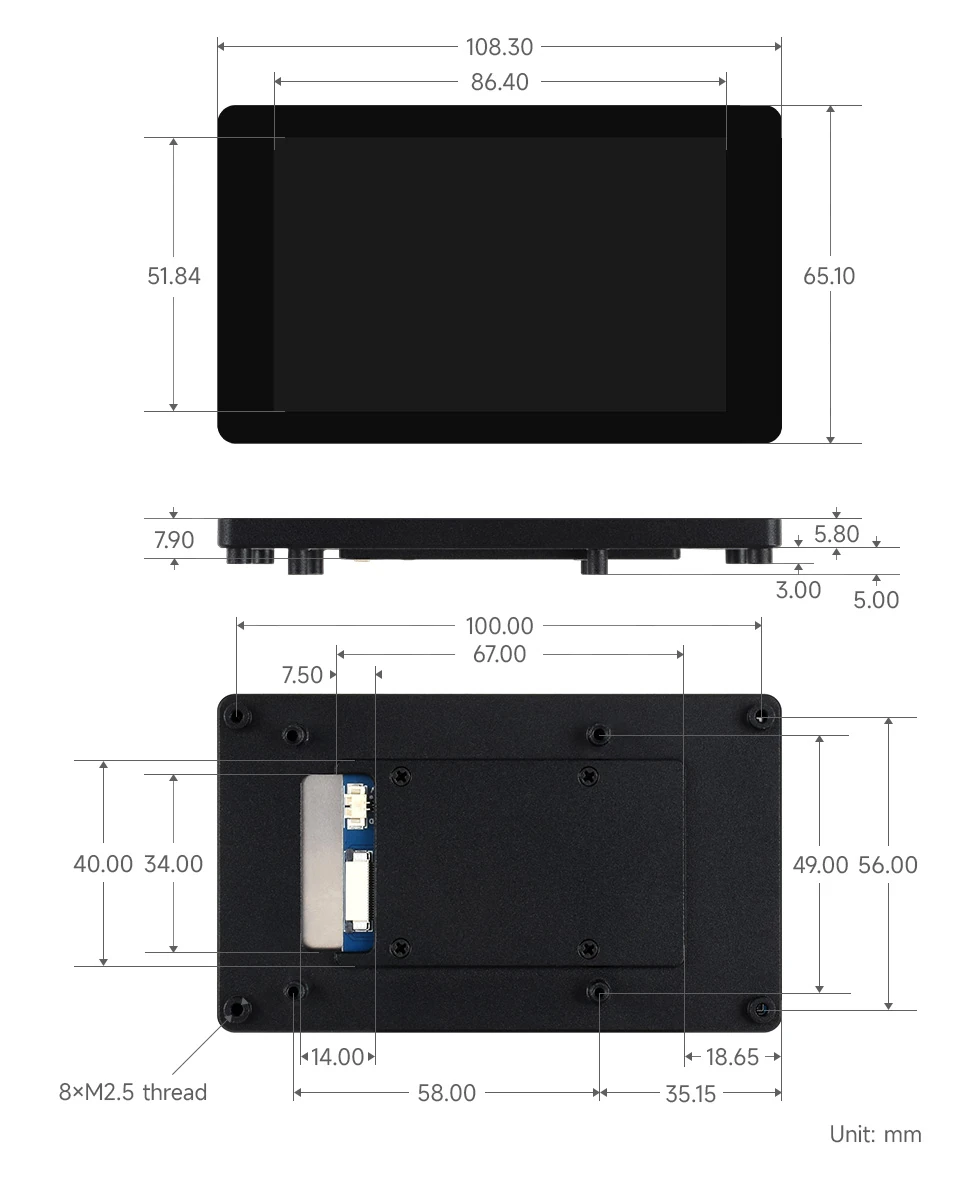
Dimensions
Working with Raspberry Pi
Pi5/CM5/CM4/CM3+/CM3 Hardware Connection
- Use the "FFC Cable 22PIN 200mm (Reverse)" cable to connect the DSI port of the display to the 22PIN DSI port of the Raspberry Pi board.
- Use the "GPIO connection cable" to connect the power connector of the display to the 5V GND pin header of the Raspberry Pi board.
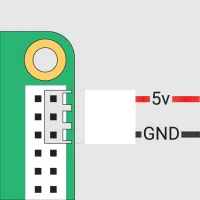
- Secure the Raspberry Pi to the display with M2.5 screws. The installation is as follows:
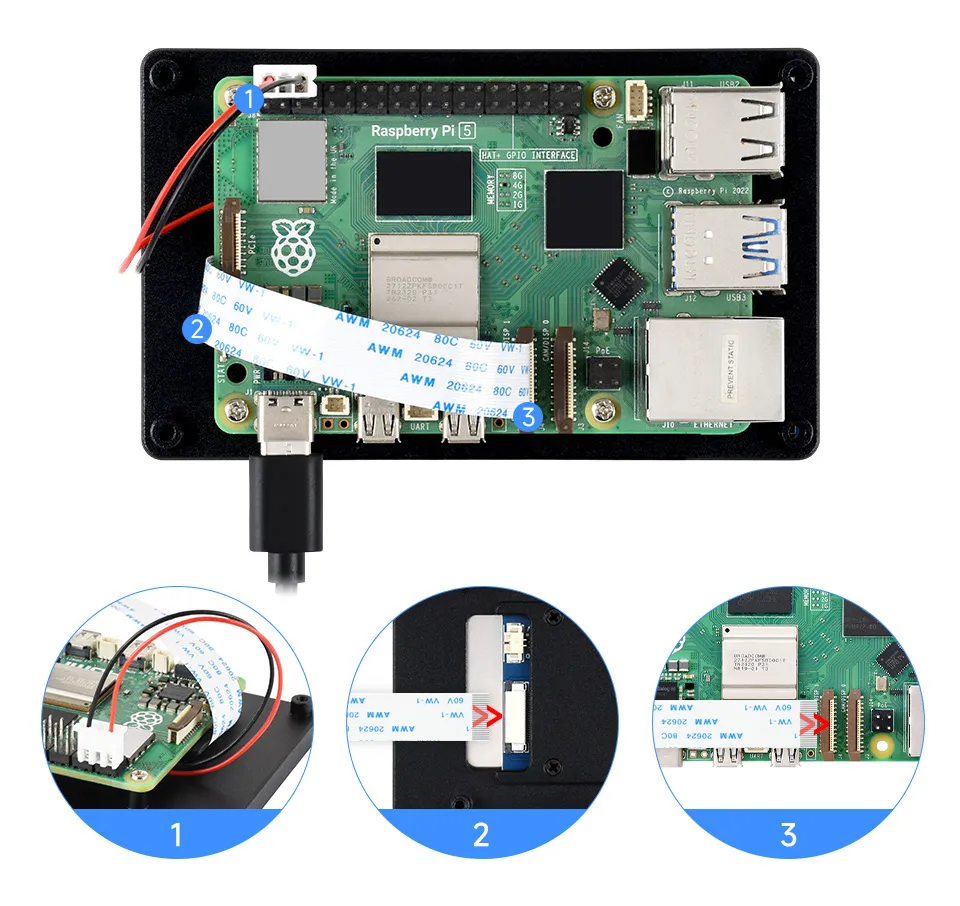
Please ensure the DSI cable is connected in the correct orientation and that 5V power is supplied via the GPIO pins.
When inserting or removing the DSI connector, handle it gently, avoiding excessive force or angled insertion/removal, to prevent damage to the connector or poor contact.
Pi4B/3B+/3B/3A+ Hardware Connection
- Use the "DSI-Cable-12cm" cable to connect the DSI port of the display to the 15PIN DSI port of the Raspberry Pi board.
- Use the "GPIO connection cable" to connect the power connector of the display to the 5V GND pin header of the Raspberry Pi board.
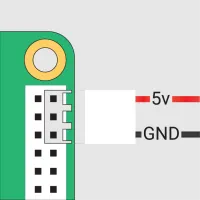
- Secure the Raspberry Pi to the display with M2.5 screws. The installation is as follows:
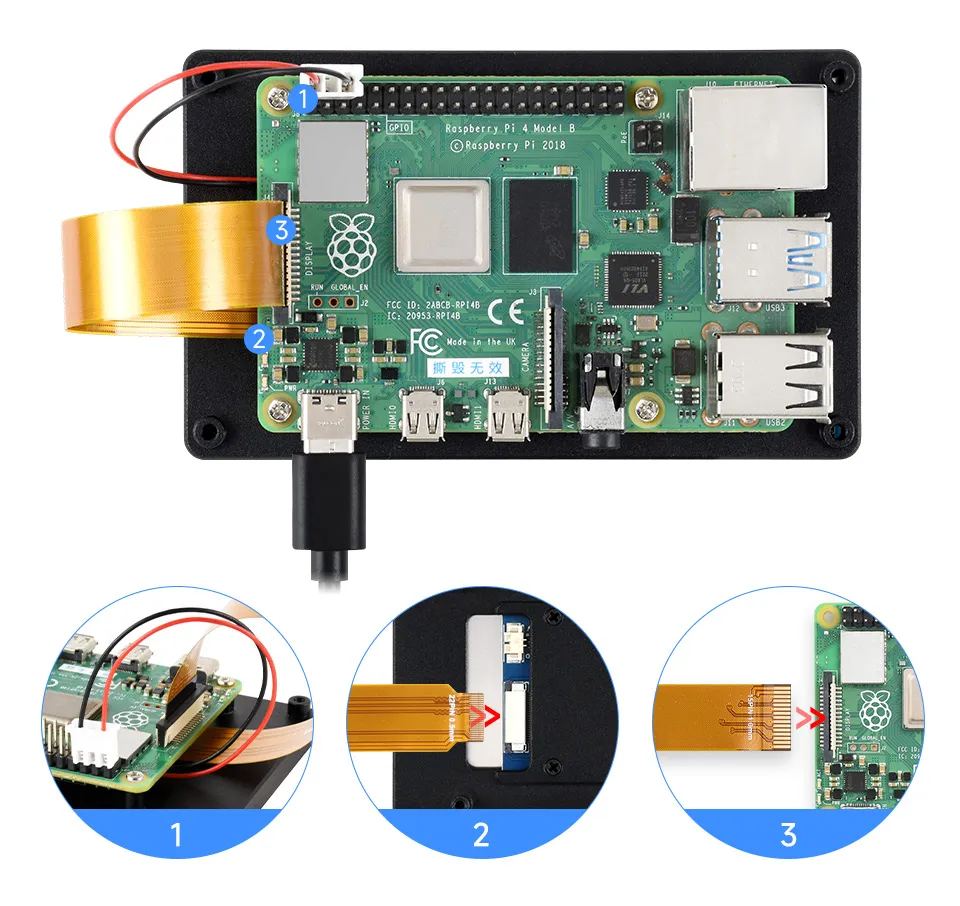
Please ensure the DSI cable is connected in the correct orientation and that 5V power is supplied via the GPIO pins.
When inserting or removing the DSI connector, handle it gently, avoiding excessive force or angled insertion/removal, to prevent damage to the connector or poor contact.
Software Settings
Flash Latest Trixie/Bookworm System
Connect the TF card to the PC, download and use Raspberry Pi Imager to flash the corresponding system image.
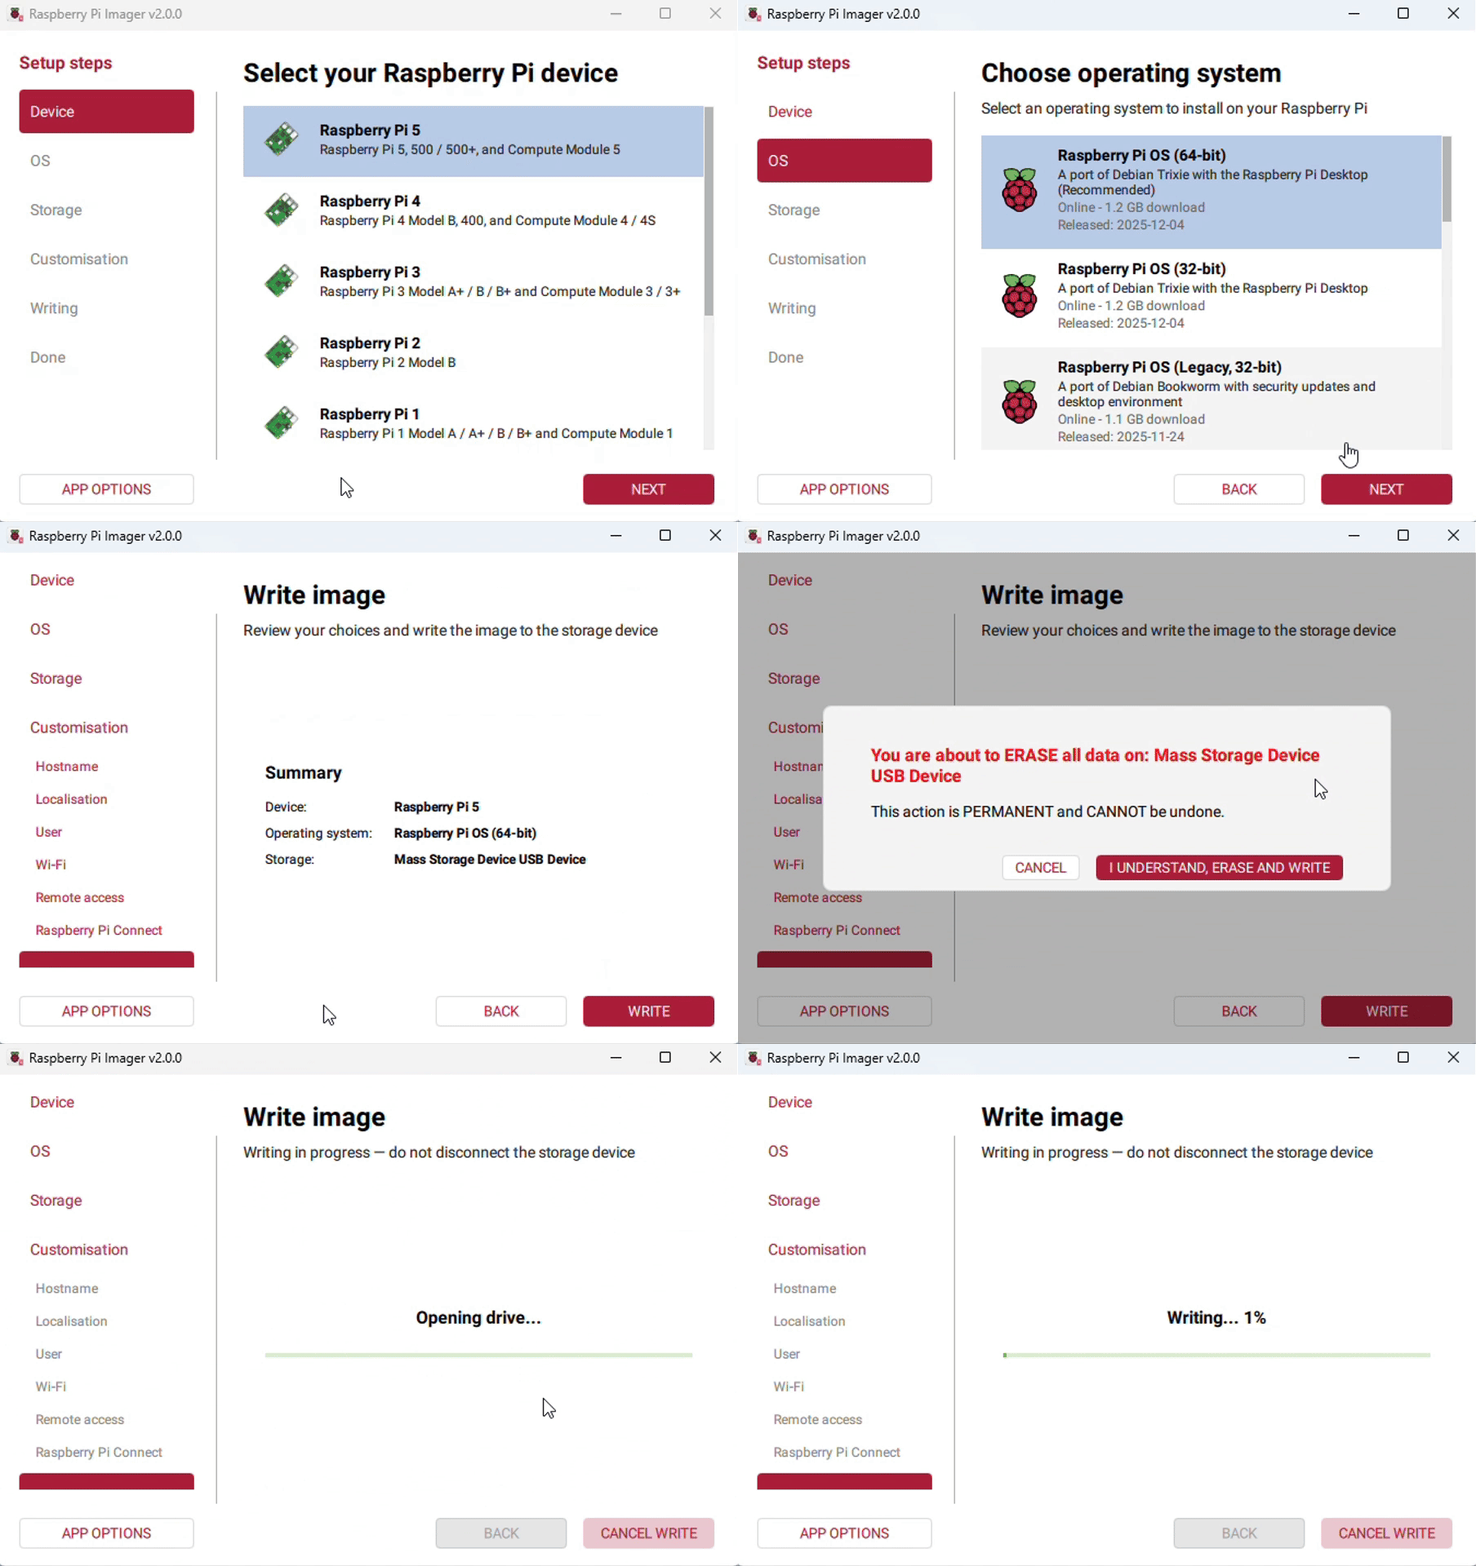
After the flashing is completed, insert the TF card into the Raspberry Pi, power it on, and log in to the terminal (you can connect the Raspberry Pi to an HDMI display or log in remotely via SSH).
Run the following commands in the terminal to install the drivers:
wget https://files.waveshare.com/wiki/common/Panel-waveshare-dsi2-driver.zipunzip Panel-waveshare-dsi2-driver.zipcd Panel-waveshare-dsi2-driver/panel-waveshare-dsi2-drivermakesudo rm /lib/modules/$(uname -r)/kernel/drivers/regulator/waveshare-panel-regulator.ko.xzsudo rm /lib/modules/$(uname -r)/kernel/drivers/gpu/drm/panel/panel-waveshare-dsi-v2.ko.xzsudo cp ./waveshare-panel-regulator.ko /lib/modules/$(uname -r)sudo cp ./panel-waveshare-dsi-v2.ko /lib/modules/$(uname -r)sudo depmodsudo modprobe waveshare-panel-regulatorsudo modprobe panel-waveshare-dsi-v2sudo dtc -I dts -O dtb -o vc4-kms-dsi-waveshare-panel-v2.dtbo vc4-kms-dsi-waveshare-panel-v2-overlay.dtssudo cp vc4-kms-dsi-waveshare-panel-v2.dtbo /boot/overlays/Configure config.txt file
sudo nano /boot/firmware/config.txtNote: Since Pi5/CM5/CM4/CM3+/CM3 have two MIPI DSI interfaces, pay attention to using the correct DSI interface and command. The default recommendation is to use DSI1.
dtoverlay=vc4-kms-v3d#DSI1 Usedtoverlay=vc4-kms-dsi-waveshare-panel-v2,4_0_inch_a#DSI0 Use# dtoverlay=vc4-kms-dsi-waveshare-panel-v2,4_0_inch_a,dsi0Save and exit, and the screen will display touch normally after the system restarts.
Adjust Backlight Brightness
GUI Brightness Adjustment
The following steps are based on the Trixie system:
Click the top-left menu, go to Preferences → Control Center, and select Screens.
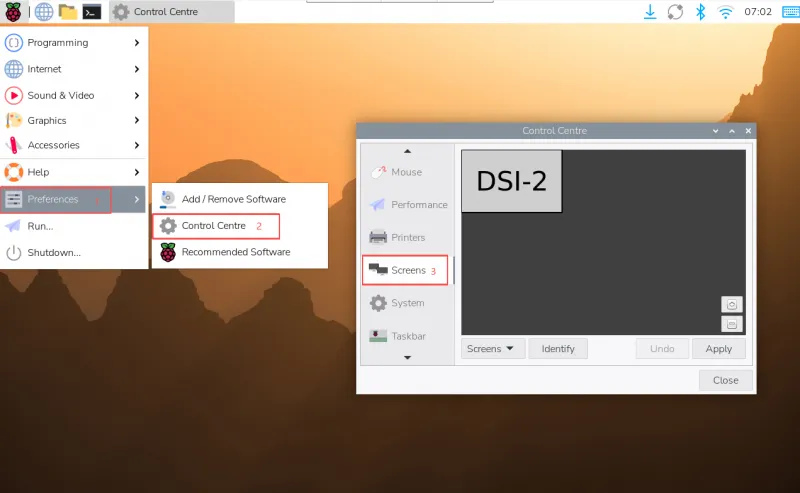
Go to "Screen" -> "DSI-2" -> "Brightness", check and adjust the desired backlight brightness, and finally click Apply to save the settings.
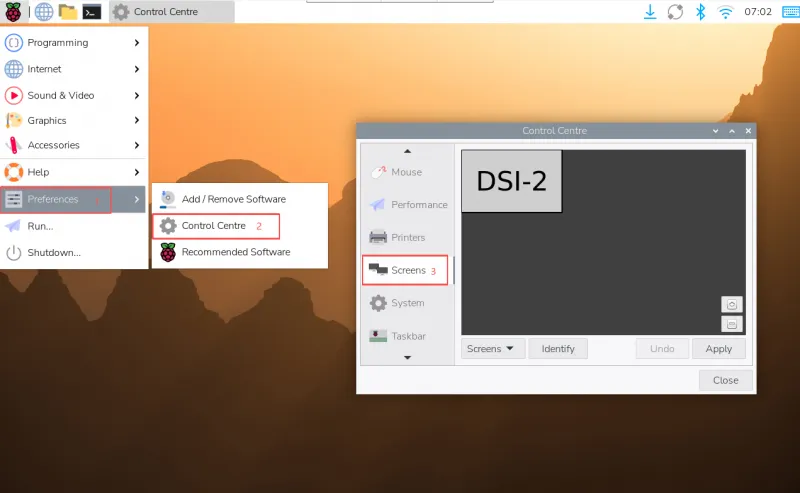 INFO
INFOIn the Bookworm system, this setting entry is located at Screen Configuration → Screen.
Use Waveshare Backlight Adjustment Application
You can also use the graphical backlight adjustment tool provided by Waveshare (this application is only for Trixie, Bookworm, and Bullseye systems):
wget https://files.waveshare.com/wiki/common/Brightness.zip
unzip Brightness.zip
cd Brightness
sudo chmod +x install.sh
./install.sh
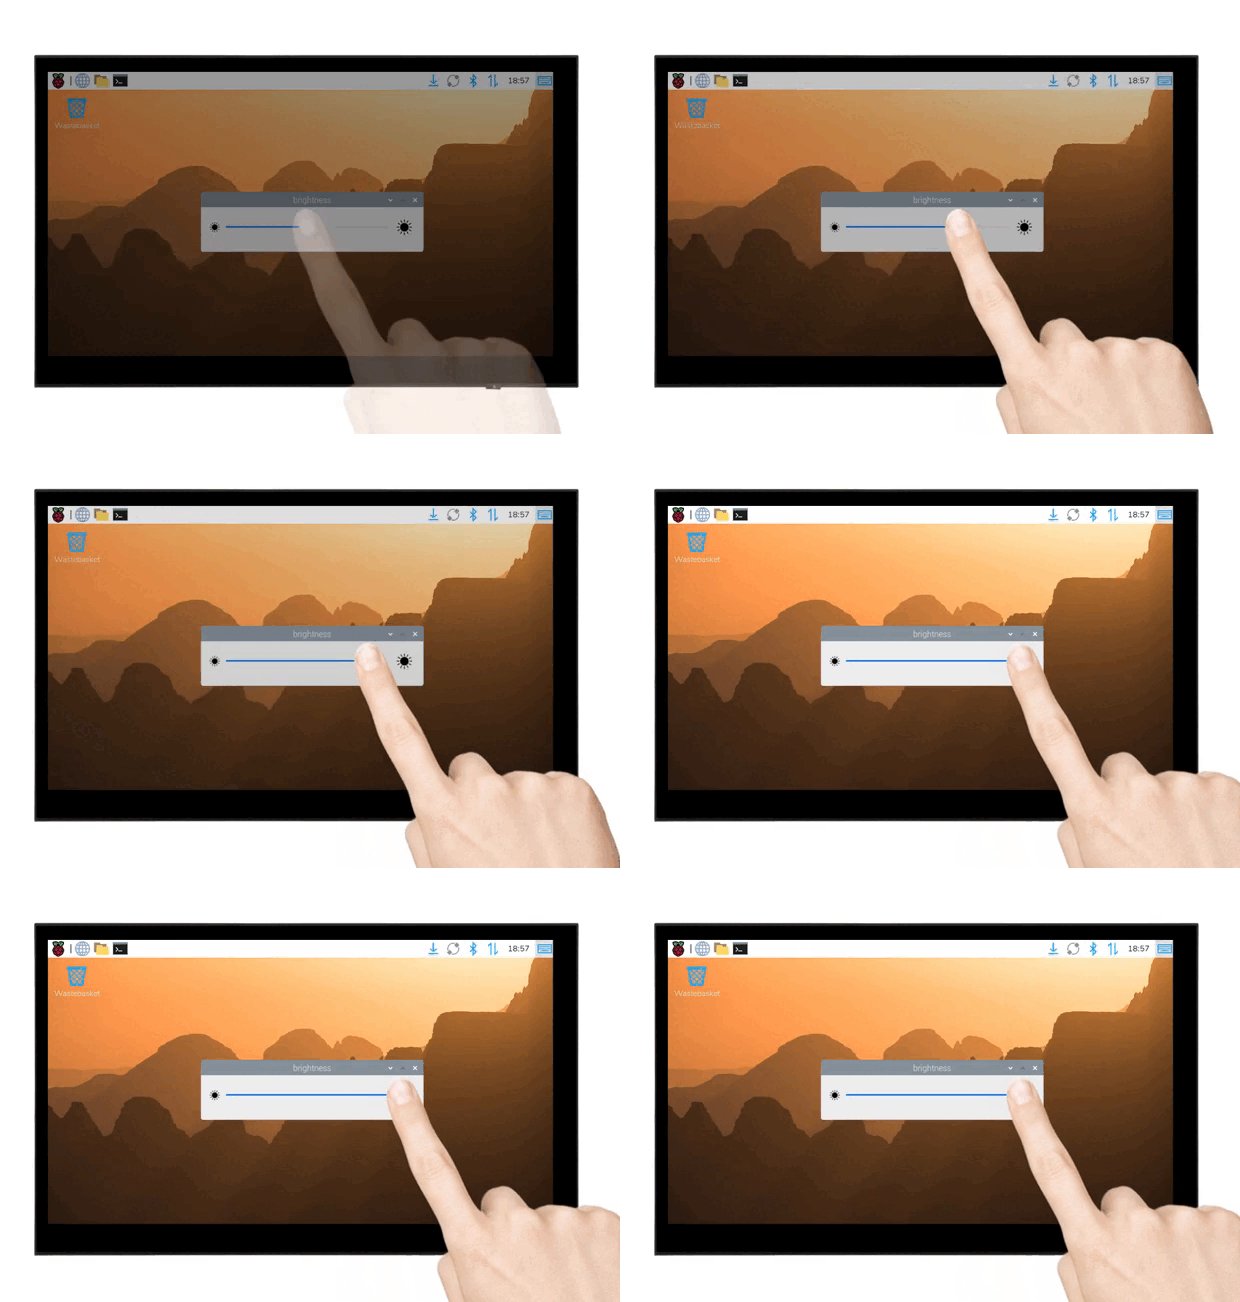
After the installation is completed, you can open the demo in the Start Menu -> Accessories -> Brightness, as shown below:
Adjust Backlight Brightness via Terminal
echo X | sudo tee /sys/class/backlight/*/brightness
Where X represents any number from 0 to 255. 0 means the darkest backlight, and 255 means the brightest backlight. For example:
echo 100 | sudo tee /sys/class/backlight/*/brightness
echo 0 | sudo tee /sys/class/backlight/*/brightness
echo 255 | sudo tee /sys/class/backlight/*/brightness
Trixie/Bookworm Display Rotation
GUI Rotation
The following steps are based on the Trixie system:
Click the top-left menu, go to Preferences → Control Center, and select Screens.
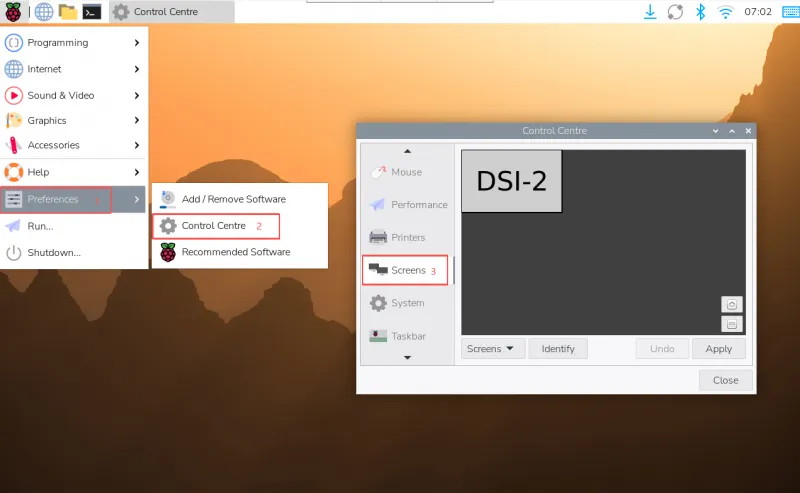
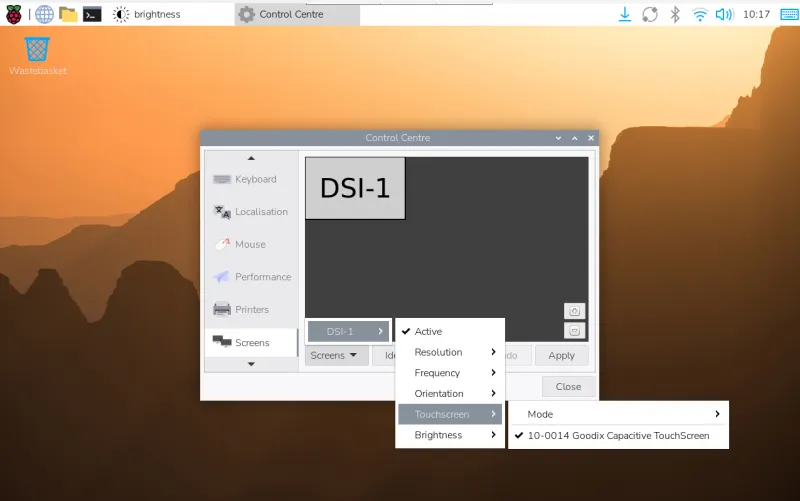
Go to "Screen" → "DSI-1" → "Touchscreen", check "10-0014 Goodix Capacitive TouchScreen".
Go to "Screen" → "DSI-2" → "Orientation", select the desired rotation, and click "Apply" to complete display and touch synchronization.
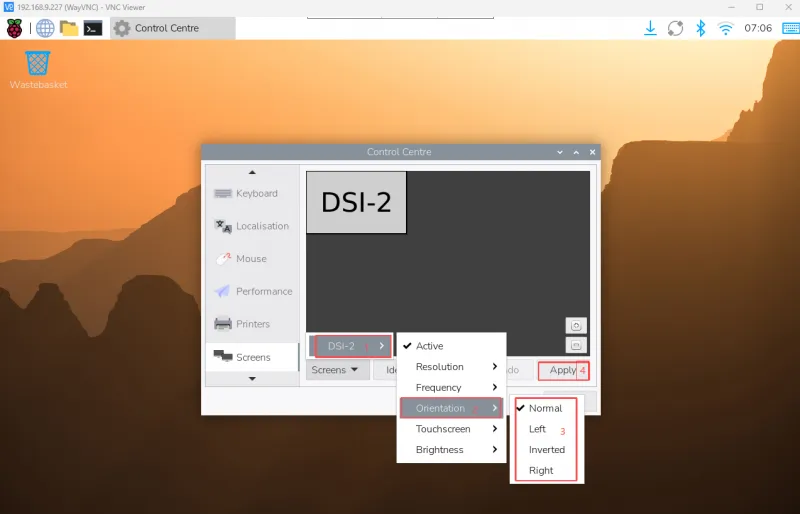
- In the Bookworm system, this setting is located at Screen Configuration → Screen.
- The above synchronous rotation method is supported only on Trixie/Bookworm systems.
Lite Version Display Rotation
sudo nano /boot/firmware/cmdline.txt
Add the corresponding display rotation directive at the beginning of the cmdline.txt file, save, and reboot to take effect.
- Rotation commands
#Display rotation 90 degrees
video=DSI-1:480x800M@60,rotate=90

#Display rotation 270 degrees
video=DSI-1:480x800M@60,rotate=270

#Display rotation 180 degrees
video=DSI-1:480x800M@60,rotate=180
- If using Pi5/CM5, use the actual detected DSI display identifier, e.g., "DSI-2".
- You cannot rotate the DSI display separately from the HDMI display using
cmdline.txt. When you use both DSI and HDMI simultaneously, they share the same rotation value.
Touch Rotation
If you rotate using the GUI, you can check the "Touchscreen" option in the screen layout editor window to synchronize touch rotation. Please refer to the previous introduction for how to rotate the screen. For command-line rotation, refer to the following:
Create a new file named 99-waveshare-touch.rules
sudo nano /etc/udev/rules.d/99-waveshare-touch.rulesAdd the following lines as needed to set the touch rotation directive, then reboot to take effect.
# Touch rotation 90 degreesENV{ID_INPUT_TOUCHSCREEN}=="1", ENV{LIBINPUT_CALIBRATION_MATRIX}="0 -1 1 1 0 0"# Touch rotation 270 degreesENV{ID_INPUT_TOUCHSCREEN}=="1", ENV{LIBINPUT_CALIBRATION_MATRIX}="0 1 0 -1 0 1"# Touch rotation 180 degreesENV{ID_INPUT_TOUCHSCREEN}=="1", ENV{LIBINPUT_CALIBRATION_MATRIX}="-1 0 1 0 -1 1"# Save, exit, and rebootsudo reboot
Touch Mode Selection
The Trixie and Bookworm systems support two touch modes, which can be switched in the Screen Configuration > Touchscreen menu:
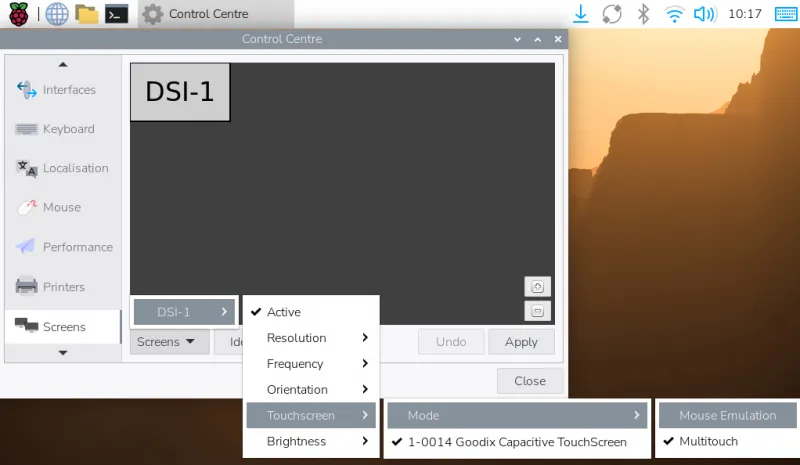
Mouse Emulation (default)
- Click = Left mouse button function
- Long press = Right mouse button function
- Supports double-click
- Does not support swiping pages or multi-touch
Note: This mode is suitable for mouse-oriented scenarios, such as double-clicking to open the file manager, or long-pressing for right-click functions.
Multitouch
- Supports multi-touch
- Supports page swiping
- Does not support double-click or long-press for right-click
Note: This mode is suitable for touch-optimized scenarios, such as web browsing and scrolling lists.
Using Touchscreen Virtual Keyboard
Raspberry Pi OS Bookworm and later versions include Squeekboard on-screen keyboard by default.
It automatically appears when text input is possible and hides when not.
You can also manually show or hide it using the keyboard icon in the top-right corner of the taskbar.
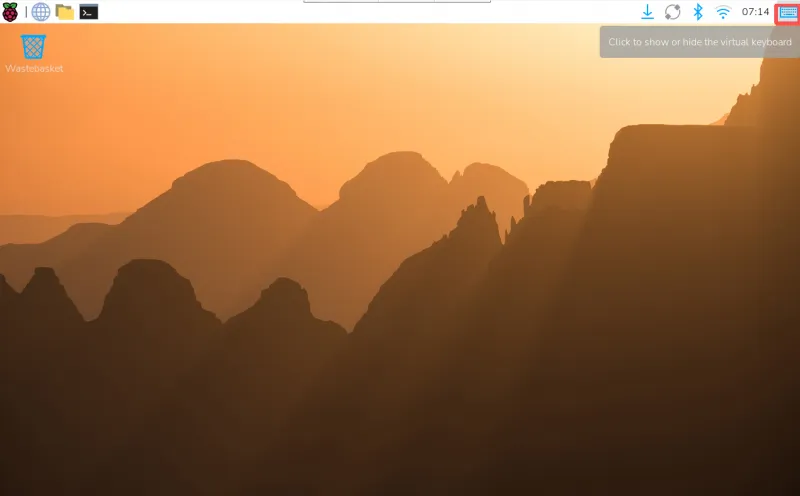
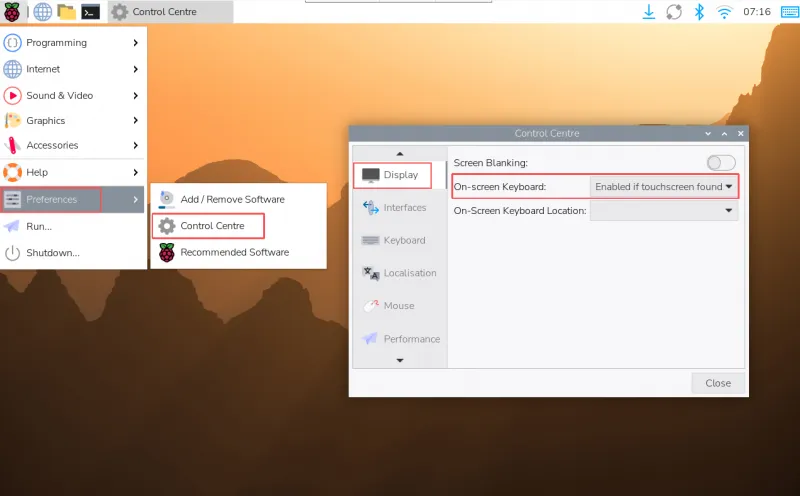
You can also permanently set the on-screen keyboard to show or hide via the top-left menu Preferences → Control Centre → Display.
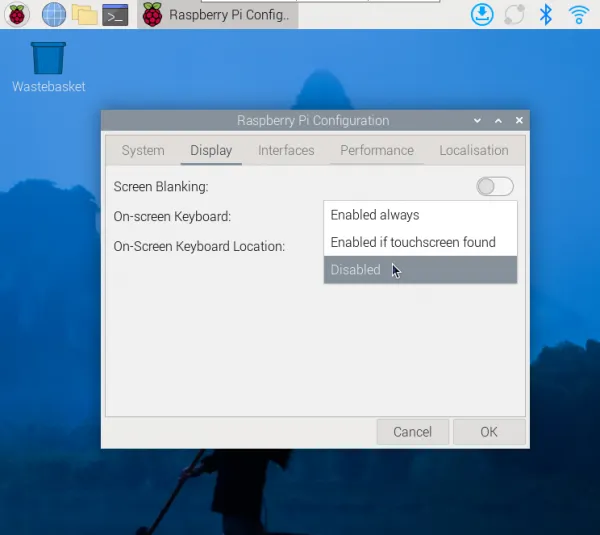
In the Bookworm system, you can set the keyboard to show or hide via Raspberry Pi Configuration → Display or raspi-config → Display.
Working with ESP32-P4 Screens
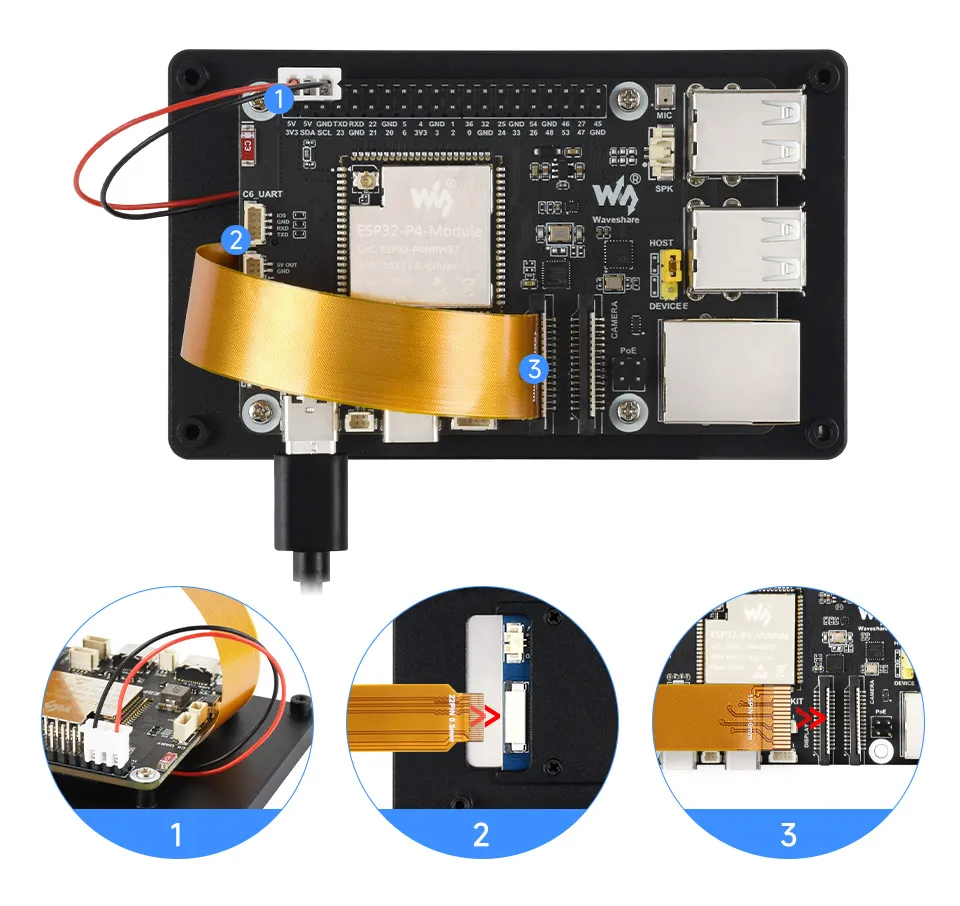
Hardware Connection
Using ESP32-P4-Module-DEV-KIT as an example
Screen Driver
ESP32-P4-Module-DEV-KIT drives this screen via MIPI 2-lane
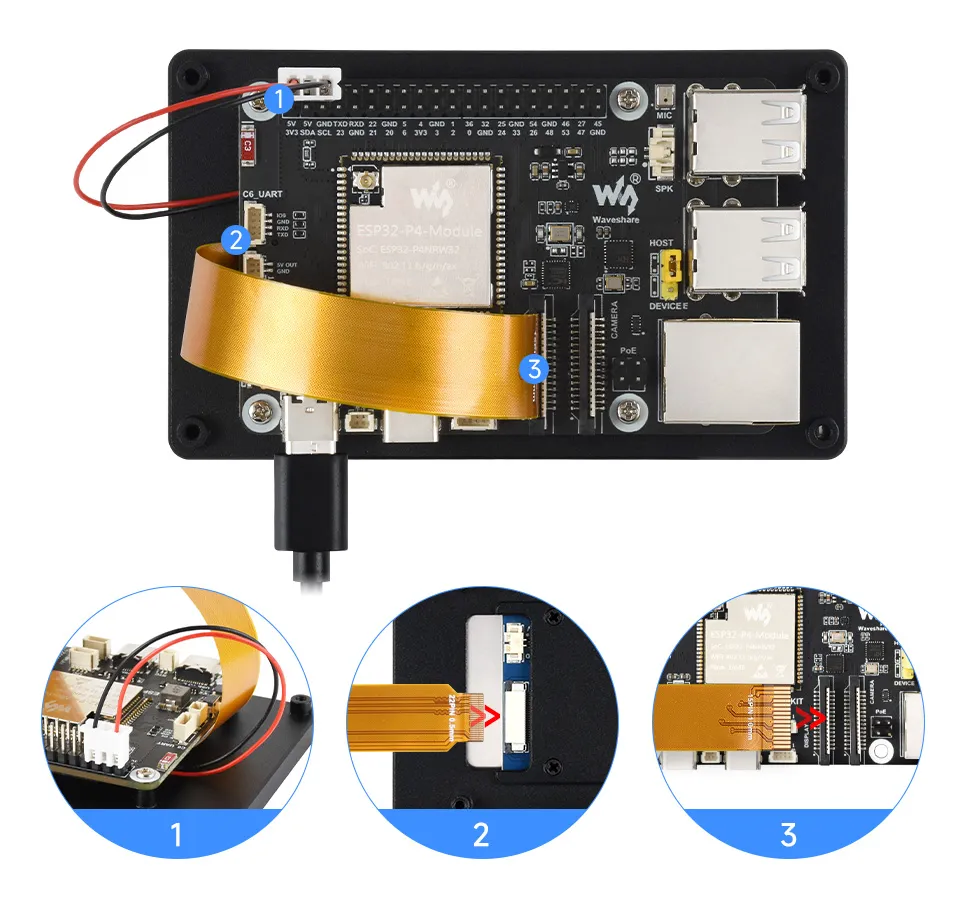
The screen driver has been packaged as a component and is driven via BSP. The component is available at ESP Component Registry
Use idf.py add-dependency "waveshare/esp32_p4_platform" to add the component to your ESP-IDF project.
Backlight Control
After connecting the matching FPC cable and power cable to the ESP32-P4-Module-DEV-KIT, you can control the backlight by writing 0x00 to 0xFF (full brightness) via I2C of the ESP32-P4-Module-DEV-KIT to register 0x96 of device 0x45 on the screen.
If using the ESP32-P4-Module-DEV-KIT BSP component, you can directly control it using the following functions:
bsp_display_brightness_init();   // Initialize the backlight

bsp_display_backlight_on();      // Turn on the backlight, default full brightness

Bsp_display_backlight_off();     // Turn off the backlight

bsp_display_brightness_set(95);  // Set the specific backlight brightness, 0~100
Support
Monday-Friday (9:30-6:30) Saturday (9:30-5:30)
Email: services01@spotpear.com
[Tutorial Navigation]
- Features
- Electrical Specifications
- Interface Introduction
- Dimensions
- Working with Raspberry Pi
- Pi5/CM5/CM4/CM3+/CM3 Hardware Connection
- Pi4B/3B+/3B/3A+ Hardware Connection
- Software Settings
- Adjust Backlight Brightness
- GUI Brightness Adjustment
- Use Waveshare Backlight Adjustment Application
- Adjust Backlight Brightness via Terminal
- Trixie/Bookworm Display Rotation
- Touch Rotation
- Touch Mode Selection
- Using Touchscreen Virtual Keyboard
- Working with ESP32-P4 Screens
- Support