


- sales/support
Google Chat:---
- sales
+86-0755-88291180
- sales01
sales@spotpear.com
- sales02
dragon_manager@163.com
- support
tech-support@spotpear.com
- CEO-Complaints
zhoujie@spotpear.com
- Only Tech-Support
WhatsApp:13246739196
- Purchase/Shipping/Refund
WhatsApp:13424403025
Raspberry Pi 10.5inch HDMI AMOLED User Guide
Introduction
10.5inch Capacitive Touch AMOLED, HDMI Port, 2560×1600 2K Resolution, Fully Laminated Toughened Glass Panel.
Features
- 10.5inch AMOLED, 2560 x 1600 resolution.
- Toughened glass capacitive touch panel, 10-points touch.
- When works with Raspberry Pi, supports Raspberry Pi OS / Ubuntu/Kali, driver free.
- When works as a computer monitor, supports Windows 11/10/8.1/8/7, ten-points touch, and driver free.
- Embedded Hi-Fi Speaker, 3.5mm audio jack, supports HDMI audio output.
- CNC alloy enclosure.
How to use
Working with Windows PC
When working with a PC, 10.5inch HDMI AMOLED can support Windows 7/ 8/ 8.1 /10/11 OS
1. Connect the TOUCH interface of the display to the USB interface of the PC. Wait for a while, the windows will automatically recognize the touch function.
2. If you use HDMI, you need to connect the HDMI interface of the display to the HDMI port of the PC. About 10s later, you can see the display properly. If you need to output sound, you can insert 3.5mm earphones into HP ports or use the internal speaker directly.
Note:
1) When the computer is connected to several different displays at the same time, the display can only be used to control the cursor on the main display, so we recommended setting this display as the main display.
2) Sometimes, USB ports of PC do have not enough power to power 10.5inch HDMI AMOLED, in this case, you can connect an external 5V/3A Type-C power adapter to the DC interface of the display.
3)If the display cannot work normally after connecting, please restart your PC and check again.
Working with Raspberry Pi
When working with Raspberry Pi, 10.5inch HDMI AMOLED can support various systems like Raspberry Pi OS/Ubuntu /Kail. Herein we take Raspberry Pi OS as an example.
Raspberry Pi cannot recognize and adapt to the resolution of display plugged, therefore, we need to set the resolution of Raspbian manually.
Please download the latest version of the image on the Raspberry Pi official website.
1) Download the compressed file to the PC, and unzip it to get the .img file.
2) Connect the TF card to the PC, use SDFormatter.exe software to format the TF card.
3) Open the Win32DiskImager.exe software, select the system image downloaded in step 1, and click ‘Write’ to write the system image.
4) After the image has finished writing, open the config.txt file in the root directory of the TF card. Add the following code at the end of config.txt, then save and quit the TF card safely.
[all]
hdmi_force_hotplug=1
hdmi_timings=2560 0 300 32 102 1600 0 10 10 10 0 0 0 60 0 297000000 3
framebuffer_width=2560
framebuffer_height=1600
config_hdmi_boost=4
hdmi_group=2
hdmi_mode=87
If you use the LCD with Raspberry Pi 4B,you need to remove line dtoverlay=vc4-fkms-V3D from config.txt file.
5) Save and eject the SD card. Plug the card to your Raspberry Pi
6) Connect the Touch interface of the display to one USB port of Raspberry Pi
7) Connect HDMI interface of the display to HDMI interface of Raspberry Pi
8) Power on Raspberry Pi, and wait for a few seconds until the displays normally.
Screen Saver
AMOLED screen has many advantages like high contrast, wide color range, wide view angle, and so on. However, it is easy to face a burn-in problem if displaying the same content for a long time. As we test, the AMOLED cannot be restored if it displays the same static image for more than 168 hours because of burn-in problem. In this case, we recommend you set a screen saver and do not let the AMOLED display the same static image for a long time (cannot longer than 1h).
You can install screen saver with the command below:
sudo apt-get install xscreensaver
About Raspberry Pi OS Version
Until 2022-01-05, Raspberry Pi release two Raspberry Pi OS versions, one is the Buster and another is the Bullseye. Buster (legacy) is the updated version of the old buster image, Bullseye is the newest version which is added several functions, using the new libcamera stack and others.
If you use Raspberry Pi in industrial projects. we recommend you use the Buster image which is more stable.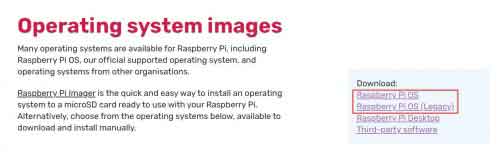
For more information about the Raspberry Pi OS, you can check the link:
GUI improving (Raspberry Pi)
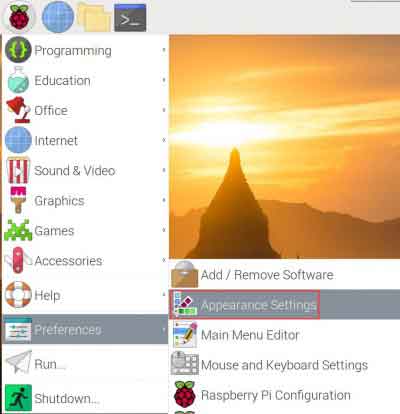
For better display and touching, you can modify the theme setting. Set the icons and text bigger. Here we take Raspbian as examples.
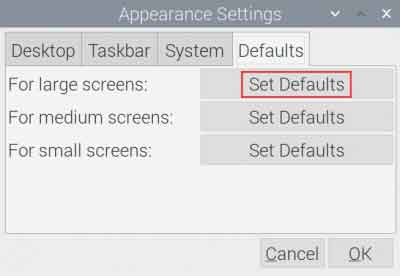
- Select Menu-》Preferences-》Appearance Settings-》Defaults-》For large screens:Set Defaults-》OK.
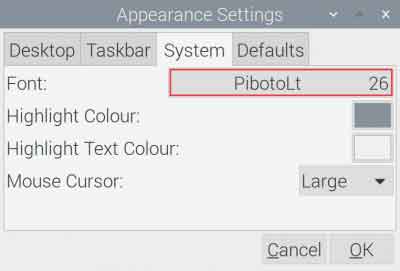
- Mosify the font size of System
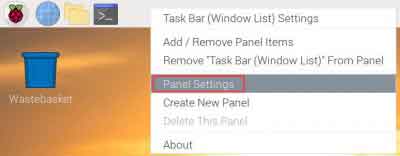
- Right-click the taskbar and select-》Panel Settings -》Set the size of Geometry.
Working with Jetson Nano
- Connect the TOUCH interface of the display to the USB port of the Jetson boards.
- Connect the HDMI interface of the display to the HDMI port of the Jetson boards.
About the Button
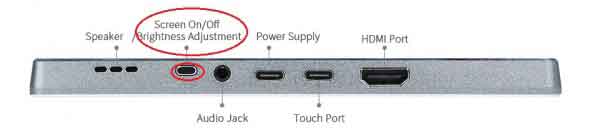
- On the side of the display, there is an ON/OFF button, which is used to turn on/off the power of display if you press it. The power button can also be used to adjust the brightness of display if long-press.
