- sales/support
Google Chat:---
- sales
+86-0755-88291180
- sales01
sales@spotpear.com
- sales02
dragon_manager@163.com
- support
tech-support@spotpear.com
- CEO-Complaints
zhoujie@spotpear.com
- sales/support
WhatsApp:13246739196
RP2350-LCD-0.96 User Guide
Overview
Introduction
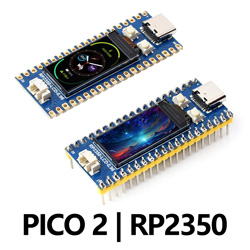
The RP2350-LCD-0.96 is a low-cost, high-performance microcontroller development board designed by Waveshare with flexible digital interfaces. In terms of hardware, it uses the RP2350A microcontroller chip officially developed by Raspberry Pi, equipped with a dual-core ARM Cortex-M33 processor and a dual-core Hazard 3 RISC-V processor, with a running frequency of up to 150MHz, built-in 520KB SRAM and 4MB memory, and up to 26 multi-function GPIO pins, a 0.96-inch LCD screen, and a battery interface, which is convenient for use in mobile applications. Its power IC TPS63000 is a high-efficiency DCDC buck-boost chip with a charge current up to 1A and a 1.8A current switch. For software development, either Raspberry Pi's C/C++ SDK, or the MicroPython is available, and there are complete development materials and tutorials, which makes it easy for you to get started, and integrate it into end products quickly.
Features
- Adopts RP2350A microcontroller chip designed by Raspberry Pi in the United Kingdom
- Adopts unique dual-core and dual-architecture design, equipped with dual-core ARM Cortex-M33 processor and dual-core Hazard3 RISC-V processor, with clock operating frequencies up to 150MHz
- Built-in 520KB of SRAM and 4MB of on-chip Flash
- Using Type-C interface, keeping up with the trend of the times, no need to entangle the front and back plugging
- Onboard a 0.96-inch LCD display
- Castellated module allows soldering directly to carrier boards
- USB1.1 host and device support
- Supports low-power sleep and hibernation modes
- Drag-and-drop downloads can be made by USB recognition as mass storage
- 26 × multi-functional GPIO pins
- Multiple hardware peripherals
- SPI × 2
- I2C × 2
- UART × 2
- 12-bit ADC × 4
- Controllable PWM channel × 16
- Accurate clock and timer on-chip
- Temperature sensor
- Accelerated floating-point libraries on-chip
- 12 × Programmable I/O (PIO) state machines for custom peripheral support
- Onboard DC-DC chip MP28164, a high-efficiency DC-DC buck-boost chip with a load current of up to 2A
- Onboard DC-DC chip TPS63000, a high-efficiency DC-DC buck-boost chip with 1.8A current switch
Pinout Definition
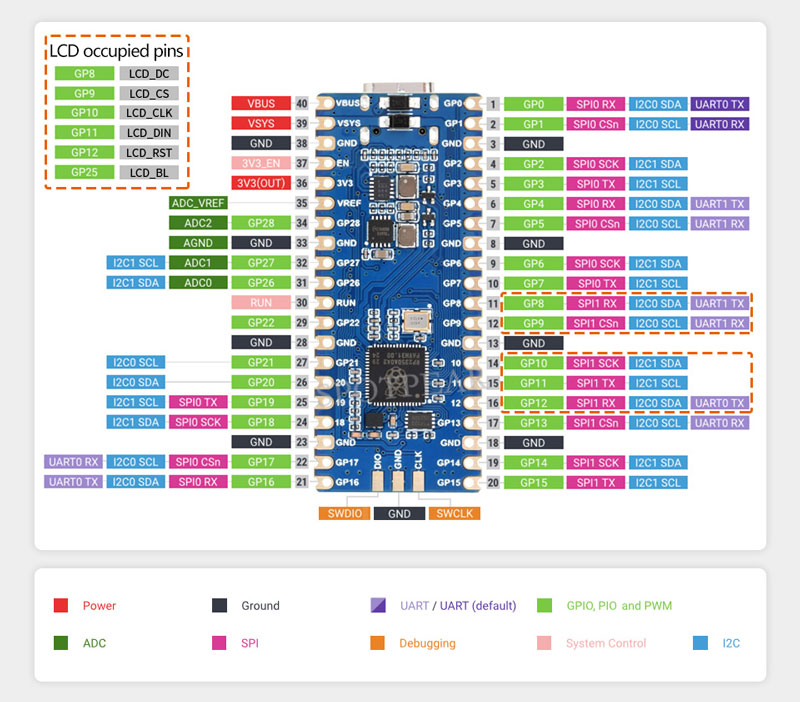
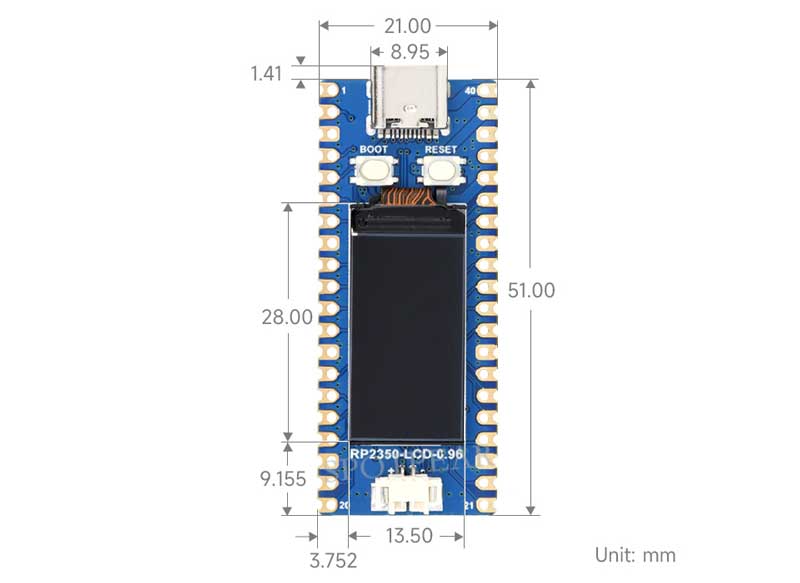
Dimensions
Example Experiments
Download the Demo to your computer desktop to conduct some interesting experiments.
External LED experiment
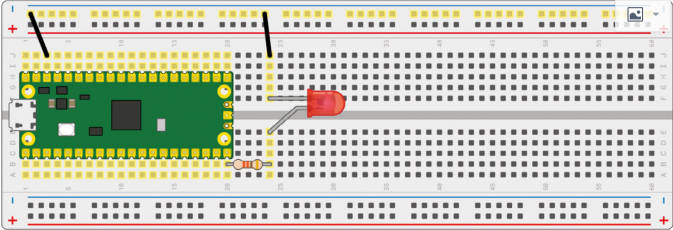
- Connect the hardware according to the figure below, connect the Micro USB connected to the computer, open the python file in the demo Lesson-5 External LED in Thonny, and you can see that the red light is flashing when you run the demo.
- Precautions for use: The longer pin of the LED is the positive pole, the shorter one is the negative pole, the negative pole should be connected to GND, the positive pole should be connected to the GPIO output port, and the resistor must be connected when using.
- Code analysis
led_external = machine.Pin(15, machine.Pin.OUT) #Set GP15 to output mode
while True:
   led_external.toggle() #Change the state of the LED light every 5 seconds
   utime.sleep(5)
Traffic Light System experiment
- Connect the hardware according to the figure below, connect the Micro USB connected to the computer, open the python file in the demo Lesson-9 Traffic-Light-System in Thonny, run the demo to see the traffic lights running normally, and the buzzer will be triggered when the button is pressed.
- Precautions for use: The longer pin of the LED is the positive pole, the shorter pin is the negative pole, the negative pole should be connected to GND, the positive pole should be connected to the GPIO output port, and the resistor must be connected when using. The red wire of the buzzer is connected to the GPIO port output, and the black wire is connected to GND.

- Code analysis
def button_reader_thread():  #Detect if a button is pressed
   global button_pressed
   while True:
       if button.value() == 1:
           button_pressed = True

_thread.start_new_thread(button_reader_thread, ()) #Use the thread to detect keystrokes
while True:
   if button_pressed == True: #If the button is pressed, the red light lights up and the buzzer alarms
       led_red.value(1)
       for i in range(10):
           buzzer.value(1)
           utime.sleep(0.2)
           buzzer.value(0)
           utime.sleep(0.2)
       global button_pressed
       button_pressed = False
   led_red.value(1)  #In normal circumstances, when the light turns from red to green, the yellow light will be on for two seconds, then the yellow light and red light will go off, and the green light will be on
   utime.sleep(5)     #When the light turns from green to red, the green light goes off first, the yellow light is on for two seconds, and then the red light is on
   led_amber.value(1)
   utime.sleep(2)
   led_red.value(0)
   led_amber.value(0)
   led_green.value(1)
   utime.sleep(5)
   led_green.value(0)
   led_amber.value(1)
   utime.sleep(5)
   led_amber.value(0)
Burglar Alarm LED Buzzer experiment
- Connect the hardware according to the figure below, connect the Micro USB connected to the computer, open the python file in the demo Lesson-14 Burglar Alarm LED Buzzer in Thonny, run the demo and you can see that when you move in front of the Passive infrared sensor, the LED light will flash and the buzzer will sound an alarm.
Precautions for use: The middle pin of the Passive infrared sensor is the data output pin, and the pins on both sides can be connected to VCC and GND respectively.
- Code analysis
def pir_handler(pin):  #Interrupt handling function, the buzzer sounds, the LED rapidly flashes
   print("ALARM! Motion detected!")
   for i in range(50):
       led.toggle()
       buzzer.toggle()
       utime.sleep_ms(100)
sensor_pir.irq(trigger=machine.Pin.IRQ_RISING, handler=pir_handler) #Turn on the interrupt, and when the human sensor detects an exception, it will enter the interrupt handling function for processing
while True:  #If there is no exception, the state of LDE will be changed every 5 seconds
   led.toggle()
   utime.sleep(5)
Potentiometer experiment
- Connect the hardware according to the figure below, connect the Micro USB connected to the computer, open the python file in the demo Lesson-16 Potentiometer in Thonny, run the demo, and rotate the potentiometer to see that the voltage value printed out in the Sheel window is also changing.
Precautions for use: The middle pin of the Potentiometer is the data output pin, and the pins on both sides can be connected to VCC and GND respectively.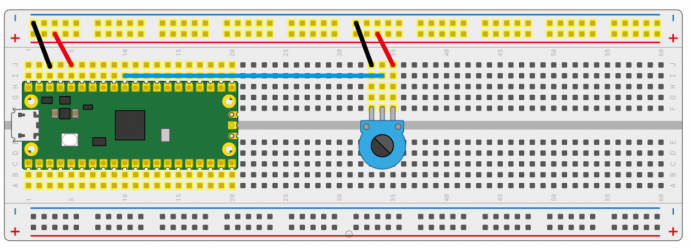
- Code analysis
potentiometer = machine.ADC(26) #Use GP26 as the analog signal collection pin
conversion_factor = 3.3 / (65535)
while True:
   voltage = potentiometer.read_u16() * conversion_factor #Format the collected data and convert it into a voltage value
   print(voltage) #Print the voltage information, the voltage value will change as the sliding varistor rotates
   utime.sleep(2)
WS2812 experiment
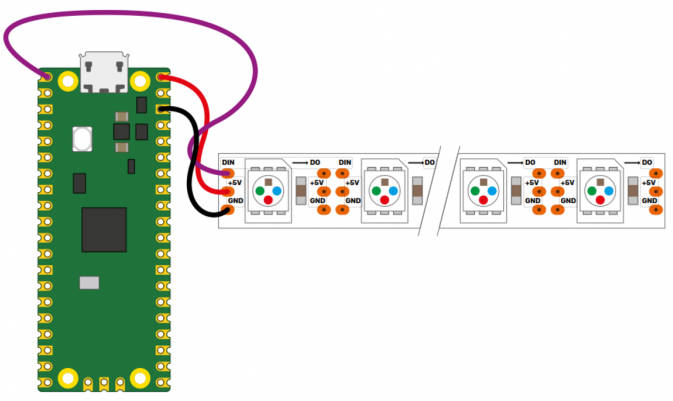
- Connect the hardware according to the figure below, connect the Micro USB connected to the computer, open the WS2812_RGB_LED.py file in the demo Lesson-25 WS2812 in Thonny, run the demo to see the RGB colors of blue, red, green, and white at once.
- Code analysis
#This code uses the state machine mechanism, the following code is a decorator, in which we can initialize the hardware, set the level of the pins, etc.
#label("bitloop") We can define labels in the code to facilitate our execution by jumping to them.
#jmp(not_x,"do_zero") When x=0, we adjust to the label "do_zero".
#nop() .set(0) [T2 - 1] When x=0, it will jump here to execute.
@asm_pio(sideset_init=PIO.OUT_LOW, out_shiftdir=PIO.SHIFT_LEFT, autopull=True, pull_thresh=24)
def ws2812():
   T1 = 2
   T2 = 5
   T3 = 1
   label("bitloop")
   out(x, 1)               .side(0)    [T3 - 1]
   jmp(not_x, "do_zero")   .side(1)    [T1 - 1]
   jmp("bitloop")          .side(1)    [T2 - 1]
   label("do_zero")
   nop()                   .side(0)    [T2 - 1]
# Create the StateMachine with the ws2812 program, outputting on Pin(22).
sm = StateMachine(0, ws2812, freq=8000000, sideset_base=Pin(0)) #Create a state machine
# Start the StateMachine, it will wait for data on its FIFO.
sm.active(1) #Start state machine
# Display a pattern on the LEDs via an array of LED RGB values.
ar = array.array("I", [0 for _ in range(NUM_LEDS)])
print(ar)
print("blue")
for j in range(0, 255):
   for i in range(NUM_LEDS):
       ar[i] = j
   sm.put(ar,8)  The method of #put() is to put the data into the output FIFO of the state machine
   time.sleep_ms(5)
LCD1602 I2C experiment
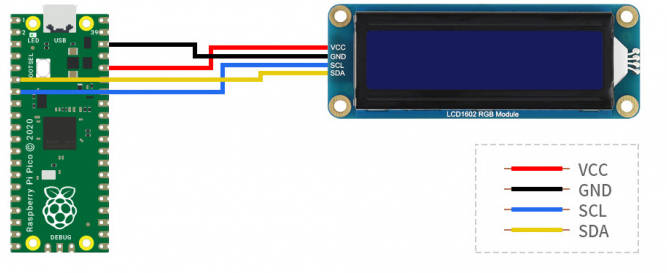
- Connect the hardware according to the figure below, connect the Micro USB connected to the computer, open the python file in the demo Lesson-21 LCD1602 I2C in Thonny, save the RGB1602.py file as a Raspberry Pi Pico, and run the Choose_ Color.py to see a different color switch every 5 seconds; run Discoloration.py file to see the RGB color gradient effect.
- Code analysis
Choose_Color.py
#Define color
rgb9 = (0,255,0) #Green
lcd.setCursor(0, 0) #Set cursor position
# print the number of seconds since reset:
lcd.printout("Waveshare") #Write characters
lcd.setCursor(0, 1) #Set the cursor position to the second row and the zero column
lcd.printout("Hello,World!") #Write characters
lcd.setRGB(rgb1[0],rgb1[1],rgb1[2]); #Set the backlight
Discoloration.py
t=0
while True:

   r = int((abs(math.sin(3.14*t/180)))*255); #RGB changes over time
   g = int((abs(math.sin(3.14*(t+60)/180)))*255);
   b = int((abs(math.sin(3.14*(t+120)/180)))*255);
   t = t + 3;
   lcd.setRGB(r,g,b); #Reset the RGB value
# set the cursor to column 0, line 1
   lcd.setCursor(0, 0) #Navigate to the first row and the zero column
# print the number of seconds since reset:
   lcd.printout("Waveshare") #Write characters
   lcd.setCursor(0, 1) #Navigate to the second row and the zero column
   lcd.printout("Hello,World!") #Write characters
   time.sleep(0.3)
Resources
Supporting resources
Documents
Demo
LCD Datasheet
Official Resources
Pico2
User manuals
Schematic diagram and datasheets
- Pico2 Schematic diagram
- Pico2 Pinout definition
- Pico2 Datasheet
- RP2350 Datasheet
- RP2350 Hardware Design Reference Manual
Related books
Raspberry Pi open source demos
FAQ
Question: Does the circuit board include under-voltage protection for the battery connector?
No, you need to use a battery with an integrated protection circuit or connect an external protection circuit to prevent deep discharging.
Support
Monday-Friday (9:30-6:30) Saturday (9:30-5:30)
Email: services01@spotpear.com


