- sales/support
Google Chat:---
- sales
+86-0755-88291180
- sales01
sales@spotpear.com
- sales02
dragon_manager@163.com
- support
tech-support@spotpear.com
- CEO-Complaints
zhoujie@spotpear.com
- Only Tech-Support
WhatsApp:13246739196
- Purchase/Shipping/Refund
WhatsApp:13424403025
15.6inch-FHD-Monitor-C User Guide
Introduction
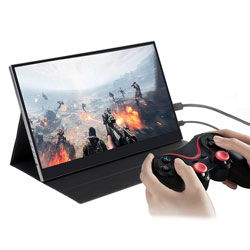
This product is a universal 15.6-inch ultra-thin portable touch display, supporting Type-C and HDMI display interfaces, with a high-definition resolution of 1920×1080 and a high color gamut of 62% NTSC.
It features a tempered glass panel with full lamination, supports ten-point capacitive touch, and has a built-in 10,000mAh large-capacity battery.
It supports Raspberry Pi and can be used as a computer monitor, or as an extension screen for a smartphone or game console.
Features
- Display: 15.6 inches, 1920×1080 resolution, IPS panel (horizontal/vertical viewing angle 178°)
- Touch screen: capacitive touch, tempered glass panel, hardness up to 6H, full lamination process
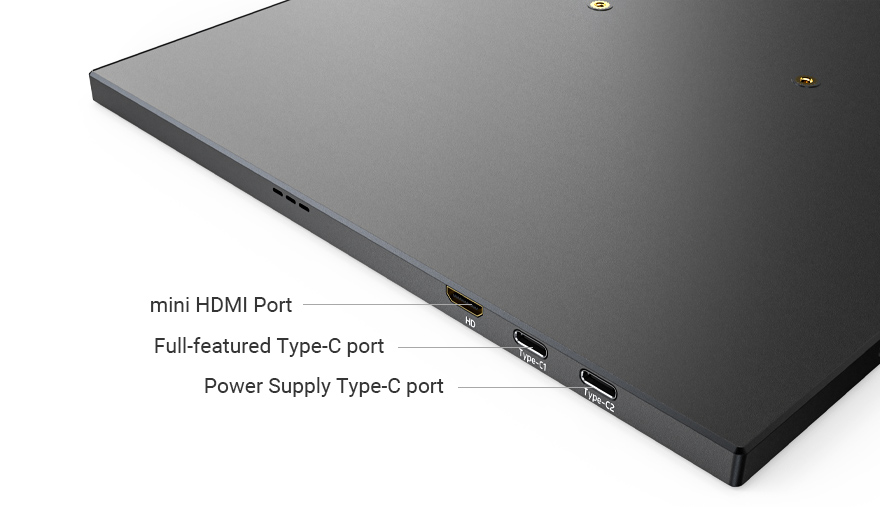
- Display interface: Type-C/HDMI
- Display color gamut: 62% NTSC
- Touch interface: Type-C (the main control terminal can be connected to Type-C/USB)
- When used with Raspberry Pi, it supports Raspberry Pi OS/Ubuntu/Kali and Retropie
- When used as a computer monitor, it supports Windows 11/10/8.1/8/7
- Supports brand laptops from Apple, Huawei, Lenovo, HP, and Dell, enabling multi-screen display for both work and entertainment
- Supports smartphones from brands like Huawei, Nubia, OPPO, and Samsung, featuring a single Type C cable for screen mirroring, a great companion for business trips and travel
- Supports popular consoles such as Microsoft XBOX360, Sony PS5 and Nintendo Switch
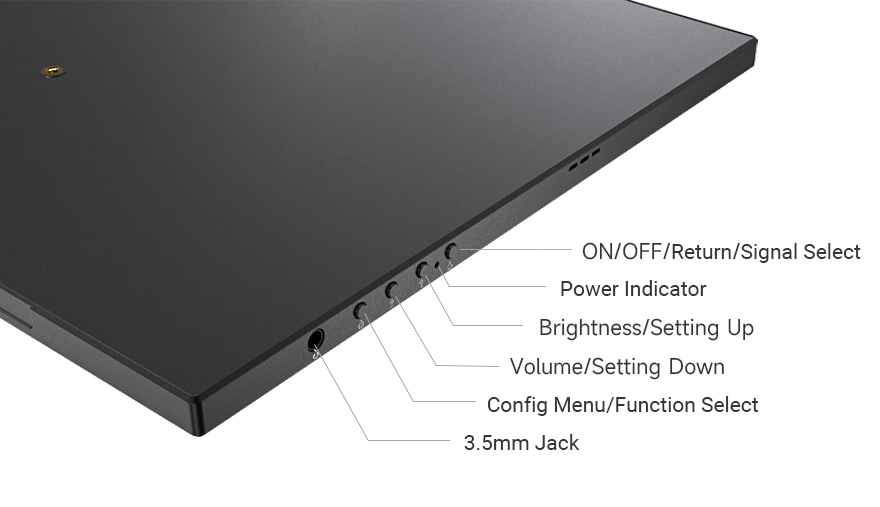
- Supports OSD menu (can be used for power control, brightness/contrast adjustment, etc.)
- Supports Type-C/HDMI audio input, with 3.5mm audio and speaker interface
- Built-in ferrite Hi-Fi speaker (no external speaker required)
- Built in 10000mAh battery, can be used even when going out (normal use for 3~4 hours)
Interface and Button Function Introduction
User Guide
Working with notebook full-featured Type-C interface
1. Press the power button for 1-2 seconds, and you can see the backlight of the monitor light up normally. (If the screen does not respond, please use a 5V power adapter to connect to the power Type-C port of the monitor for charging.)
2. Connect the full-featured Type-C interface of the monitor to the full-featured Type-C interface of the main control, using the matching dual-ended Type-C cable.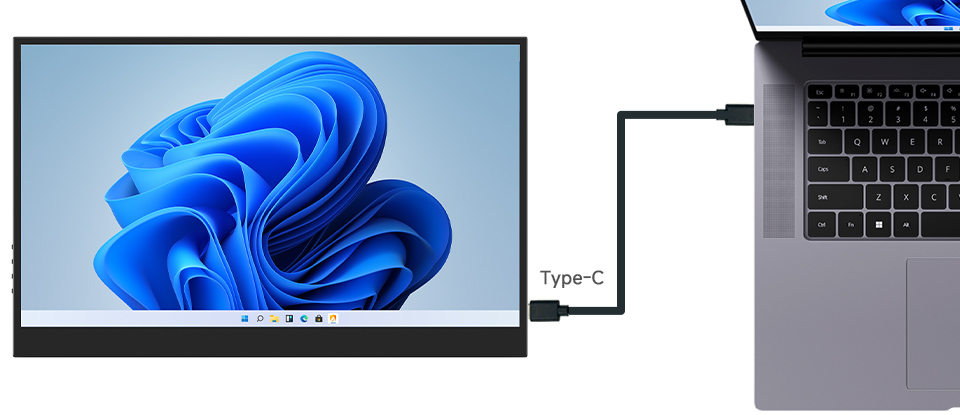
- Note:
- Please make sure that your main control device supports the full-featured Type-C interface, and confirm that your mobile phone supports the full-featured Type-C wired screen projection function.
- If the USB port is not powered enough and the battery is too low, the display will flash or not display. In this case, you can resume normal use after connecting an external 5V 3A power adapter to the power Type-C port of the monitor.
Working with PC HDMI interface
Supporting Windows 11/10/8.1/8/7 system. How to use:
1. Press the power button for 1-2 seconds, and you can see the backlight of the monitor light up normally. (If the screen does not respond, please use a 5V power adapter to connect to the power Type-C port of the monitor for charging.)
2. Connect the mini HDMI interface of the monitor to the HDMI interface of the PC, and Windows will automatically recognize the display function.
3. Connect the full-featured Type-C interface of the monitor to the USB interface of the PC, and Windows will automatically recognize the touch function.
- Note:
- Some PCs do not support HDMI devices plug and play, and can be used normally after restarting the system.
- If the USB port is not powered enough and the battery is too low, the display will flash or not display. In this case, you can resume normal use after connecting an external 5V 3A power adapter to the power Type-C port of the monitor.
Working with Raspberry Pi
Hardware connection:
1. Press the power button for 1-2 seconds, and you can see the backlight of the monitor light up normally. (If the screen does not respond, please use a 5V power adapter to connect to the power Type-C port of the monitor for charging.)
2. Connect the mini HDMI port of the monitor to the HDMI port of the Raspberry Pi.
3. Connect the full-featured Type-C interface of the monitor to the USB interface of the Raspberry Pi.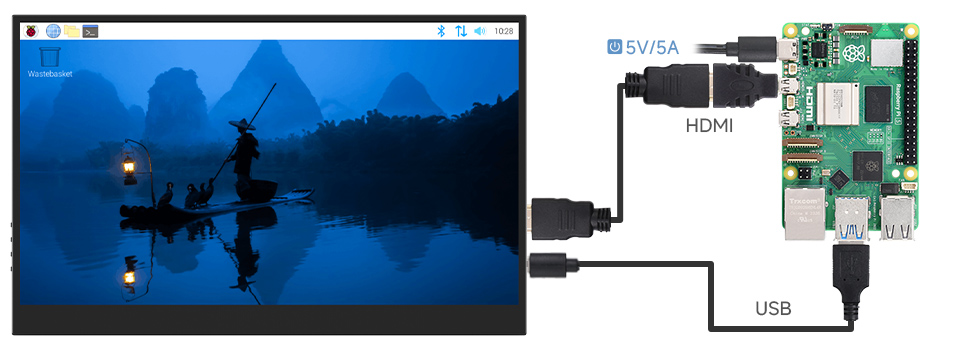
Software settings:
Raspberry Pi OS/Ubuntu/Kali and Retropie systems for Raspberry Pi.
1. Connect the TF card to the PC, download and use Raspberry Pi Imager to burn the corresponding system image.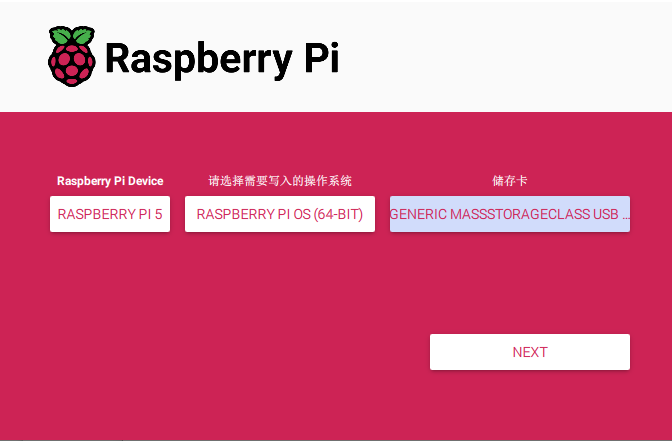
2. After the image burning is completed, open the config.txt file in the root directory of the TF card, add the following code at the end of the config.txt, save and safely eject the TF card.
Note: Since Pi5/Pi4/CM4/CM3+/CM3 has two HDMI interfaces, please note that the correct HDMI interface and instructions are used, HDMI0 is recommended by default.
hdmi_group=2
hdmi_mode=82
hdmi_cvt 1920 1080 60 6 0 0 0
3. Insert the TF card into the Raspberry Pi, power on the Raspberry Pi, and wait for a few seconds normally to enter the display. After the system starts, it can be touched normally.
- Note:
- If the USB port is not powered enough and the battery is too low, the display will flash or not display. In this case, you can resume normal use after connecting an external 5V 3A power adapter to the power Type-C port of the monitor.
Dimensions

Support
Monday-Friday (9:30-6:30) Saturday (9:30-5:30)
Email: services01@spotpear.com