


- sales/support
Google Chat:---
- sales
+86-0755-88291180
- sales01
sales@spotpear.com
- sales02
dragon_manager@163.com
- support
tech-support@spotpear.com
- CEO-Complaints
zhoujie@spotpear.com
- Only Tech-Support
WhatsApp:13246739196
- Purchase/Shipping/Refund
WhatsApp:13424403025
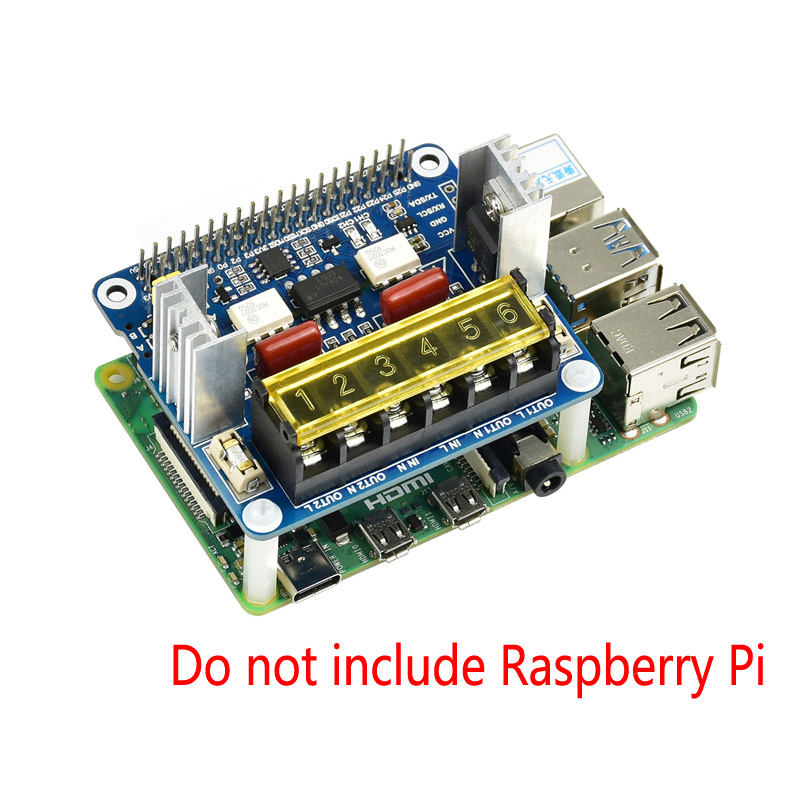
Raspberry Pi 2-CH TRIAC HAT User Guide
Introduction
Dual Channels Bidirectional Triac HAT for Raspberry Pi, Integrated MCU, Commands Control, UART / I2C
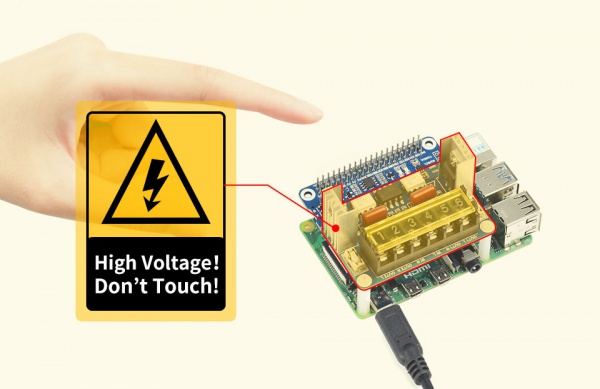
Note: This is a relay device and the circuits are exposed. DO NOT touch the components onboard! We recommend you to add insulate enclosure when using
The device will get hot when working, higher the output power, hotter it is. The device will cut off output signal to protect the TRIAC when the temperate reaches 125°C. We recommend you to add cooling devices to let the TRIAC HAT work normally under 80°C.
Features
- AC voltage: 100~600V
- AC current: 0~20A
- Dimensions:65 × 56.5(mm)
- Working voltage:3.3V/5V
- Interfaces:UART/I2C
- Controller:STM32F030
- UART data rate:1200 ~ 921600bps
- I2C data rate:≤1Mbps
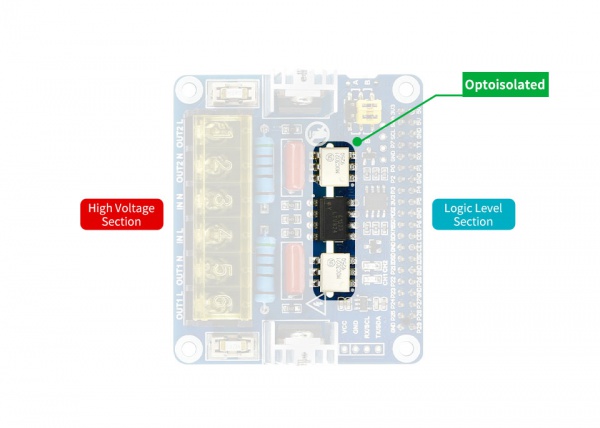
Interfaces
| PIN | Description |
| VCC | 3.3V/5V Power input |
| GND | Ground |
| RX/SCL | UART data output/I2C clock |
| TX/SDA | UART data input/I2C data |
Jumpers
You can change the communication interfaces by the jumpers. Note that you can also change the DIP switch which is on the backside for different interface.
| Jumpers | Interfaace |
| A | I2C |
| B | UART |
Work with Raspberry Pi
Notices
- HIGH VOLTAGE WARNNING
- Solders are exposed on the backside.
Please add nylon standoffs to Raspberry Pi for protecting. Do not touch it by hands.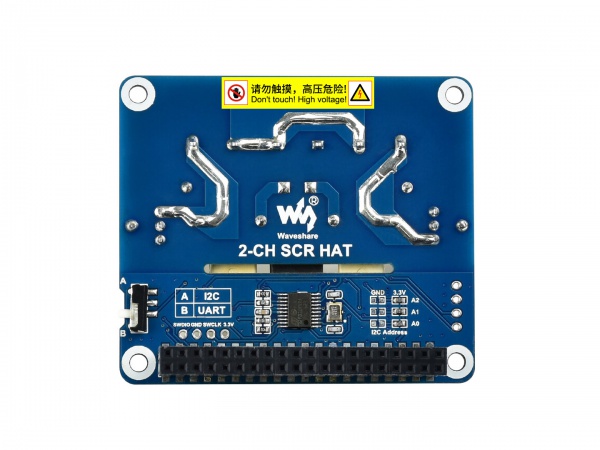
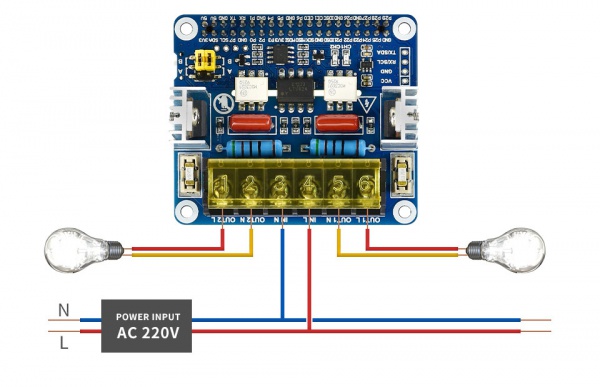
- Reference connection
Install libraries
- Install BCM2835 libraries
wget http://www.airspayce.com/mikem/bcm2835/bcm2835-1.64.tar.gz
tar zxvf bcm2835-1.60.tar.gz
cd bcm2835-1.64/
sudo ./configure
sudo make
sudo make check
sudo make install
#For more details, please refer to http://www.airspayce.com/mikem/bcm2835/
- Install WiringPi libraries
sudo apt-get install wiringpi

#For Pi 4, you need to update it:
cd /tmp
wget https://project-downloads.drogon.net/wiringpi-latest.deb
sudo dpkg -i wiringpi-latest.deb
gpio -v
#You will get 2.52 information if you install it correctly
- Install Python libraries
# python2
sudo apt-get update
sudo apt-get install python-pip
sudo pip install RPi.GPIO
sudo apt-get install python-smbus
sudo apt-get install python-serial
# python3
sudo apt-get update
sudo apt-get install python3-pip
sudo pip3 install RPi.GPIO
sudo apt-get install python3-smbus
sudo apt-get install python3-serial
Examples
Open terminal and download demo codes by following commands
sudo apt-get install p7zip
wget https://www.waveshare.com/w/upload/e/ef/2-CH_SCR_HAT_code.7z
7zr x 2-CH_SCR_HAT_code.7z -r -o./2-CH_SCR_HAT_code
sudo chmod 777 -R 2-CH_SCR_HAT_code
cd 2-CH_SCR_HAT_code/RaspberryPi/
- C codes
Open terminal and run the codes by the following commands:
cd c
make clean
make
sudo ./main
Expected result: Connect a lamp to the output port, connect input supply, you can find that the brightness of the lamp is changed.
Note: Only WIRINGPI and DEV_LIB are supported if you use UART interface
WIRINGPI, DEV_LIB, and USE_BCM2835_LIB are all be supported for I2C Inteface
- Python code
Open a terminal and run the codes by the following commands
cd python/examples
sudo python main.py
Expected result: Connect a lamp to the output port, connect input supply, you can find that the brightness of the lamp is changed.
Web control
The example is based on python Web frame
Open the terminal, and install bottle as below
sudo apt-get install python-bottle
cd Web_python
sudo python main.py
Open browser (host PC or telephone, we recommend you to use Chrome browser) and go to [IP of Raspberry Pi]:8080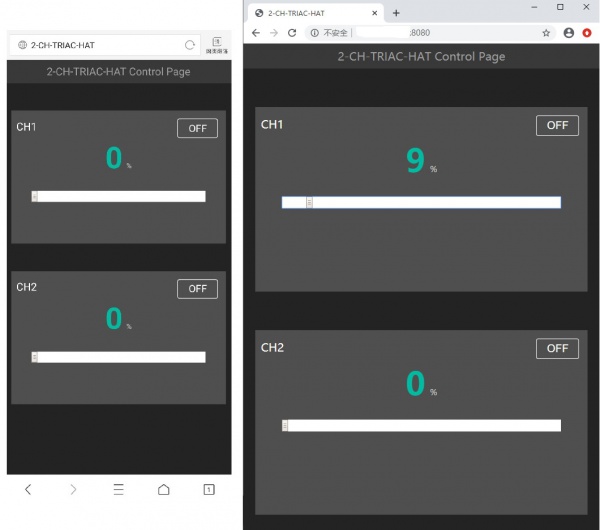
Working with Jetson nano
Install libraries
sudo apt-get update
sudo apt-get install python3-pip
sudo pip3 install Jetson.GPIO
sudo groupadd -f -r gpio
sudo usermod -a -G gpio your_user_name
sudo cp /opt/nvidia/jetson-gpio/etc/99-gpio.rules /etc/udev/rules.d/
sudo udevadm control --reload-rules && sudo udevadm trigger
Examples
Downlaod the demo codes by the following commands
sudo apt-get install p7zip
wget https://www.waveshare.com/w/upload/e/ef/2-CH_SCR_HAT_code.7z
7zr x 2-CH_SCR_HAT_code.7z -r -o./2-CH_SCR_HAT_code
sudo chmod 777 -R 2-CH_SCR_HAT_code
cd 2-CH_SCR_HAT_code/RaspberryPi/
- C codes
Open a terminal and run the following commands
cd C
make
sudo ./main
Expected result: Connect a lamp to the output port, connect input supply, you can find that the brightness of the lamp is changed.
Note: DEV_LIB is only supported by the C codes
- Python codes
Open a terminal and run the following commands
cd python
sudo python main.py
Expected result: Connect a lamp to the output port, connect input supply, you can find that the brightness of the lamp is changed.
Load testing
| Output power | With fan | Without Fan |
| 1800W | 75℃ | 105℃ |
| 1000W | 50℃ | 75℃ |
| 600W | 35℃ | 50℃ |
The TRIAC may be destroyed if the working temperature higher than 50°C for long time, once the temperature reach 125°C the device will force to protecting status and cut off output. You should add cooling devices for normally working.
WARNNING: DO NOT short the circuit, the TRIAC may burst if the circuit is shorted
