- sales/support
Google Chat: zj734465502@gmail.com
- sales
+86-0755-88291180
- sales01
sales01@spotpear.com
- sales02
dragon_manager@163.com
- support
services01@spotpear.com
- CEO-Complaints
manager01@spotpear.com
- sales/support
WhatsApp:13246739196
RoArm-M2-S Guide
Overview
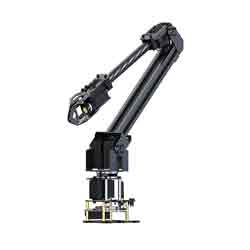
RoArm-M2-S is a 4DOF smart robotic arm designed for innovative applications. Adopts lightweight structure design with a total weight of less than 850g and an effective payload of 0.5kg@0.5m, it can be flexibly mounted on various mobile platforms. Adopts a 360°omnidirectional base combined with three flexible joints to create a workspace with a 1-meter diameter.
The joint direct-drive design enhances repositioning precision and also improves structural reliability, with innovative dual-drive technology doubling the shoulder joint torque. The onboard ESP32 MCU main control module supports multiple wireless control modes and provides control interfaces and rich communication protocols for easily connecting to various devices.
Provides a user-friendly and cross-platform WEB application that integrates a simple and visualized coordinate control mode, making it easier to get started. Comes with rich graphic and video tutorials to help you learn and use it quickly. Compatible with ROS2 and various host computers, supports various wireless and wired communication modes. Comes with an expansion plate, and supports customizing the EoAT (End of Arm Tooling) to meet innovative application requirements.
RoArm-M2-S achieves an excellent balance between lightweight, user-friendliness, expandability, and open innovation, it is a multifunctional robotic arm that integrates intelligent control, human-machine interaction, and customizable development. Ideal for applications that require a combination of flexibility, expandability, and user-friendliness.
Features
- Expandability: Comes with various expandable components, and supports multifunctional EoAT (End of Arm Toolings) customization to meet different innovative application needs.
- Omnidirectional Workspace: The base, with 360° rotation, combined with flexible joint movements, creates a workspace with a diameter of up to 1 meter, enabling versatile movement in all directions.
- Easy to use: Offers cross-platform web applications and coordinate control modes to reduce user difficulties, making it easy for users to operate the robotic arm.
- Open-source Code: The control code and communication interface documentation for RoArm-M2-S are open-source, facilitating secondary development for users.
- Lightweight Structure: Utilizes carbon fiber and 5052 aluminum alloy, resulting in a body weighing less than 850g, making it easy to install on various mobile platforms.
- Direct-Drive Design: Uses 12-bit high-precision magnetic encoders to obtain joint angles, ensuring a repeat positioning accuracy of 0.088°, thereby enhancing structural reliability.
- Dual-Drive Technology: Innovative dual-drive technology increases the torque of the robotic arm's shoulder joint, improving the overall load capacity of the robotic arm.
- Powerful Main Control: Utilizes the ESP32 main control MCU, supporting various control interfaces and wireless communication protocols.
- Multi-platform Support: Compatible with ROS2 and various host computers, supporting multiple wireless and wired communication methods, providing flexibility for different development and control requirements.
- Rich Tutorials: Offers rich graphic and video tutorials covering various functionalities to help users quickly get started and use the robotic arm, thereby accelerating the realization of innovative applications.
How to Use
Precautions
Before use, please learn the following:
- 1. RoArm-M2-S is pre-assembled before shipment, but it is not recommended to disassemble it due to a significant number of servos.
- 2. The working voltage range of RoArm-M2-S is 7-12.6V. It is recommended to use the 12V 5A power supply, or you can use a 3S lithium battery. It is strictly forbidden to use a power supply that exceeds this working voltage range.
- 3. It may bring you potential risks that the torque of RoArm-M2-S is large. When using the product, avoid having sensitive areas such as eyes and head within the range of servo movement.
- 4. Keep this product away from children to prevent injury.
- 5. For safety reasons, the default demos have a relatively slow speed for the robotic arm's operation. You can refer to subsequent tutorials to change this speed, but excessively low speed may cause shaking when the robotic arm reaches certain positions.
Introduction
- 1. The two images above show the markings for various parts of the robotic arm and the commonly used interfaces.
- 2. To use, connect the provided 12V 5A power cable to the power interface on the robotic arm, turn on the power switch, and the product's joints will automatically move to the center position.
- 3. After powering on, the OLED screen will display the following information:
- The first line indicates that the WiFi is in AP mode, and the WiFi hotspot is named RoArm-M2.
- The second line indicates that the STA mode is turned off. When WiFi is in STA mode, the router will assign an IP address, which will be displayed.
- The content of the third line is the MAC address of the device, which is unique and used for ESP-NOW communication. Please refer to RoArm-M2-S ESP-NOW Control for specific usage.
4. After power-on, use a smartphone or computer to connect to RoArm-M2-S's WiFi: RoArm-M2, with the password 12345678. Once connected to the WiFi, open the. Google Chrome browser and enter 192.168.4.1 in the address bar to access the web-based control interface. From there, you can use the web interface features to control the robotic arm.
Web Usage
Key Function
AngleCtrl: Servo Angle Control
The numbers displayed on the buttons represent the angles to which each joint has rotated, displayed in radians. The labels for each joint can be found on the image in #Introduction. All displayed numbers are updated only after the button is released, and the specific update process is explained below.

1. "B L," and "B R" control the rotation of the base joint at the first column, with a rotation range of 360°. When the product is powered on, the base joint will automatically rotate to the middle position, and the number on the button is 0.
- Keep clicking on "B L", the base joint turns left at 180°, and the value updates from 0 to 3.14.
- Then, keep clicking on "B R", the base joint turns right at 360°, and the value updates from 3.14 to -3.14.
2. "S D," and "S U," control the rotation of the shoulder joint at the second column, with a rotation range of 180°. When the product is powered on, the shoulder joint will automatically rotate to the middle position, and the number on the button is 0.
- Keep clicking on "S D", the shoulder joint rotates forward at 90°, and the value updates from 0 to -1.57.
- Then, keep clicking on "S U", the shoulder joint rotates reversely at 180°, and the value updates from -1.57 to 1.57.
3. "E D," and "E U," control the rotation of the elbow joint at the third column, with a rotation range of 225°. When the product is powered on, the elbow joint will automatically rotate to the middle position, and the number on the button is 1.57.
- Keep clicking on "E D", the "elbow" joint will rotate downward at 90°, and the value will change from 3.14.
- Then keep clicking on "E U", the "elbow joint" will rotate reversely at 90°, and the value will change from 3.14 to -1.11.
4. "H+ DG," and "H- UG," control the rotation of the end joint at the fourth column. The end joint is divided into "claw" and "wrist" joints, depending on the end effector's configuration. When the product is powered on, the end joint will automatically rotate to the middle position, and the number on the button is 3.14.
- When in "claw" joint mode, the rotation range is 135°.
- Pressing "H+ DG" will make the "claw" joint close, which is the default closed state.
- Pressing "H- DG" will make the "claw" joint open, with a maximum opening angle of 135°, and the value will change from 3.14 to 1.08.
- The rotation range of the "wrist" joint is 270°.
- Keep clicking on "H+ DG", the "wrist" joint will rotate downward at 135°, and the value will change from 3.14 to 5.20.
- Then, keep clicking on "H- DG", the "wrist" joint will rotate upward at 270°, and the value will change from 5.20 to 1.08.
- When in "claw" joint mode, the rotation range is 135°.
INIT: reset all joints to the middle position they were in when the product was powered on.
Torque: Torque Lock Control
- Clicking "Torque OFF" means the torque lock is off, then you can manually rotate the joints when the robotic arm is powered on; clicking "Torque ON" means the torque lock is on, then you can't manually rotate the joints after the robotic arm is powered on.
Note: if one of the joints or all the joints of the robotic arm receives other rotation commands after the torque lock is turned off, the torque lock will be turned on automatically.
DEFA: Dynamic External Force Adaptation
Clicking "DEFA ON" means that the Dynamic External Force Adaptation (DEFA) function is enabled. When DEFA is turned on, if external forces cause the robotic arm to move, it will automatically return to its original position before the external force is applied. Clicking "DEFA OFF" to disable this function, means that the robotic arm will not automatically return to its original position when external forces are applied.
LED: LED control
Clicking "LED OFF" to turn off LED lights, and clicking "LED ON" to turn on LEDs.
HORIZONTAL DRAG
Please refer to Horizontal Drag Instructions for more details.
VERTICAL DRAG
Please refer to Vertical Drag Instructions for more details.
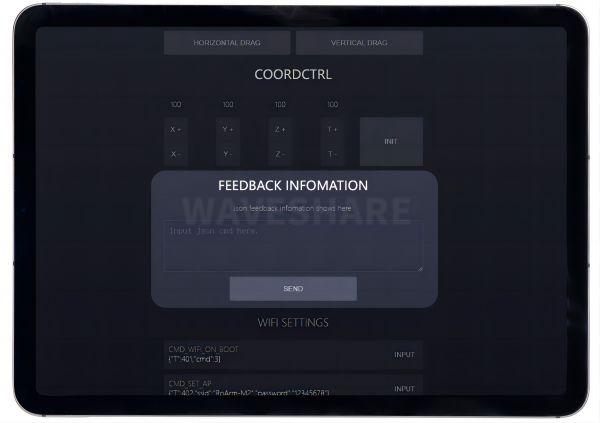
COORDCTRL: Control
X, Y, and Z respectively represent the X axis, Y axis, and Z axis of the "Clamp/Wrist" EoAT (End of Arm Tooling) of the robotic arm. T represents the rotation angle of the EoAT (Different joints have different rotation angles, as you refer to "ANGLECTRL H+DG"), and all of these four parameters are adjusted by "+ -".
INIT: reset all EoAT to the middle position they were in when the product was powered on.
FEEDBACK INFOMATION
Input JSON command to communicate with the robotic arm and the feedback of JSON command will be displayed here. The following is the and you can click on RoArm-M2-S JSON Command Meaning.