


- sales/support
Google Chat:---
- sales
+86-0755-88291180
- sales01
sales@spotpear.com
- sales02
dragon_manager@163.com
- support
tech-support@spotpear.com
- CEO-Complaints
zhoujie@spotpear.com
- Only Tech-Support
WhatsApp:13246739196
Raspberry Pi 5inch DSI LCD User Guide
Features
- 5-inch capacitive touch screen, hardware resolution is 800 x 480.
- Capacitive touch panel, support 5-point touch.
- Toughened glass capacitive touch panel, hardness up to 6H.
- Supports Pi5/4B/CM4/3B+/3A+/3B/CM3/CM3+/2B/B+/A+.
- Directly drive the LCD by the DSI interface on the Raspberry Pi, with up to 60Hz refreshing rate.
- When working with Raspberry Pi, support Raspberry Pi OS / Ubuntu / Kali / Volumio and Retropie, driver-free.
- When working with VisionFive 2, support Debian, single-point touch control, and driver-free.
- When working with Tinker Board 2, support Linux/Android, five-point touch control, and driver-free.
- When working with Core3566, support Debian/Ubuntu, five-point touch control, and driver-free.
- Support brightness adjustable through software control.
Video Tutorial
Interface Definition
| PIN | Label |
|---|---|
| 1 | GND |
| 2 | DSI1_DN1 |
| 3 | DSI1_DP1 |
| 4 | GND |
| 5 | DSI1_CN |
| 6 | DSI1_CP |
| 7 | GND |
| 8 | DSI1_DN0 |
| 9 | DSI1_DP0 |
| 10 | GND |
| 11 | SCL0 |
| 12 | SDA0 |
| 13 | GND |
| 14 | 3V3 |
| 15 | 3V3 |
Hardware Connection
Work with Pi 4B/3B+/3A+/3B/2B/B+/A+
- Use an FFC cable to connect the 5-inch DSI LCD to the 15-pin DSI interface on the Raspberry Pi board.
- For convenience, you can fix the Raspberry Pi on the backside of the 5-inch DSI LCD with screws and assemble the copper column. As shown in the following figure:
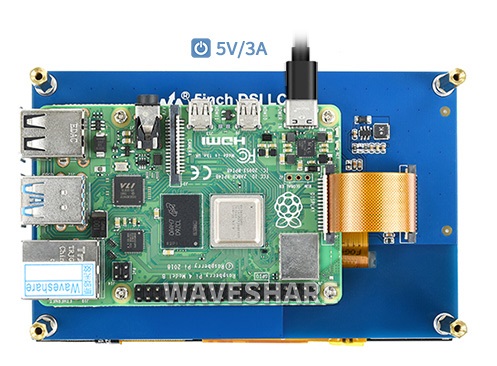
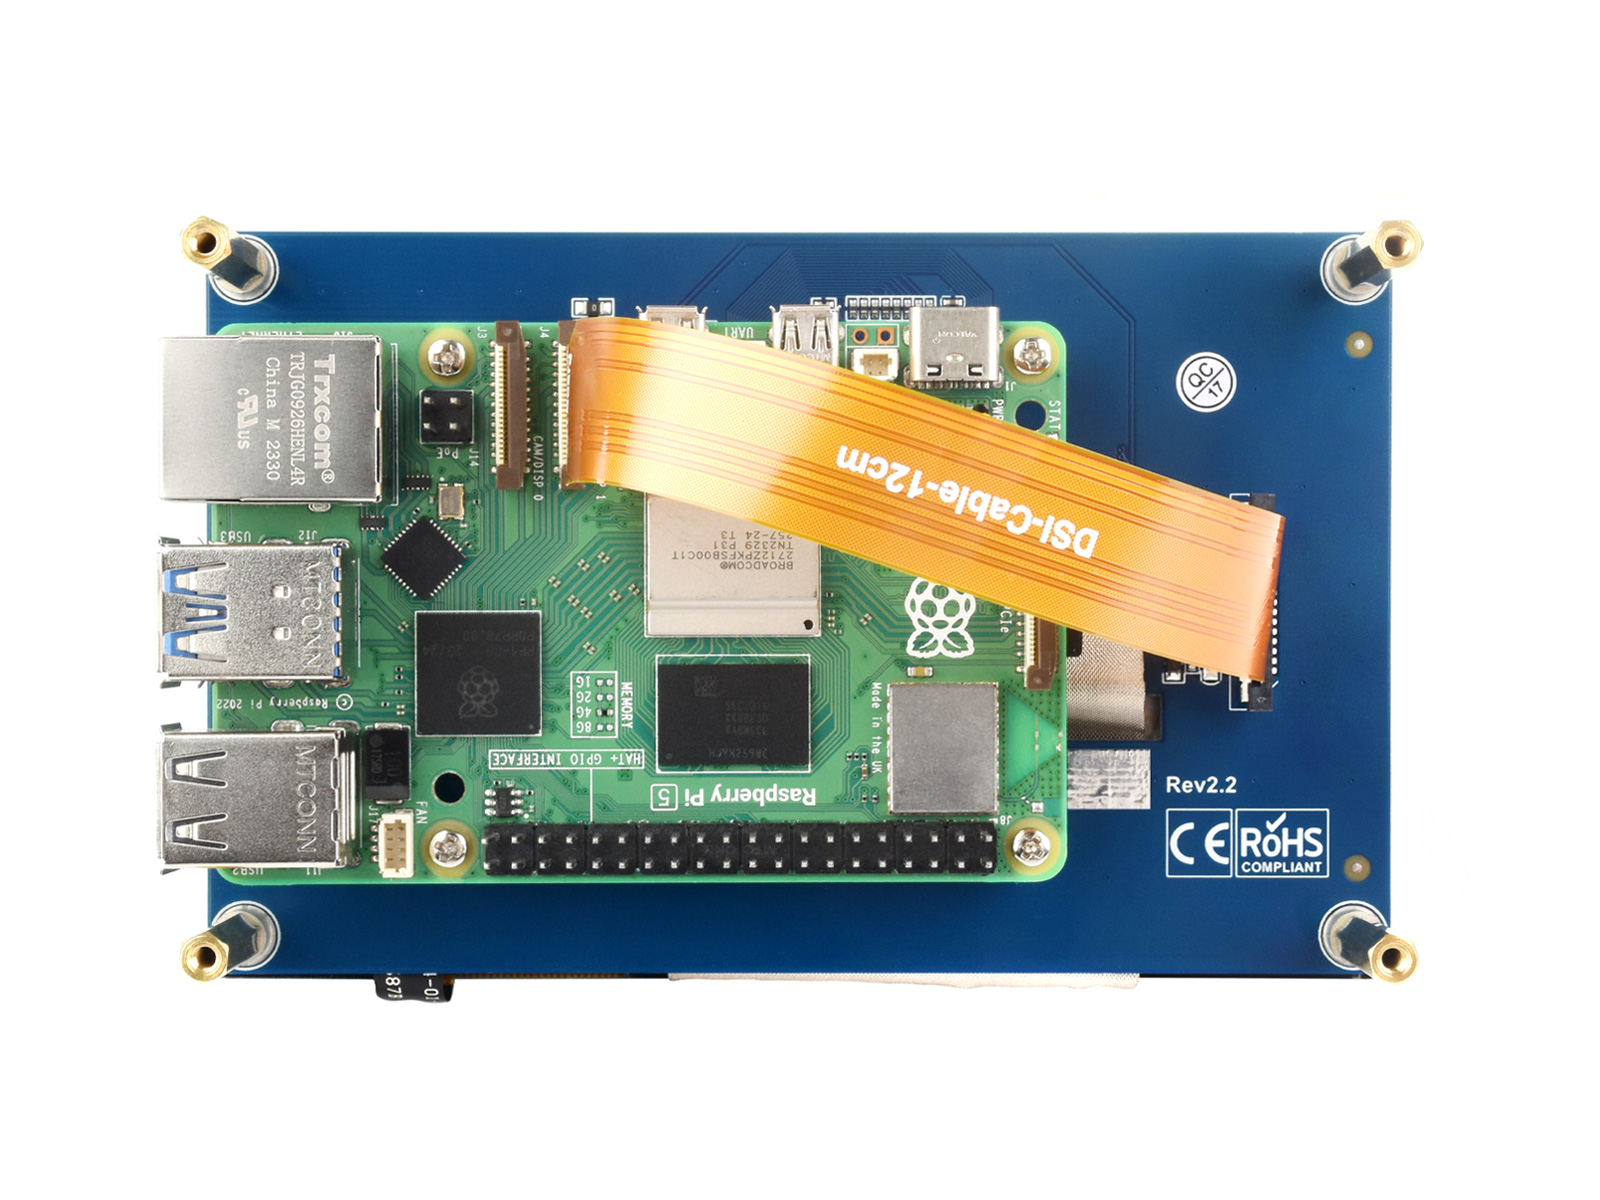
Work with Pi 5/CM4/CM3+/CM3
- Use a DSI-Cable-12cm cable to connect the 5-inch DSI LCD to the 22-pin DSI1 interface on the Raspberry Pi board.
- For convenience, you can fix the Raspberry Pi 5 on the backside of the 5-inch DSI LCD with screws and assemble the copper column. As shown in the following figure:
Software Settings
For Bookworm and Bullseye System
Method 1: Use Raspberry Pi Imager to Flash Latest Official Image
For Raspberry Pi OS/Ubuntu/Kali/Volumio and Retropie systems.
- 1. Connect the TF card to the PC, download and use Raspberry Pi Imager to flash the corresponding system image.
- 2. After the image flashing is completed, open the config.txt file in the root directory of the TF card, add the following code at the end of the config.txt, save and safely eject the TF card.
dtoverlay=vc4-kms-v3d
#DSI1 Use
dtoverlay=vc4-kms-dsi-7inch
#DSI0 Use(Only Pi5/CM4)
#dtoverlay=vc4-kms-dsi-7inch,dsi0- 3. Insert the TF card into the Raspberry Pi, power on the Raspberry Pi, and wait for a few seconds normally to enter the display. After the system starts, it can be touched normally.
- Note: For the Bookworm system on the Raspberry Pi 5, it is recommended to manually update to the latest system version and reboot (network connection is required).
#Update the system
sudo apt-get update
sudo apt-get full-upgrade -y
#Reboot the system
sudo reboot
Method 2: Use the Pre-installed Image
1. Select the corresponding Raspberry Pi version image, download and unzip it as .img file.
Raspberry 3/4B/CM4/5 version download: Waveshare DSI LCD - Pi3/4B/CM4/5 pre-installed image
2. Connect the TF card to the PC, format the TF card with SDFormatter.
3. Open Win32DiskImager, select the prepared system image, and click "Write" to start flashing.
4. After the flashing is completed, open the config.txt file in the root directory of the TF card, find the line "[all]", according to your display model, uncomment the relevant lines to enable the DSI display, and then save and safely eject the TF card.
Note: For Pi5/CM4/CM3+/CM3, since there are two MIPI DSI display interfaces, please make sure to use the correct display interface and instructions, the DSI1 display interface is recommended by default.
Let's take the 800*480 DSI LCD display as an example:
Use DSI1 interface:
#800*480 resolution DSI LCD display
dtoverlay=vc4-kms-dsi-7inch
Use DSI0 interface:
#800*480 resolution DSI LCD display
dtoverlay=vc4-kms-dsi-7inch,dsi0
5. Insert the TF card into the Raspberry Pi, power on and start, wait for a few seconds to enter the system display, and the touch function can also work normally.
Adjust Backlight Brightness
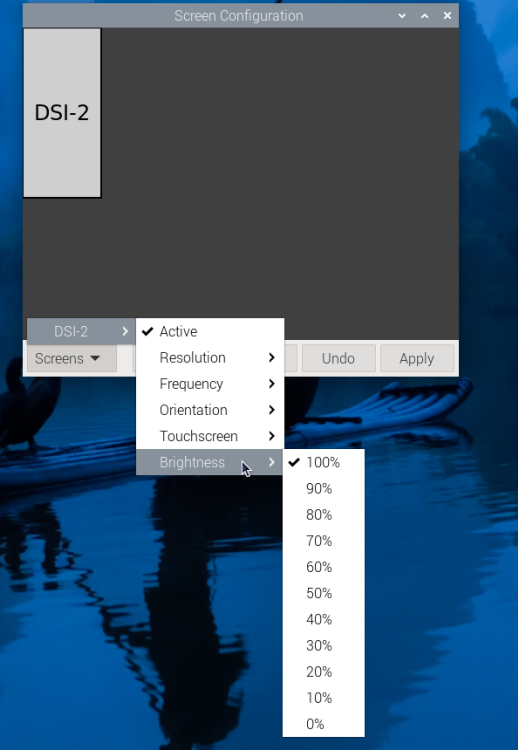
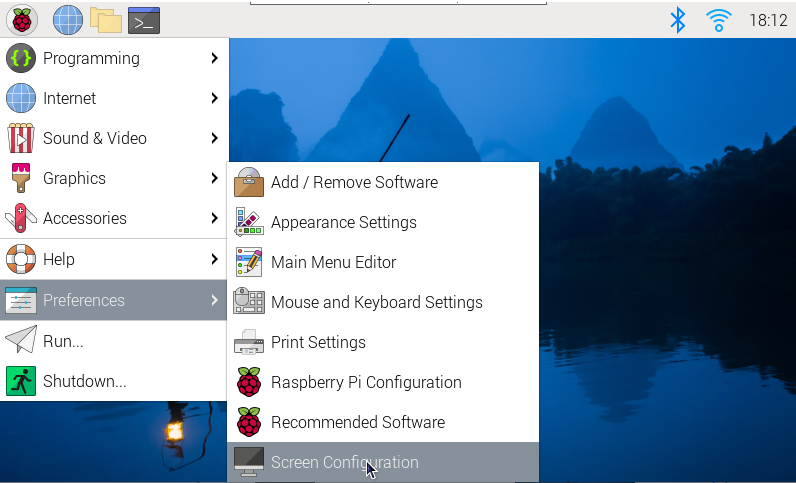
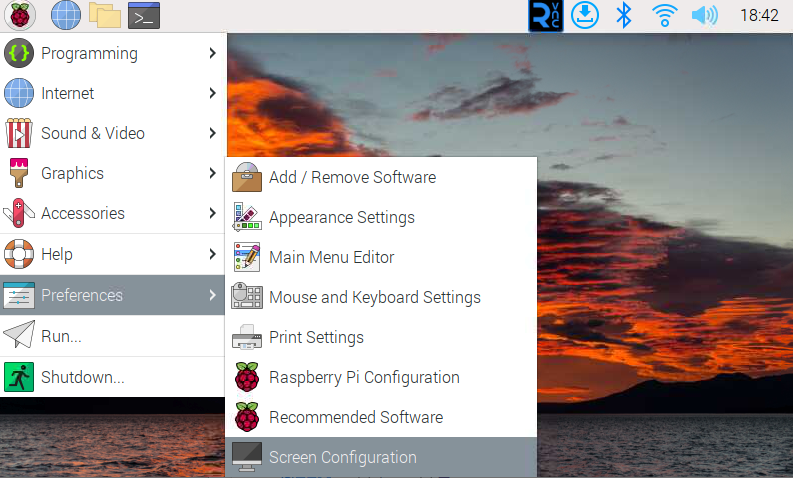
- 1. Open the "Screen Configuration" application;
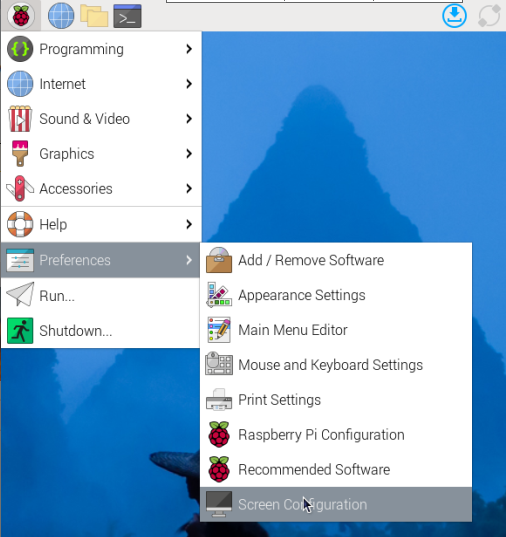
- 2. Go to "Screen" -> "DSI-2" -> "Brightness", check the backlight brightness you need to set, and finally click "Apply" to complete the backlight setting.
Waveshare also provides a corresponding demo (the demo is only used for Bookworm and Bullseye systems), users can download, install and use in the following way:
wget https://files.waveshare.com/wiki/common/Brightness.zip
unzip Brightness.zip
cd Brightness
sudo chmod +x install.sh
./install.sh
After the installation is completed, you can open the demo in the Start Menu -> Accessories -> Brightness, as shown below:
In addition, you can also control the brightness of the backlight by entering the following command on the terminal:
echo X | sudo tee /sys/class/backlight/*/brightness
Where X represents any number from 0 to 255. 0 means the darkest backlight, and 255 means the brightest backlight. For example:
echo 100 | sudo tee /sys/class/backlight/*/brightness
echo 0 | sudo tee /sys/class/backlight/*/brightness
echo 255 | sudo tee /sys/class/backlight/*/brightness
Use Touchscreen Virtual Keyboard
Raspberry Pi OS Bookworm and later versions include Squeekboard on-screen keyboard by default.
When connecting to the touch display, the on-screen keyboard will automatically appear if text input is possible, and it will automatically hide if text input is not possible.
For applications that do not support automatic text input detection, you can manually display or hide the on-screen keyboard by clicking the keyboard icon at the far right of the task bar.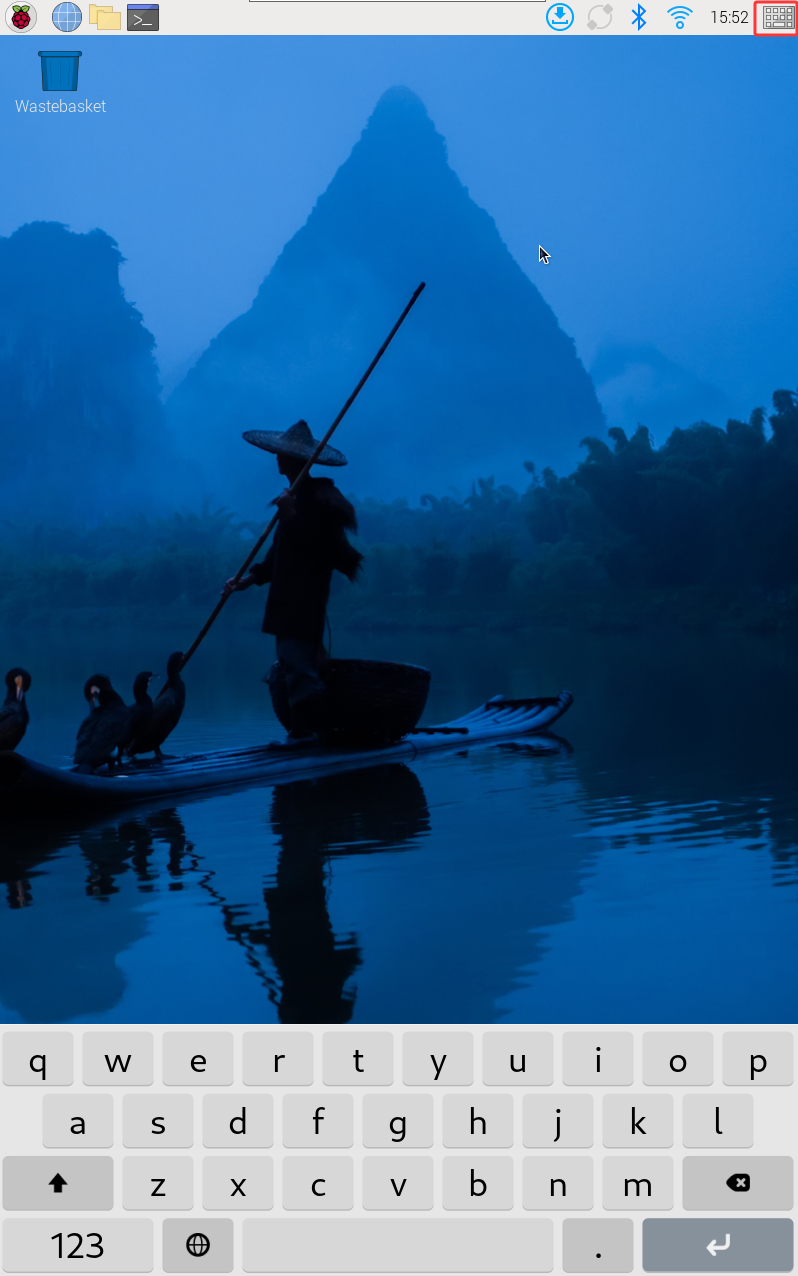
You can also set the display or hide the screen keyboard through the "Display" option under "Raspberry Pi Configuration" or through the "Display" section in raspi-config.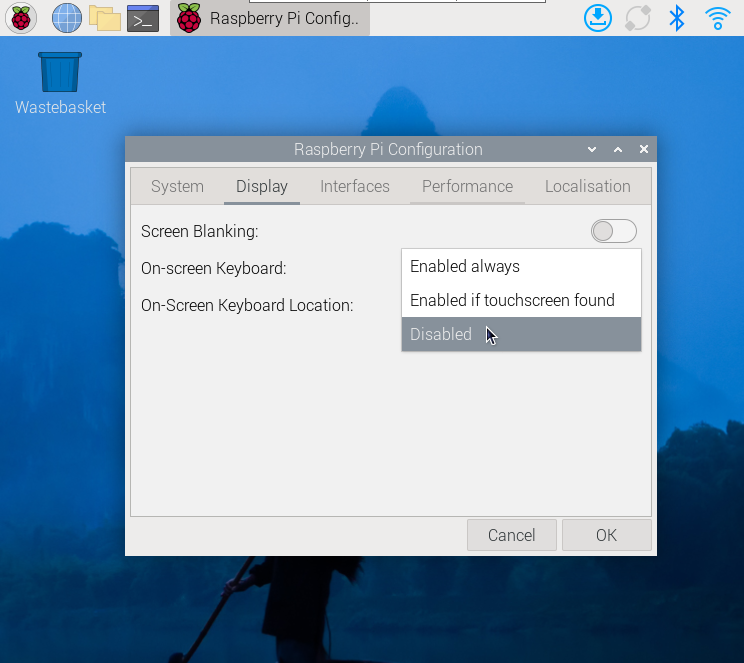
- Note:
For versions of Raspberry Pi OS before Bookworm, use matchbox-keyboard. If you are using the wayfire desktop compositor, use wvkbd.
Display Rotation
Bookworm Display Rotation
GUI interface rotation
- 1. Open the "Screen Configuration" application;
- 2. Go to "Screen" - > "DSI-1" - > "Touchscreen" and check "6-0038 generic ft5x06(79)"
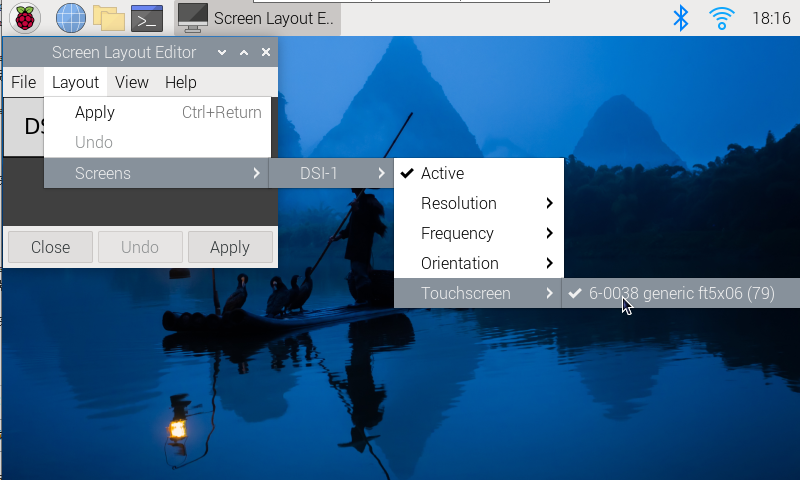
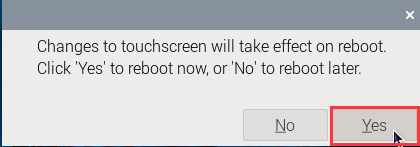
- 3. Click "Apply" and close the current window. Restart according to the pop-up prompt, and then touch screen select Done.

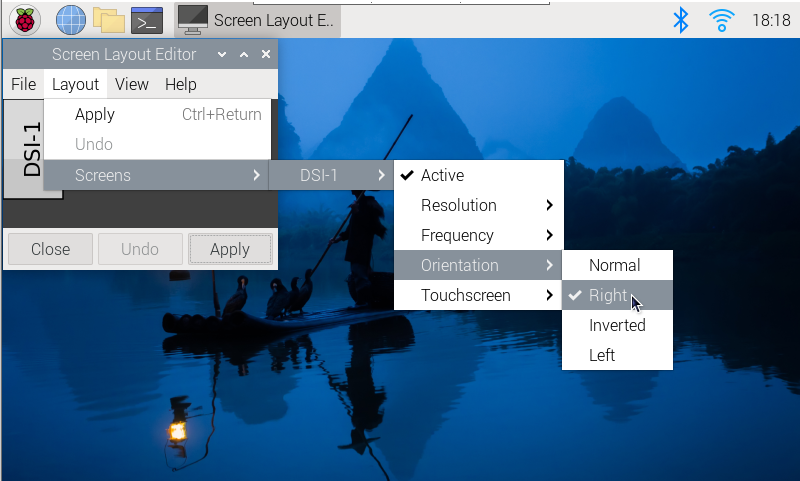
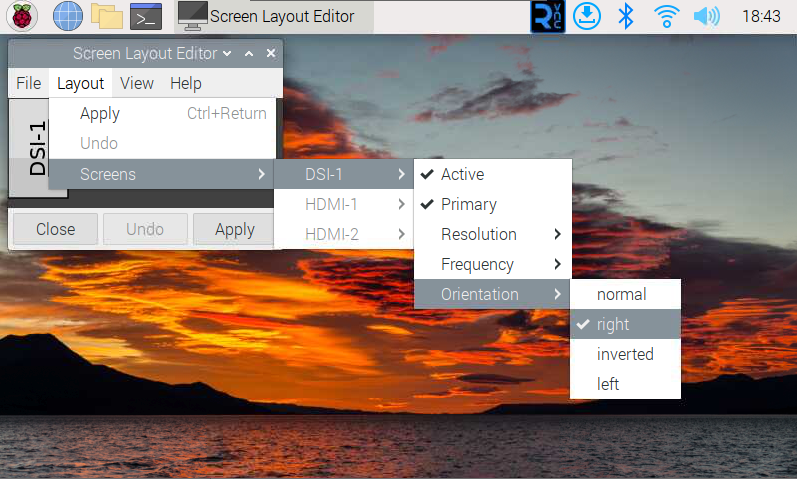
- 4.Go to "Screen" -> "DSI-1" -> "Orientation", check the direction you need to rotate, and finally click "Apply" to complete the display and touch synchronous rotation.
Note: Only the Bookworm system supports the above synchronization rotation method. Note: Only the Bookworm system supports the above synchronous rotation methods. For Bullseye and Butser systems, after displaying rotation, touch rotation needs to be manually set separately.
lite version display rotation
- 1. Need to modify the /boot/firmware/cmdline.txt file:
sudo nano /boot/firmware/cmdline.txt
- 2. At the beginning of the cmdline.txt file, add the command for displaying the rotation angle: (Please note, this command needs to be on the same line, with each command separated by a space.)
video=DSI-1:800x480M@60,rotate=90
Change the display rotation angle by modifying the rotate value to 90, 180, or 270.
- 3. Save and restart
sudo reboot
Bullseye/Buster Display Rotation
GUI interface rotation
- 1. Open the "Screen Configuration" application;
- 2. Go to "Screen" -> "DSI-1" -> "Orientation", check the direction you need to rotate, and finally click "Apply" to complete the display rotation.
lite version display rotation
- 1. Need to modify the /boot/cmdline.txt file:
sudo nano /boot/cmdline.txt
- 2. At the beginning of the cmdline.txt file, add the command for displaying the rotation angle: (Please note, this command needs to be on the same line, with each command separated by a space.)
video=DSI-1:800x480M@60,rotate=90
Change the display rotation angle by modifying the rotate value to 90, 180, or 270.
- 3. Save and restart
sudo reboot
Stretch/Jessie Display Rotation
For some older systems, they do not use the vc4-kms-v3d or vc4-fkms-v3d driver modes, and the display rotation method is as follows:
- 1. Add a statement to the config.txt file (the config file is located in the root directory of the TF card, i.e., in the /boot folder):
display_rotate=1 #1:90;2: 180; 3: 270
- 2. Save the changes and then reboot the Raspberry Pi
sudo reboot
Touch Rotation
Bookworm Touch
If you use the graphical interface for rotation, you can tick "Touchscreen" in the screen layout editor window to synchronize the touch rotation. Please refer to the previous introduction for how to rotate the screen. For the command line rotation method, please refer to the following text:
1. Create a new file named 99-waveshare-touch.rules
sudo nano /etc/udev/rules.d/99-waveshare-touch.rules
2. Add the following lines as needed:
#90°:
ENV{ID_INPUT_TOUCHSCREEN}=="1", ENV{LIBINPUT_CALIBRATION_MATRIX}="0 -1 1 1 0 0"

#180°:
#ENV{ID_INPUT_TOUCHSCREEN}=="1", ENV{LIBINPUT_CALIBRATION_MATRIX}="-1 0 1 0 -1 1"

#270°:
#ENV{ID_INPUT_TOUCHSCREEN}=="1", ENV{LIBINPUT_CALIBRATION_MATRIX}="0 1 0 -1 0 1"
3. Save and reboot
sudo reboot
Bullseye/Buster Touch
After some systems display rotation, the touch direction is inconsistent, and you need to perform the following operations to perform touch rotation:
1. Install libinput
sudo apt-get install xserver-xorg-input-libinput
- If you have Ubuntu or Jetson Nano installed. The installation code is:
sudo apt install xserver-xorg-input-synaptics
2. Create the xorg.conf.d directory under /etc/X11 (if the directory already exists, proceed directly to step 3).
sudo mkdir /etc/X11/xorg.conf.d
3. Copy the 40-libinput-conf file to the directory you created just now.
sudo cp /usr/share/X11/xorg.conf.d/40-libinput.conf /etc/X11/xorg.conf.d/
4. Edit this file.
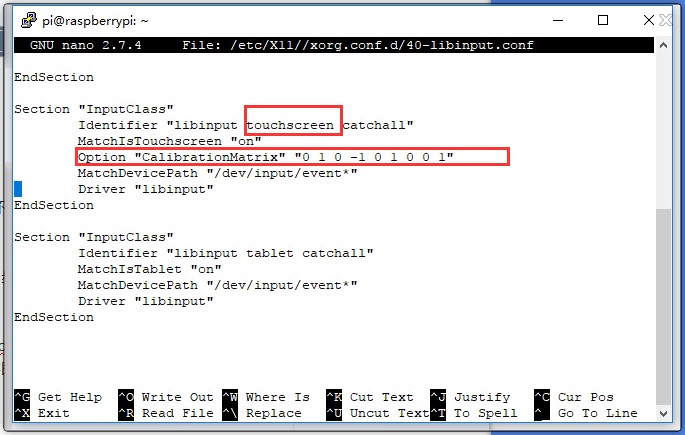
sudo nano /etc/X11/xorg.conf.d/40-libinput.conf
#Find the touchscreen section, add the corresponding rotation angle command in it, and save it
#"90° Right touch rotation:
Option "CalibrationMatrix" "0 1 0 -1 0 1 0 0 1"
#180° Inverted touch rotation:
#Option "CalibrationMatrix" "-1 0 1 0 -1 1 0 0 1"
#270° Left touch rotation:
#Option "CalibrationMatrix" "0 -1 1 1 0 0 0 0 1"
Similar to the position in the following image:
5. Reboot Raspberry Pi
sudo reboot
After completing the above steps, touch will cause a rotation.
Screen Sleep
Run the following command on the Raspberry Pi terminal and the screen will enter sleep mode:
xset dpms force off
Note: The above command is only for Bullseye and Buster systems.
Disable Touch
At the end of the config.txt file, add the following command corresponding to disabling touch (the config file is located in the root directory of the TF card, which can also be accessed via the command: sudo nano /boot/config.txt):
disable_touchscreen=1
Note: After adding a command, it needs to be restarted to take effect.
Resources
Drawing
Software
FAQ
Question:What is the power consumption of 5inch DSI LCD?
Power the 5inch DSI LCD using the Raspberry Pi's DSI interface, with a power consumption of approximately 1.2W.
Question:Can a 5-inch DSI LCD control the backlight with an external PWM signal?
The default state is to support software adjustment, it is recommended to view #Backlight Control, you can also weld PWM to control the backlight as follows:
As shown in the figure below, first remove the original soldered resistor, and then connect the pad (left pad) of the resistor to the P1 pin of the Raspberry Pi, and you can use GPIO to control the backlight.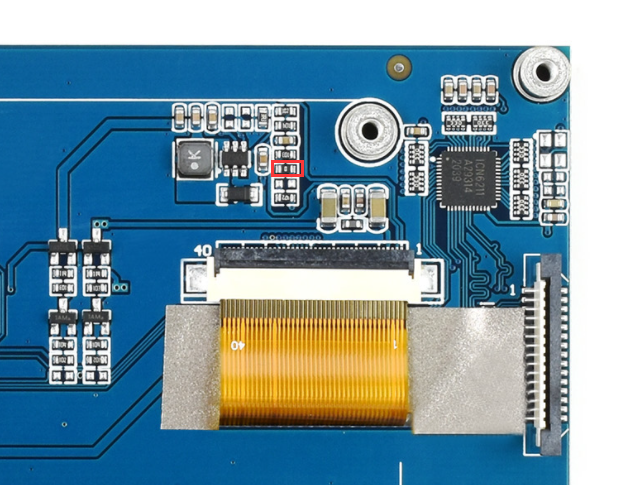
- gpio -g pwm 18 0
- gpio -g mode 18 pwm (the occupied pins are PWM pins)
- gpio pwmc 1000
- Control brightness:
- gpio -g pwm 18 X (X is between 0 and 1024, 0 is the darkest, and 1024 is the brightest)
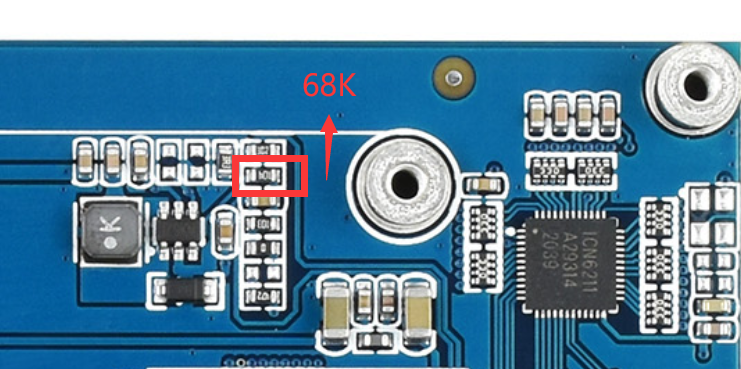
- PS: To ensure a good customer experience, the default factory minimum brightness is the visible state. If you need to completely turn off the backlight to achieve a black screen effect, please manually change the 100K resistor as shown below to a 68K resistor:
Question:How to use 5inch DSI LCD on Raspberry Pi 5?
1. The hardware connection between DSI LCD and Pi5 as below:
(1) A DSI cable (official Raspberry Pi cable or Waveshare Pi5-Display-Cable-200mm) for Pi 5 is required. Please ensure the proper orientation with the SODIMM.
(2) Priority usage for Pi5's DSI1 interface.
If using the DSI0 interface, you need to add "dtoverlay=vc4-kms-dsi-7inch,dsi0" in the config.txt file

2. Check the DSI LCD version.
(1) The latest DSI LCD version compatible with Pi5 is Rev2.2, which can be directly used.
(2) If you purchased the product earlier, such as the Rev2.1 version (or older), due to the power detection mechanism of Pi5, it may misidentify the capacitors on the DSI LCD as a false short-circuit state, preventing the system from booting. In this situation, you can manually remove the large capacitors at the four positions marked in red circles in the image below.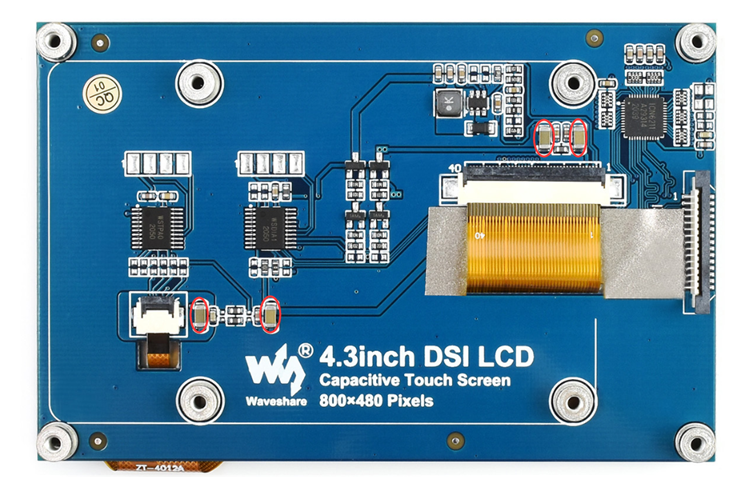
3. Software Setup:
For the Pi5, use the Bookworm system. (Please note, Pi5 currently only supports Bookworm, not Bullseye or Buster.)
(1) Connect the TF card to the PC, download and flash the corresponding system image using Raspberry Pi Imager.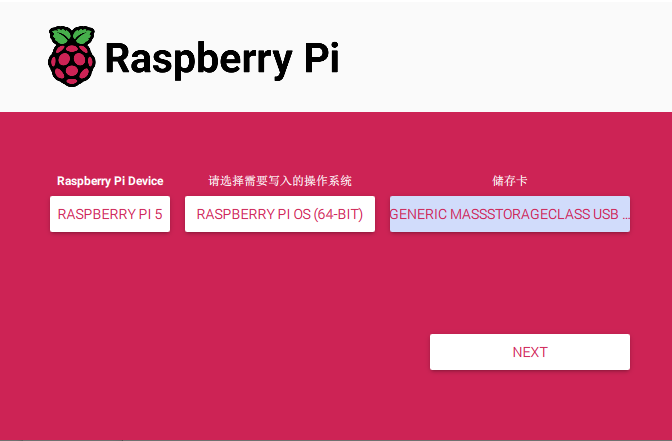
(2) After the image is flashed, open the config.txt file in the root directory of the TF card, add the following code at the end of the config.txt, save and safely eject the TF card.
dtoverlay=vc4-kms-v3d
#DSI1 Use
dtoverlay=vc4-kms-dsi-7inch
#DSI0 Use
#dtoverlay=vc4-kms-dsi-7inch,dsi0
(3) Connect the TF card to the Raspberry PI, start the Raspberry PI, and log in to the Raspberry PI terminal (you can connect the Raspberry PI to the HDMI display or log in remotely using ssh).
#Update system
sudo apt-get update
sudo apt-get full-upgrade -y
#Reboot system
sudo reboot
(4) Wait for the system restart, it will be able to display and touch normally.
Note that if use the DSI0 interface at the same time, you need to add the additional commands: "dtoverlay=vc4-kms-dsi-7inch,dsi0"
Question: What screw size the columns use that are included?
Screw is M2.5.
Support
Monday-Friday (9:30-6:30) Saturday (9:30-5:30)
Email: services01@spotpear.com
[Tutorial Navigation]
- Features
- Video Tutorial
- Interface Definition
- Hardware Connection
- Software Settings
- For Bookworm and Bullseye System
- Method 1: Use Raspberry Pi Imager to Flash Latest Official Image
- Method 2: Use the Pre-installed Image
- Adjust Backlight Brightness
- Use Touchscreen Virtual Keyboard
- Display Rotation
- Touch Rotation
- Screen Sleep
- Disable Touch
- Resources
- FAQ
- Question:What is the power consumption of 5inch DSI LCD?
- Question:Can a 5-inch DSI LCD control the backlight with an external PWM signal?
- Question:How to use 5inch DSI LCD on Raspberry Pi 5?
- Question: What screw size the columns use that are included?
- Support