


- sales/support
Google Chat:---
- sales
+86-0755-88291180
- sales01
sales@spotpear.com
- sales02
dragon_manager@163.com
- support
tech-support@spotpear.com
- CEO-Complaints
zhoujie@spotpear.com
- Only Tech-Support
WhatsApp:13246739196
- Purchase/Shipping/Refund
WhatsApp:13424403025
Raspberry Pi Pico-2CH-RS485 User Guide
Overview
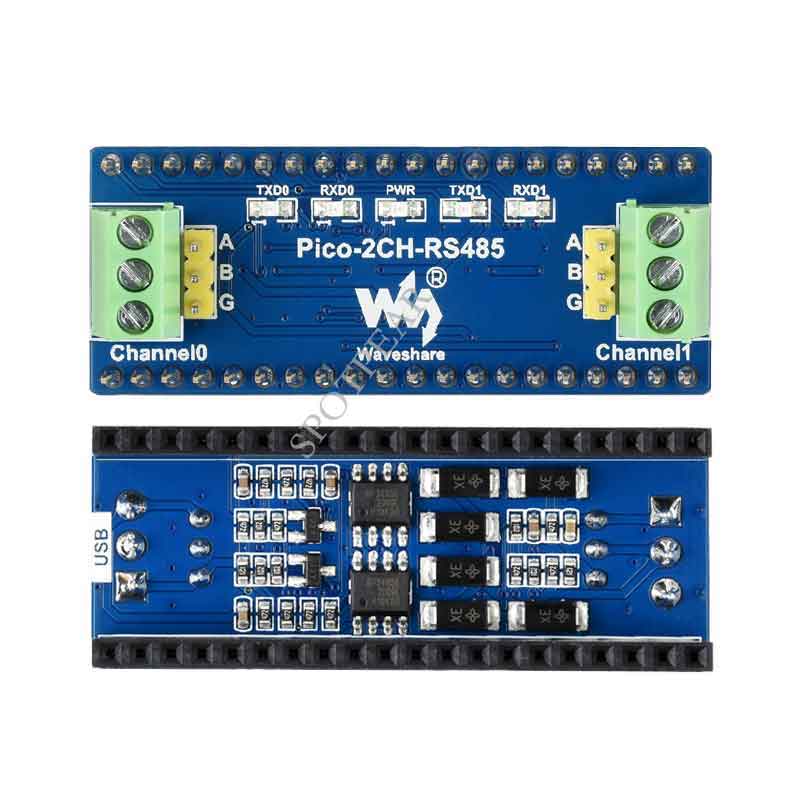
This is a 2-Channel RS485 module for Raspberry Pi Pico, SP3485 transceiver, UART To RS485
Features
- Standard Raspberry Pi Pico header supports Raspberry Pi Pico series
- Using UART bus, easily converting UART to RS485 or vice versa
Specification
- Operating voltage: 3.3V
- Communication bus: UART
- RS485 transceiver: SP3485
- Baudrate: 300~500000bps
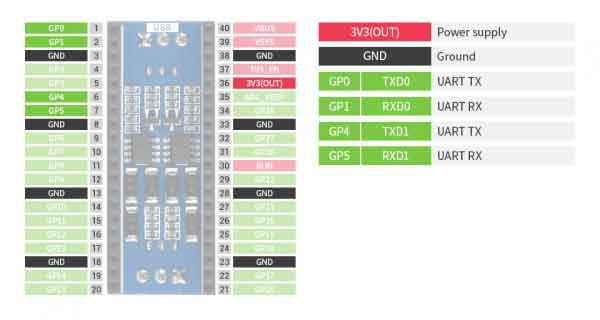
Pinout
Hardware connection
When connecting PICO, please pay attention not to connect in the opposite direction. The direction can be judged by observing the USB screen printing end of the module and the USB interface end of the Pico (also can be judged by the pin label of the platoon master on the module and the pin label of the Pico).
You can also wire it according to the table below
| RS485 | Pico | Description |
| VCC | VSYS | Power input |
| GND | GND | Ground |
| TX_CH0 | GP0 | UART transmit pin |
| RX_CH0 | GP1 | UART receive pin |
| TX_CH1 | GP4 | UART transmit pin |
| RX_CH1 | GP5 | UART receive pin |
Connection
The connection of the RS485 board is same as the Pico-2CH-RS232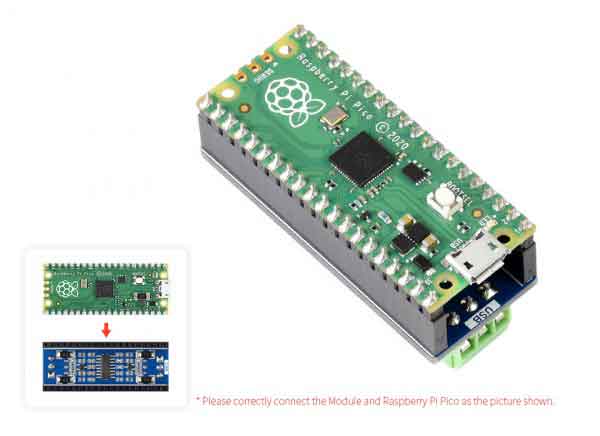
Setup environment
To setup the Pico for working, please refer to the official guide: https://www.raspberrypi.org/documentation/rp2040/getting-started/
Download example
Open a terminal and run the follow command
sudo apt-get install p7zip-full
cd ~
sudo wget  https://www.waveshare.com/w/upload/9/94/Pico_2CH_RS485.7z
7z x Pico_2CH_RS485.7z -o./Pico_2CH_RS485
cd ~/Pico_2CH_RS485
cd c/build/
Run the examples
C codes
- Go the example directory and build it
cd ~/Pico_2CH_RS485/c/
Create the build folder and add SDK path to it:
By default, the ../../pico-sdk is the path of SDK
We have created the build folder in examples, you can just enter it.
Note: If the actual path of your Pi is different, you need to write the correct path.
cd build
export PICO_SDK_PATH=../../pico-sdk
Run the cmake to generate Makefile file
cmake ..
Run the make command to build the codes and generate an executable file.
make -j9
After building, an uf2 file is generated. Press and hold the key on the Pico board to connect the Pico to the Raspberry Pi's USB port via the Micro USB cable, then release the key. Once connected, Raspberry will automatically recognize a removable disk (RPI-RP2). Copy the file main.uf2 in the corresponding folder to the recognized removable disk (RPI-RP2).
cp main.uf2 /media/pi/RPI-RP2/
Python codes
Run in Raspberry Pi
- Hold the BOOTSET key of the Pico board, then connect the Pico to Raspberry Pi by USB cable, then release the key.
- Once the removable disk (RPI-RPI2) is recognized, copy the rp2-pico-20210418-v1.15.uf2 file to pico.
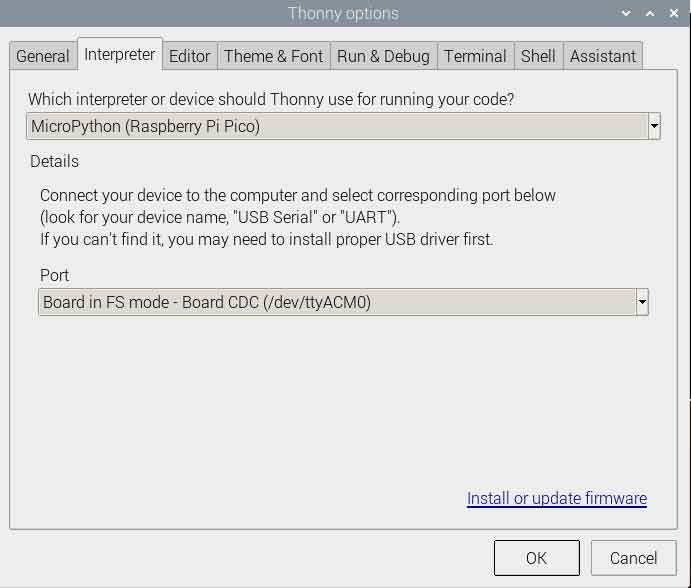
- Open the Thonny IDE in Raspberry Pi, update it if it doesn't support Pico
- Configure the port by choosing MicroPython(Raspberry Pi and ttyACM0 port) in Tools -> Options... -> Interpreter
If your Thonny doesn't support Pico, you can update it with the following command:
sudo apt upgrade thonny
- Choose File->Open...->python/ and select the corresponding .py file to run the codes