- sales/support
Google Chat: zj734465502@gmail.com
- sales
+86-0755-88291180
- sales01
sales01@spotpear.com
- sales02
dragon_manager@163.com
- support
services01@spotpear.com
- CEO-Complaints
manager01@spotpear.com
- sales/support
WhatsApp:13246739196
Raspberry Pi Pioneer600 User Guide
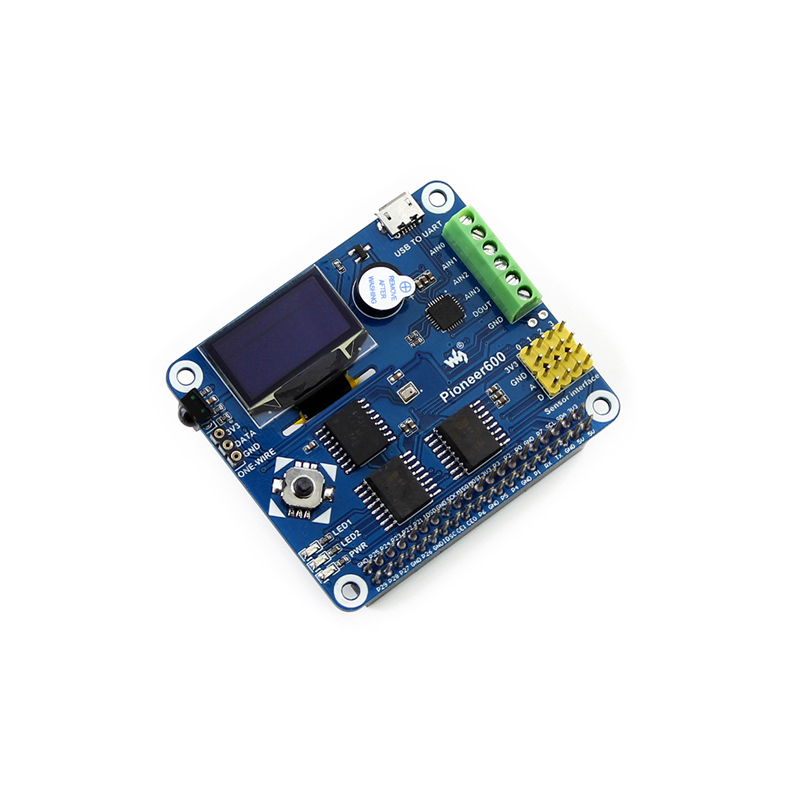
Introduction
Raspberry Pi Expansion Board, Miscellaneous Components, All-in-One
Preparation - installing the libraries required
Installing the libraries required
Before using the PIONEER600, you shall install the bcm2835, wiringPi and python libraries to the RPi to add the additional APIs, and configure the settings to start up the core drivers of I2C, SPI and UART after the libraries installed.
For simplicity reason, it is recommended to download the ready-to-use Image (Libraries pre-installed). Download password: t8aj. This image allows you to start Pioneer600 without installing the libraries.
For more detailed information about the installation and configuration of the RPI library functions, please refer to Libraries Installation for RPi.
When finished the configurations above, you need to download the sample programs from File:Pioneer600-Code.tar.gz, and unzip them to the directory of /home/pi (you can also copy them into the RPi board with your U-disk). Some of the sample programs can be implemented via different ways, such as the libraries of bcm2835, wiringPi, sysfs, python and so on. That means you can implement a same function by using different libraries. Therefore, the libraries of bcm2835, wiringPi and python should be installed to the RPi before used. In the next section, we will present the expansion functions provided by PIONEER600.
For more detailed information, please refer to the relative Raspberry Pi documents.
If the sample programs (download from File:Pioneer600-Code.tar.gz) presented in the next section are unable to be performed after installing the libraries, you can try to apply the command
chmod +x filename
to grant the program the executable permission.
Connecting the expansion board and the RPI
The Pioneer600 expansion board supports the Raspberry Pi A+ / B+ / 2 / 3 Model B. Before running the sample programs, please make sure the Pioneer600 is connected to the RPi and the RPi is powered up by the USB power supply. Without the RPi main board, the sample programs cannot be used on the expansion board.
Connected to Raspberry Pi Model A+:
Connected to Raspberry Pi B+ / 2 / 3 Model B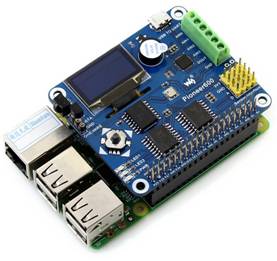
LED sample programs - Changing the LED status
- bcm2835 program:
Open the Linux terminal and enter to the corresponding path and run the following commands:
The command for compiling the program:
pi@raspberrypi ~/Pioneer600/LED/bcm2835 $ make
The command for executing the program:
pi@raspberrypi ~/Pioneer600/LED/bcm2835 $ sudo ./led
Expected result: The LED1 is blinking.
Press the keys Ctrl+C to end the program.
- wiringPi program:
Enter the Linux terminal, and run the following commands:
The command for compiling the program:
pi@raspberrypi ~/Pioneer600/LED/wiringPi $ make
The command for executing the program:
pi@raspberrypi ~/Pioneer600/LED/wiringPi $ sudo ./led
Expected result: The LED1 is blinking.
Press the keys Ctrl+C to end the program.
Enter the Linux terminal, and run the following commands:
The command for compiling the program:
pi@raspberrypi ~/Pioneer600/LED/wiringPi $ make
The command for executing the program:
pi@raspberrypi ~/Pioneer600/LED/wiringPi $ sudo ./pwm
Expected result: The brightness of the LED1 is changing gradually.
Press the keys Ctrl+C to end the program.
- sysfs program:
Enter the Linux terminal, and run the following commands:
The command for compiling the program:
pi@raspberrypi ~/Pioneer600/LED/fs $ make
The command for executing the program:
pi@raspberrypi ~/Pioneer600/LED/fs $ sudo ./led
Expected result: The LED1 blinks 10 times and then the program will automatically quit.
Press the keys Ctrl+C to end the program.
- python program:
Enter the Linux terminal, and run the following commands:
The command for executing the program:
pi@raspberrypi ~/Pioneer600/LED/python $ sudo python led.py
Expected result: The LED1 is blinking.
Press the keys Ctrl+C to end the program.
Enter the Linux terminal, and run the following commands:
The command for executing the program:
pi@raspberrypi ~/Pioneer600/LED/python $ sudo python pwm.py
Expected result: The brightness of the LED1 is changing gradually.
Press the keys Ctrl+C to end the program.
Key sample programs
- bcm2835 program:
Enter the Linux terminal, and run the following commands:
The command for compiling the program:
pi@raspberrypi ~/Pioneer600/KEY/bcm2835 $ make
The command for executing the program:
pi@raspberrypi ~/Pioneer600/KEY/bcm2835 $ sudo ./key
Expected result:
Press the center key of the joystick, and the terminal will display the following information:
Key Test Program!!!!
KEY PRESS
KEY PRESS
KEY PRESS
Press the keys Ctrl+C to end the program.
- wiringPi program:
Enter the Linux terminal, and run the following commands:
The command for compiling the program:
pi@raspberrypi ~/Pioneer600/KEY/wiringPi $ make
The command for executing the program:
pi@raspberrypi ~/Pioneer600/KEY/wiringPi $ sudo ./key
Expected result:
Press the center key of the joystick, and the terminal will display the following information:
Key Test Program!!!
KEY PRESS
KEY PRESS
KEY PRESS
Press the keys Ctrl+C to end the program.
- python program:
Enter the Linux terminal, and run the following commands:
The command for executing the program:
pi@raspberrypi ~/Pioneer600/KEY/python $ sudo ./key.py
Expected result:
Press the center key of the joystick, and the terminal will display the following information:
Key Test Program
KEY PRESS
KEY PRESS
KEY PRESS
Press the keys Ctrl+C to end the program.
PCF8574 sample programs - I/O expansion demos
- bcm2835 program:
Enter the Linux terminal, and run the following commands:
The command for compiling the program:
pi@raspberrypi ~/Pioneer600/PCF8574/bcm2835 $ make
The command for executing the program:
pi@raspberrypi ~/Pioneer600/PCF8574/bcm2835 $ sudo ./led
Expected result: The LED2 is blinking.
Press the keys Ctrl+C to end the program.
Enter the Linux terminal, and run the following commands:
The command for compiling the program:
pi@raspberrypi ~/Pioneer600/PCF8574/bcm2835 $ make5
The command for executing the program:
pi@raspberrypi ~/Pioneer600/PCF8574/bcm2835 $ sudo ./pcf8574
Expected result: Press the direction keys, then the LED2 will light up, the buzzer will sound, and the terminal will display the following information:
PCF8574 Test Program !!!
up
left
down
right
Press the keys Ctrl+C to end the program.
- python program:
Enter the Linux terminal, and run the following commands:
The command for executing the program:
pi@raspberrypi ~/Pioneer600/PCF8574/python $ sudo python led.py
Expected result: The LED2 is blinking.
Press the keys Ctrl+C to end the program.
Enter the Linux terminal, and run the following commands:
The command for executing the program:
pi@raspberrypi ~/Pioneer600/PCF8574/python $ sudo python pcf8574.py
Expected result: Press the direction keys, then the LED2 will light up, the buzzer will sound, and the terminal will display the following information:
PCF8574 Test Program !!!
up
left
down
right
Press the keys Ctrl+C to end the program.
- fs program:
Enter the Linux terminal, and run the following commands:
The command for compiling the program:
pi@raspberrypi ~/Pioneer600/PCF8574/fs $ make
The command for executing the program:
pi@raspberrypi ~/Pioneer600/PCF8574/fs $ sudo ./led
Expected result: The LED2 is blinking.
Press the keys Ctrl+C to end the program.
- wiringPi program:
Enter the Linux terminal, and run the following commands:
The command for compiling the program:
pi@raspberrypi ~/Pioneer600/PCF8574/wiringPi $ make
The command for executing the program:
pi@raspberrypi ~/Pioneer600/PCF8574/wiringPi $ sudo ./led
Expected result: The LED2 is blinking.
Press the keys Ctrl+C to end the program.
Enter the Linux terminal, and run the following commands:
The command for compiling the program:
pi@raspberrypi ~/Pioneer600/PCF8574/wiringPi $ make
The command for executing the program:
pi@raspberrypi ~/Pioneer600/PCF8574/wiringPi $ sudo ./LED
Expected result: The LED2 is blinking.
Press the keys Ctrl+C to end the program.
BMP280 sample programs- Barometer Demos
- bcm2835 program:
Enter the Linux terminal, and run the following commands:
The command for compiling the program:
pi@raspberrypi ~/Pioneer600/BMP280/bcm2835 $ make
The command for executing the program:
pi@raspberrypi ~/Pioneer600/BMP280/bcm2835 $ sudo ./bmp280
Expected result: The terminal will display the following information:
BMP280 Test Program ...
Temperature = 34.20 C Pressure = 100.51 kPa
Press the keys Ctrl+C to end the program.
- wiringPi program:
Enter the Linux terminal, and run the following commands:
The command for compiling the program:
pi@raspberrypi ~/Pioneer600/BMP280/wiringPi $ make
The command for executing the program:
pi@raspberrypi ~/Pioneer600/BMP280/wiringPi $ sudo ./bmp180
Expected result: The terminal will display the following information:
BMP280 Test Program ...
Temperature = 34.20 C Pressure = 100.51 kPa
Press the keys Ctrl+C to end the program.
- python program:
Enter the Linux terminal, and run the following commands to execute the program:
pi@raspberrypi ~/Pioneer600/BMP280/python $ sudo python bmp280.py
Expected result: The terminal will display the following information:
BMP280 Test Program ...
Temperature = 34.20 C Pressure = 100.51 kPa
Press the keys Ctrl+C to end the program.
DS3231 sample programs - High precision RTC Demos
- bcm2835 program:
Enter the Linux terminal, and run the following commands:
The command for compiling the program:
pi@raspberrypi ~/Pioneer600/DS3231/bcm2835 $ make
The command for executing the program:
pi@raspberrypi ~/Pioneer600/DS3231/bcm2835 $ sudo ./ds3231
Expected result: The terminal will display the following information:
start..........
2015/08/12 18:00:00 Wed
2015/08/12 18:00:01 Wed
2015/08/12 18:00:02 Wed
2015/08/12 18:00:03 Wed
Press the keys Ctrl+C to end the program.
- wiringPi program:
Enter the Linux terminal, and run the following commands:
The command for compiling the program:
pi@raspberrypi ~/Pioneer600/DS3231/wiringPi $ make
The command for executing the program:
pi@raspberrypi ~/Pioneer600/DS3231/wiringPi $ sudo ./ds3231
Expected result: The terminal will display the following information:
start..........
2015/08/12 18:00:00 Wed
2015/08/12 18:00:01 Wed
2015/08/12 18:00:02 Wed
2015/08/12 18:00:03 Wed
Press the keys Ctrl+C to end the program.
- python program:
Enter the Linux terminal, and run the following commands to execute the program:
pi@raspberrypi ~/Pioneer600/DS3231/python $ sudo python ds3231.py
Expected result: The terminal will display the following information:
2015/08/12 18:00:00 Wed
2015/08/12 18:00:01 Wed
2015/08/12 18:00:02 Wed
2015/08/12 18:00:03 Wed
2015/08/12 18:00:04 Wed
Press the keys Ctrl+C to end the program.
DS18B20 sample programs - Temperature sensor Demos
(Notes: To use the DS18B20 program, you should add a line dtoverlay=w1-gpio-pullup to the end of the Raspberry Pi boot file /boot/config.txt, and restart the RPi to make it take effect. For more detailed information, please refer to the relative Raspberry Pi documents.)
- sysfs program:
Enter the Linux terminal, and run the following commands to execute the program:
pi@raspberrypi ~/Pioneer600/DS18B20/fs $ sudo ./ds18b20
Expected result: The terminal will display the following information:
rom: 28-00000674869d
temp: 30.437 °C
temp: 30.375 °C
Press the keys Ctrl+C to end the program.
- python program:
Enter the Linux terminal, and run the following commands to execute the program:
pi@raspberrypi ~/Pioneer600/DS18B20/python $ sudo python ds18b20.py
Expected result: The terminal will display the following information:
rom: 28-00000674869d
C=29.687 F=85.437
C=29.687 F=85.437
C=29.687 F=85.437
Press the keys Ctrl+C to end the program.
IRM sample programs - Infrared reflective sensor program
- bcm2835 program:
Enter the Linux terminal, and run the following commands:
The command for compiling the program:
pi@raspberrypi ~/Pioneer600/IRM/bcm2835 $ make
The command for executing the program:
pi@raspberrypi ~/Pioneer600/IRM/bcm2835 $ sudo ./irm
Expected result: Press the keys on the infrared remote controller, and the terminal will display the relative value of the pressed key.
irm test start:
Get the key: 0x0c
Get the key: 0x18
Get the key: 0x5e
Press the keys Ctrl+C to end the program.
- wiringPi program:
Enter the Linux terminal, and run the following commands:
The command for compiling the program:
pi@raspberrypi ~/Pioneer600/IRM/wiringPi $ make
The command for executing the program:
pi@raspberrypi ~/Pioneer600/IRM/wiringPi $ sudo ./irm
Expected result: Press the keys on the infrared remote controller, and the terminal will display the relative value of the pressed key.
irm test start:
Get the key: 0x0c
Get the key: 0x18
Get the key: 0x5e
Press the keys Ctrl+C to end the program.
- python program:
Enter the Linux terminal, and run the following commands to execute the program:
pi@raspberrypi ~/Pioneer600/IRM/python $ sudo python irm.py
Expected result: Press the keys on the infrared remote controller, and the terminal will display the relative value of the pressed key.
IRM Test Start ...
Get the key: 0x0c
Get the key: 0x18
Get the key: 0x5e
Press the keys Ctrl+C to end the program.
UART sample programs - Transmitting the serial data received
Notices: The serial port of RPi is set to terminal debugging mode by default. However, in order to run this sample program, you should disable the terminal debugging function, which means you cannot debug the RPi via the serial port communication any more. In this case, you should employ other methods to debug the RPi before running this program. For example, you can connect an external HDMI displayer to the RPi or use SSH.
- wiringPi program:
Enter the Linux terminal, and run the following commands:
The command for compiling the program:
pi@raspberrypi ~/Pioneer600/UART/wiringPi $ make
The command for executing the program:
pi@raspberrypi ~/Pioneer600/UART/wiringPi $ sudo ./UART
Expected result: Connect the expansion board to the PC via the USB TO UART interface, and configure the serial communication software on the PC (Here, you can use the software PuTTY to monitor the serial port), selecting the right serial port number and setting the Baud rate to 115200. Then, you can use your PC to send data to the RPi via the serial communication. After the data is received by the RPi, it will be echoed to the serial monitor on the PC.
- python program:
Enter the Linux terminal, and run the following commands to execute the program:
pi@raspberrypi ~/Pioneer600/UART/python $ sudo python uart.py
Expected result: It is the same as in the above case.
OLED sample programs
Note: If the demos of WiringPi or Python is run after the demo of BCM, the OLED won't work properly again. In this case, you have to reboot your Raspberry Pi, execute the demo again and the OLED will be restored. The reason may be: the priorities of BCM libraries is more than of WiringPi or Python. If you have a good idea to solve such problems, welcome to contact us.
- bcm2835 program:
Enter the Linux terminal, and run the following commands:
The command for compiling the program:
pi@raspberrypi ~/Pioneer600/OLED/bcm2835 $ make
The command for executing the program:
pi@raspberrypi ~/Pioneer600/OLED/bcm2835 $ sudo ./oled
Expected result: The OLED shows the LOGO of Waveshare for 2 seconds, and then it will switch to display the current system time.
Press the keys Ctrl+C to end the program.
Note:
- If the OLED flickers, connect the VCC to the 3.3V rather than 5V.
- If the characters are shown in wrong condition, you could try other parameters in
bcm2835_spi_setClockDivider(uint16_t ), likebcm2835_spi_setClockDivider(BCM2835_SPI_CLOCK_DIVIDER_2048);[1]
- wiringPi program:
Enter the Linux terminal, and run the following commands:
The command for compiling the program:
pi@raspberrypi ~/Pioneer600/OLED/wringPi $ make
The command for executing the program:
pi@raspberrypi ~/Pioneer600/OLED/wiringPi $ sudo ./oled
Expected result: The OLED shows the LOGO of Waveshare for 2 seconds, and then it will switch to display the current system time.
Press the keys Ctrl+C to end the program.
- python program:
When using this python program to control the OLED, you need to install another library python-imaging. To install the python-imaging library, you should connect the RPi to the network, and use the line below:
sudo apt-get install python-imaging
Expected result: Entering the following commands under the Terminal to execute the program, you will get different displayed information.
pi@raspberrypi ~/Pioneer600/OLED/python $ sudo python oled.py
pi@raspberrypi ~/Pioneer600/OLED/python $ sudo python dispchar.py
pi@raspberrypi ~/Pioneer600/OLED/python $ sudo python image.py
pi@raspberrypi ~/Pioneer600/OLED/python $ sudo python animate.py
pi@raspberrypi ~/Pioneer600/OLED/python $ sudo python waveshare.py
For more detailed information, please refer to the relative Raspberry Pi documents.
How to use Pioneer600 with external sensor kits (purchased separately)
Pioneer600 has four interfaces for external sensors, so that you can not only use the on-board sensors, but also other external sensors.
Before using the external sensors, you should:
- Connect the sensor kits to the expansion board, and install the expansion board to the RPi.
- Make sure that the libraries are installed and the I2C core driver is start up, since the on-board chip PCF8591 need to use the I2C interface to provide AD/DA function.
- Download the sample programs, and unzip them to the directory of /home/pi (you can also copy them into the RPi board with your U-disk).
Color Sensor sample program
Please connect the color sensor to the Pioneer600 according to the list below.
| Pins of Color Sensor | Pins of Pioneer600 |
|---|---|
| LED | 3.3V |
| OUT | P0 |
| S3 | D3( P26) |
| S2 | D2(P23) |
| S1 | D1(P22) |
| S0 | D0(P21) |
| GND | GND |
| VCC | 3.3V |
Enter the folder of /Pioneer600/Sensor/Color_Sensor, and run the following command under the terminal:
sudo ./Color_Sensor
Expected result: The program performs the white balance adjustment to the sensor and it may take 2 seconds. When finished, you can see relative data of RGB are outputted on the terminal. A color check list is helpful for finding out what the measured color it is.
Press the keys Ctrl+C to end the program.
Flame Sensor sample program
Please connect the flame sensor to the Pioneer600 according to the list below.
| Pins of Flame Sensor | Pins of Pioneer600 |
|---|---|
| DOUT | D3 |
| AOUT | A3 |
| GND | GND |
| VCC | 3.3V |
Enter the folder of /Pioneer600/Sensor/Flame_Sensor, and run the following command under the terminal:
sudo ./General_Sensor
Expected result: The signal indicator will turn on, when the sensor is close to a fire. And it will turn off, when the sensor is away from the fire. The serial output changes along with the distance from the sensor to the fire.
Press the keys Ctrl+C to end the program.
Notices: The flame sensor is designed to detect fire only, but it is not fireproof itself. When using it, please keep a safe distance from the fire to avoid burning out.
Hall Sensor sample program
Please connect the hall sensor to the Pioneer600 according to the list below.
| Pins of Hall Sensor | Pins of Pioneer600 |
|---|---|
| DOUT | D3 |
| AOUT | A3 |
| GND | GND |
| VCC | 3.3V |
Enter the folder of /Pioneer600/Sensor/Hall_Sensor, and run the following command under the terminal:
sudo ./General_Sensor
Expected result: The signal indicator will turn on, when the sensor is close to a magnet. And it will turn off, when the sensor is away from the magnet. The serial output changes along with the distance from the sensor to the magnet.
Press the keys Ctrl+C to end the program.
Infrared Reflective Sensor sample program
Please connect the infrared reflective sensor to the Pioneer600 according to the list below.
| Pins of Infrared Reflective Sensor | Pins of Pioneer600 |
|---|---|
| DOUT | D3 |
| AOUT | A3 |
| GND | GND |
| VCC | 3.3V |
Enter the folder of /Pioneer600/Sensor/Infrared_Reflective_Sensor, and run the following command under the terminal:
sudo ./General_Sensor
Expected result: The signal indicator will turn on, when the sensor is close to a barrier. And it will turn off, when the sensor is away from the barrier. The serial output changes along with the distance from the sensor to the barrier.
Press the keys Ctrl+C to end the program.
Laser Sensor sample program
Please connect the laser sensor to the Pioneer600 according to the list below.
| Pins of Laser Sensor | Pins of Pioneer600 |
|---|---|
| DOUT | D3 |
| GND | GND |
| VCC | 3.3V |
Enter the folder of /Pioneer600/Sensor/Laser_Sensor, and run the following command under the terminal:
sudo ./General_Sensor
Expected result: The signal indicator will turn on, when a barrier is placed above the sensor. And the signal indicator will turn off, when the barrier is away from the sensor. By reading the status of the indicator, you can get to know whether the sensor has detected the barrier.
Press the keys Ctrl+C to end the program.
Moisture Sensor sample program
Please connect the moisture sensor to the Pioneer600 according to the list below.
| Pins of Moisture Sensor | Pins of Pioneer600 |
|---|---|
| DOUT | D3 |
| AOUT | A3 |
| GND | GND |
| VCC | 3.3V |
Enter the folder of /Pioneer600/Sensor/Moisture_Sensor, and run the following command under the terminal:
sudo ./General_Sensor
Expected result: Insert the sensor into the soil and water the soil little by little. And then you may find the serial output changes.
Press the keys Ctrl+C to end the program.
Rotation Sensor sample program
Please connect the rotation sensor to the Pioneer600 according to the list below.
| Pins of Rotation Sensor | Pins of Pioneer600 |
|---|---|
| SIA | D0 |
| SIB | D1 |
| SW | D2 |
| GND | GND |
| VCC | 3.3V |
Enter the folder of /Pioneer600/Sensor/Rotation _Sensor, and run the following command under the terminal:
sudo ./Rotation_Sensor
Expected result: There are three actions of the rotary encoder: clockwise rotation, anticlockwise rotation, and button press. The serial output of the module varies with different actions.
Turn right!
Turn left!
Turn down!
Press the keys Ctrl+C to end the program.
Sound Sensor sample program
Please connect the sound sensor to the Pioneer600 according to the list below.
| Pins of Sound Sensor | Pins of Pioneer600 |
|---|---|
| DOUT | D3 |
| AOUT | A3 |
| GND | GND |
| VCC | 3.3V |
Enter the folder of /Pioneer600/Sensor/Sound_Sensor, and run the following command under the terminal:
sudo ./General_Sensor
Expected result: The signal indicator will turn on, when the microphone of the module is close to a sound source. And it will turn off, when the microphone is away from the sound source. The serial output changes along with the distance from the sensor to the sound source.
Press the keys Ctrl+C to end the program.
Temperature-Humidity Sensor sample program
Please connect the temperature-humidity sensor to the Pioneer600 according to the list below.
| Pins of Temperature-Humidity Sensor | Pins of Pioneer600 |
|---|---|
| DOUT | D3 |
| GND | GND |
| VCC | 3.3V |
Enter the folder of /Pioneer600/Sensor/Temperature-Humidity_Sensor, and run the following command under the terminal:
sudo ./DHT11
Expected result: The data of temperature and humidity detected are shown on the terminal. For example:
Humidity=33
Temperature=28
Press the keys Ctrl+C to end the program.
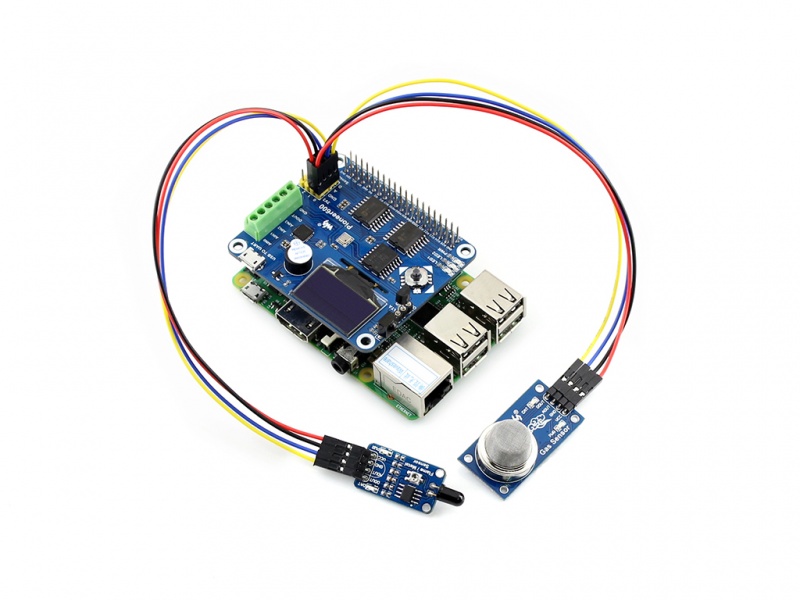
MQ-5 Gas Sensor sample program
Please connect the MQ-5 gas sensor to the Pioneer600 according to the list below.
| Pins of MQ-5 Gas Sensor | Pins of Pioneer600 |
|---|---|
| DOUT | D3 |
| AOUT | A3 |
| GND | GND |
| VCC | 3.3V |
Enter the folder of /Pioneer600/Sensor/MQ-5_Gas_Sensor, and run the following command under the terminal:
sudo ./General_Sensor
Expected result: Warn-up the sensor for a minute. And then, put the sensor into a container filled with sensitive gas, you will find the indicator turns on. While take the sensor out of the container, you can see the indicator turns off. By checking the indicator, you can get to know whether the concentration of the sensitive gas is beyond the index.
Press the keys Ctrl+C to end the program.
Tilt Sensor sample program
Please connect the title sensor to the Pioneer600 according to the list below.
| Pins of Tilt Sensor | Pins of Pioneer600 |
|---|---|
| DOUT | D3 |
| GND | GND |
| VCC | 3.3V |
Enter the folder of /Pioneer600/Sensor/Tilt_Sensor, and run the following command under the terminal:
sudo ./General_Sensor
Expected result: The signal indicator will turn on, when the sensor is being vibrated or in a tilted state. And it will turn off, when the sensor is laid flat. By checking the indicator, you can get to know whether the module is in a condition of vibrating or tilting.
Press the keys Ctrl+C to end the program.
UV Sensor sample program
Please connect the UV sensor to the Pioneer600 according to the list below.
| Pins of UV Sensor | Pins of Pioneer600 |
|---|---|
| AOUT | A3 |
| GND | GND |
| VCC | 3.3V |
Enter the folder of /Pioneer600/Sensor/UV_Sensor, and run the following command under the terminal:
sudo ./General_Sensor
Expected result: Place the sensor close to the sun light. The serial output changes along with the distance from the sensor to the light source.
Press the keys Ctrl+C to end the program.
Liquid Level Sensor sample program
Please connect the liquid level sensor to the Pioneer600 according to the list below.
| Pins of Liquid Level Sensor | Pins of Pioneer600 |
|---|---|
| AOUT | A3 |
| GND | GND |
| VCC | 3.3V |
Enter the folder of /Pioneer600/Sensor/Liquid_Level_Sensor, and run the following command under the terminal:
sudo ./General_Sensor
Expected result: Immerse the sensor into the water deeply. The serial output changes along with the water depth.
Press the keys Ctrl+C to end the program.
Open the terminal of Raspberry Pi and install libraries as guides below
Install WiringPi Library
cd
sudo apt-get install wiringpi
wget https://project-downloads.drogon.net/wiringpi-latest.deb
sudo dpkg -i wiringpi-latest.deb
gpio -v
Install C Library bcm2835
cd
wget http://www.airspayce.com/mikem/bcm2835/bcm2835-1.60.tar.gz
tar zxvf bcm2835-1.60.tar.gz
cd bcm2835-1.60/
sudo ./configure
sudo make && sudo make check && sudo make install
For more information and the newest libraries please refer to website:http://www.airspayce.com/mikem/bcm2835/
Install Python Library
- For python2
cd
sudo apt-get update
sudo apt-get install python-pip
sudo pip install RPi.GPIO
- For python3
cd
sudo apt-get update
sudo apt-get install python3-pip
sudo pip install RPi.GPIO