


- sales/support
Google Chat:---
- sales
+86-0755-88291180
- sales01
sales@spotpear.com
- sales02
dragon_manager@163.com
- support
tech-support@spotpear.com
- CEO-Complaints
zhoujie@spotpear.com
- Only Tech-Support
WhatsApp:13246739196
- Purchase/Shipping/Refund
WhatsApp:13424403025
Displaying a new image on PICO-1.3LCD
Step 1】Save the photo you want to display in 240x240 size and 16-bit BMP format using Photoshop software.

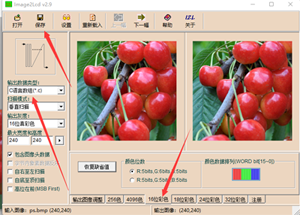
To save a BMP photo as a 16-bit code .c file using Image2LCD:

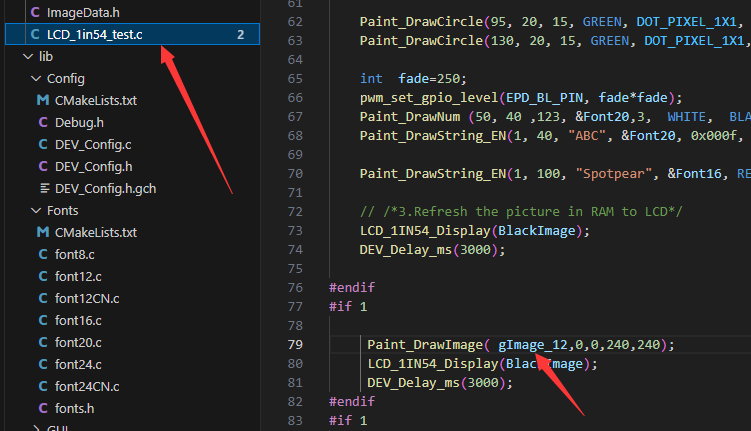
Step 3】To open the "imageData.c" program from the downloaded Pico-1.3LCD folder in Visual Studio Code:
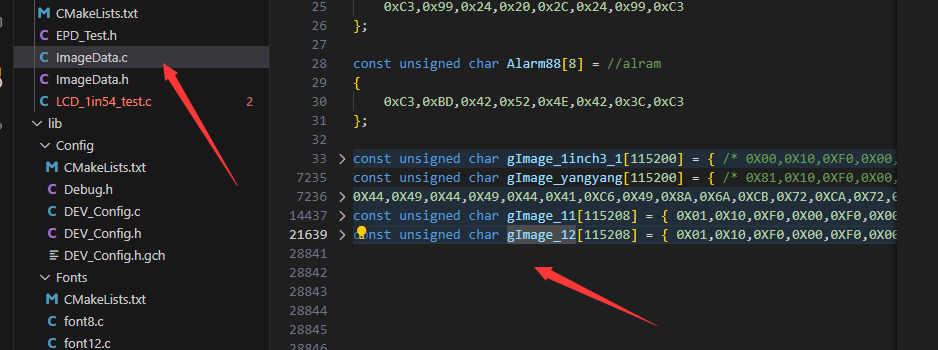
Update the image code in the imageData.c file, then replace the gImage function or variable in the main program. After re-running the Pico, the new image will be displayed."
TAG:
UART To CAN Mini
Raspberry Pi OpenWrt Tutorial 1
Arduino IR Thermal Imaging Camera
Core1121 LoRa LR1121 HF LF SPI For Sub-GHz and 2.4GHz
0.85inch LCD Button Mechanical Keyboard Display Screen 128x128 For Arduino /Raspberry Pi /ESP32 /RP2040 /STM32
Raspberry Pi Zero 2W Dual Ethernet Expansion Board USB Hub Expansion RJ45
DeepSeek XiaoZhi AI Voice Chat Robot BOX ESP32-S3 Development Board 1.28 inch Round LCD 1.28inch TouchScreen N16R8
ESP32 1.9inch LCD
JETSON NANO MINI
Luckfox Pico ST7789
ESP32-S3 GEEK
SpotPear
ESP32 S3 Development Board 1.46 inch Round LCD 1.46inch Display 412x412 QMI8658 Sensor / MIC / SD /MP3 Audio /Battery Port LVGL/HMI For Arduino
PC USB Secondary Screen
Information
CAN FD
RK3566
Sipeed NanoKVM Cube KVM HDMI Remote OS Control Manager Install /Power Control /Remote Desktop Server UART
Serial Bus Servo
User Guide

Raspberry Pi LCD Display Screen 1.3inch LCD with Game Button AND Audio Buzzer For Zero 2W /3B/4B/PI5
TAG:
Raspberry Pi 5 Fan
Raspberry Pi 5 Official Original AI Kit Hailo8l 13Tops 26Tops PCIe M.2 HAT Pi5
Arduino UNO R4 Minima
Monitor
Raspberry Pi 11.9inch LCD
Milk-V Duo RISC V
Arduino MLX90640
NVIDIA Jetson AGX Orin 32 64GB AI 275TOPS
Luckfox Pico Core1106 RV1106
Raspberry Pi Pico 2 RP2350 One Type-A
Raspberry-Pi -GPIO-Audio-amplification-PWM-Sound-Card-Speaker-Buzzer
USB-CAN-B
ESP32-S3
3.4inch Round LCD HDMI Capacitive touchscreen display Raspberry Pi Jetson Nano mini PC 800x800
MAX9296A GMSL Camera Adapter Board 2-Ch High-Speed And Low-Latency Transmission Long distance For Raspberry Pi 5 Jetson Orin Nano/NX
Raspberry Pi Pico 2 RP2350B 2.41 inch AMOLED Development Board QSPI Display TouchScreen 450x600 RM690BO FT6336 QMI8658
UNO R4 Minima
NVIDIA Jetson Orin Nano/NX PoE Power over Ethernet RJ45 802.3af
Luckfox Omni3576 Rockchip RK3576 Core3576
Raspberry Pi 5 DSI display